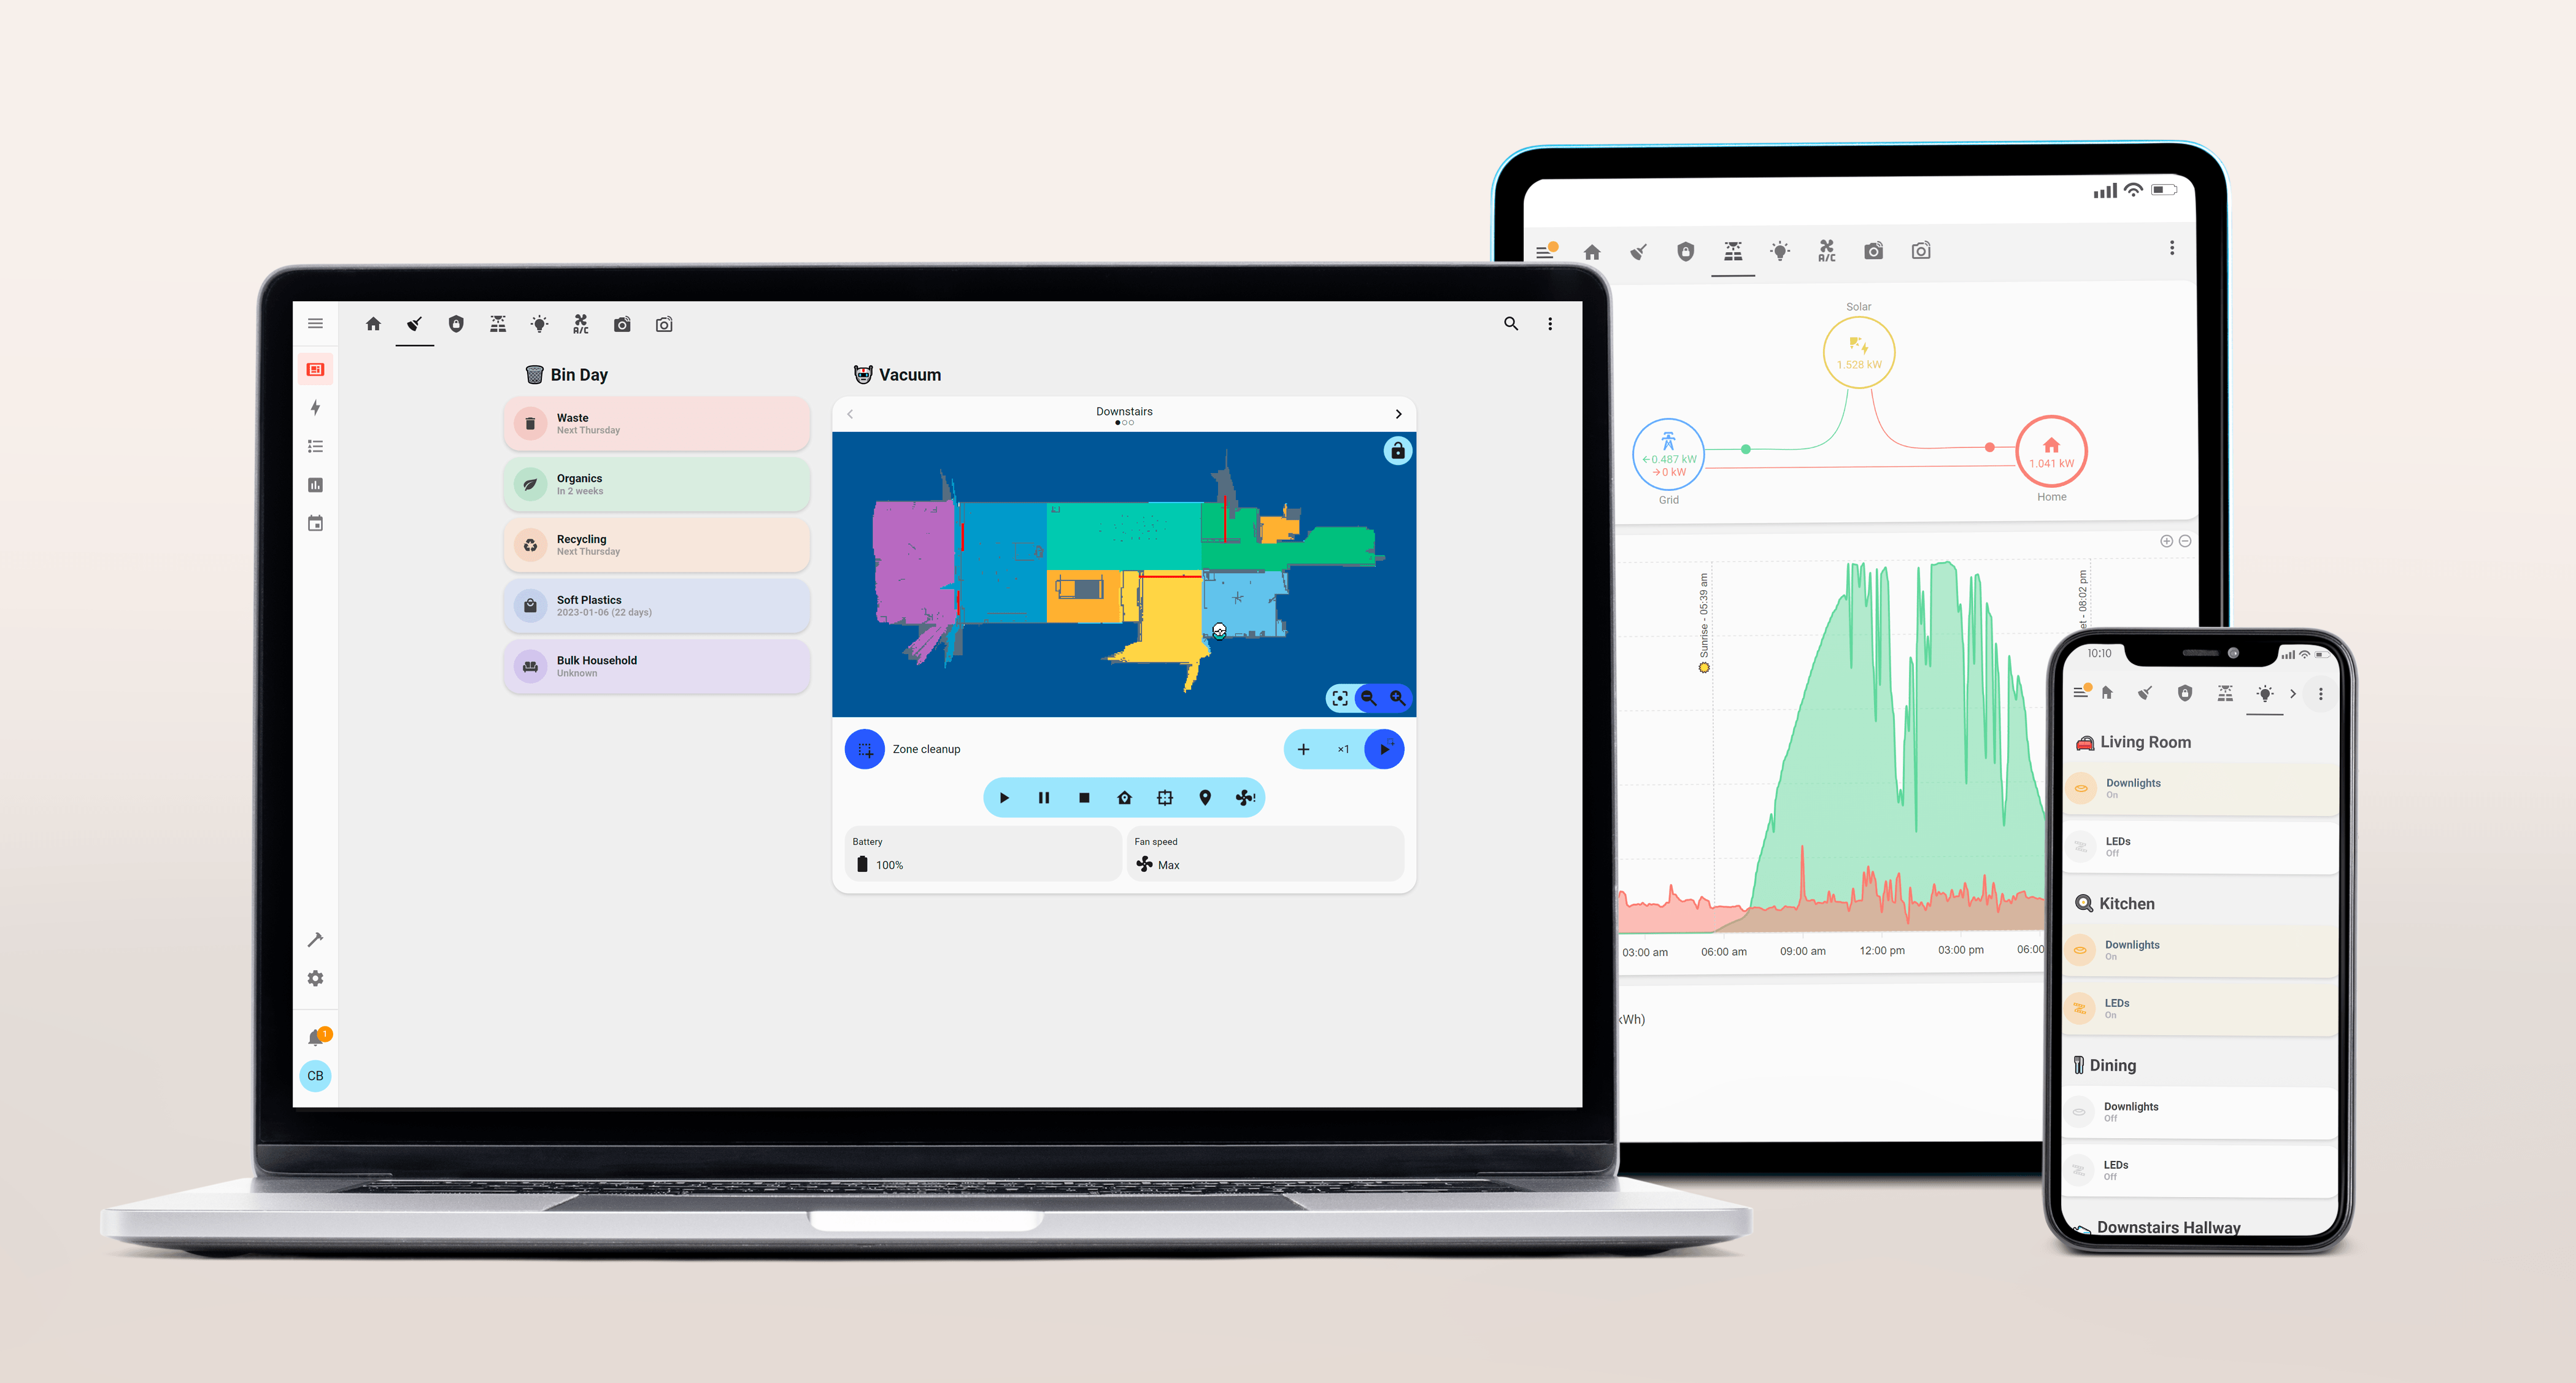
I created dashboards in Home Assistant and put them on Android tablets around the house. I've always liked the idea of quickly being able to view, monitor and action all the different smart devices around the home.
Mockup template by rawpixel.com on Freepik
Table of Contents
Dashboard
Home Assistant Dashboards
Home Assistant is an open-source home automation software that integrates with over a thousand different devices and services. With its customisable dashboards, I can quickly build and manage all aspects of my home.
Dashboards start with a View, tabs inside of a dashboard to group rooms or services. Within a View, there are Cards, components that include devices and services. There are many built-in cards for common devices such as light bulbs and sensors, but custom ones can also be added. Think of Views as webpages and Cards as elements inside of them.
There's an easy way and a hard way to create dashboards. With the easy way, you can use the Home Assistant UI to create Views and add Cards. The hard way is to create dashboards purely with code in YAML. The benefit of going the hard way is the flexibility and further customisation options available. I went the hard way, following this terrific video from EverythingSmartHome on YouTube.
My Dashboard
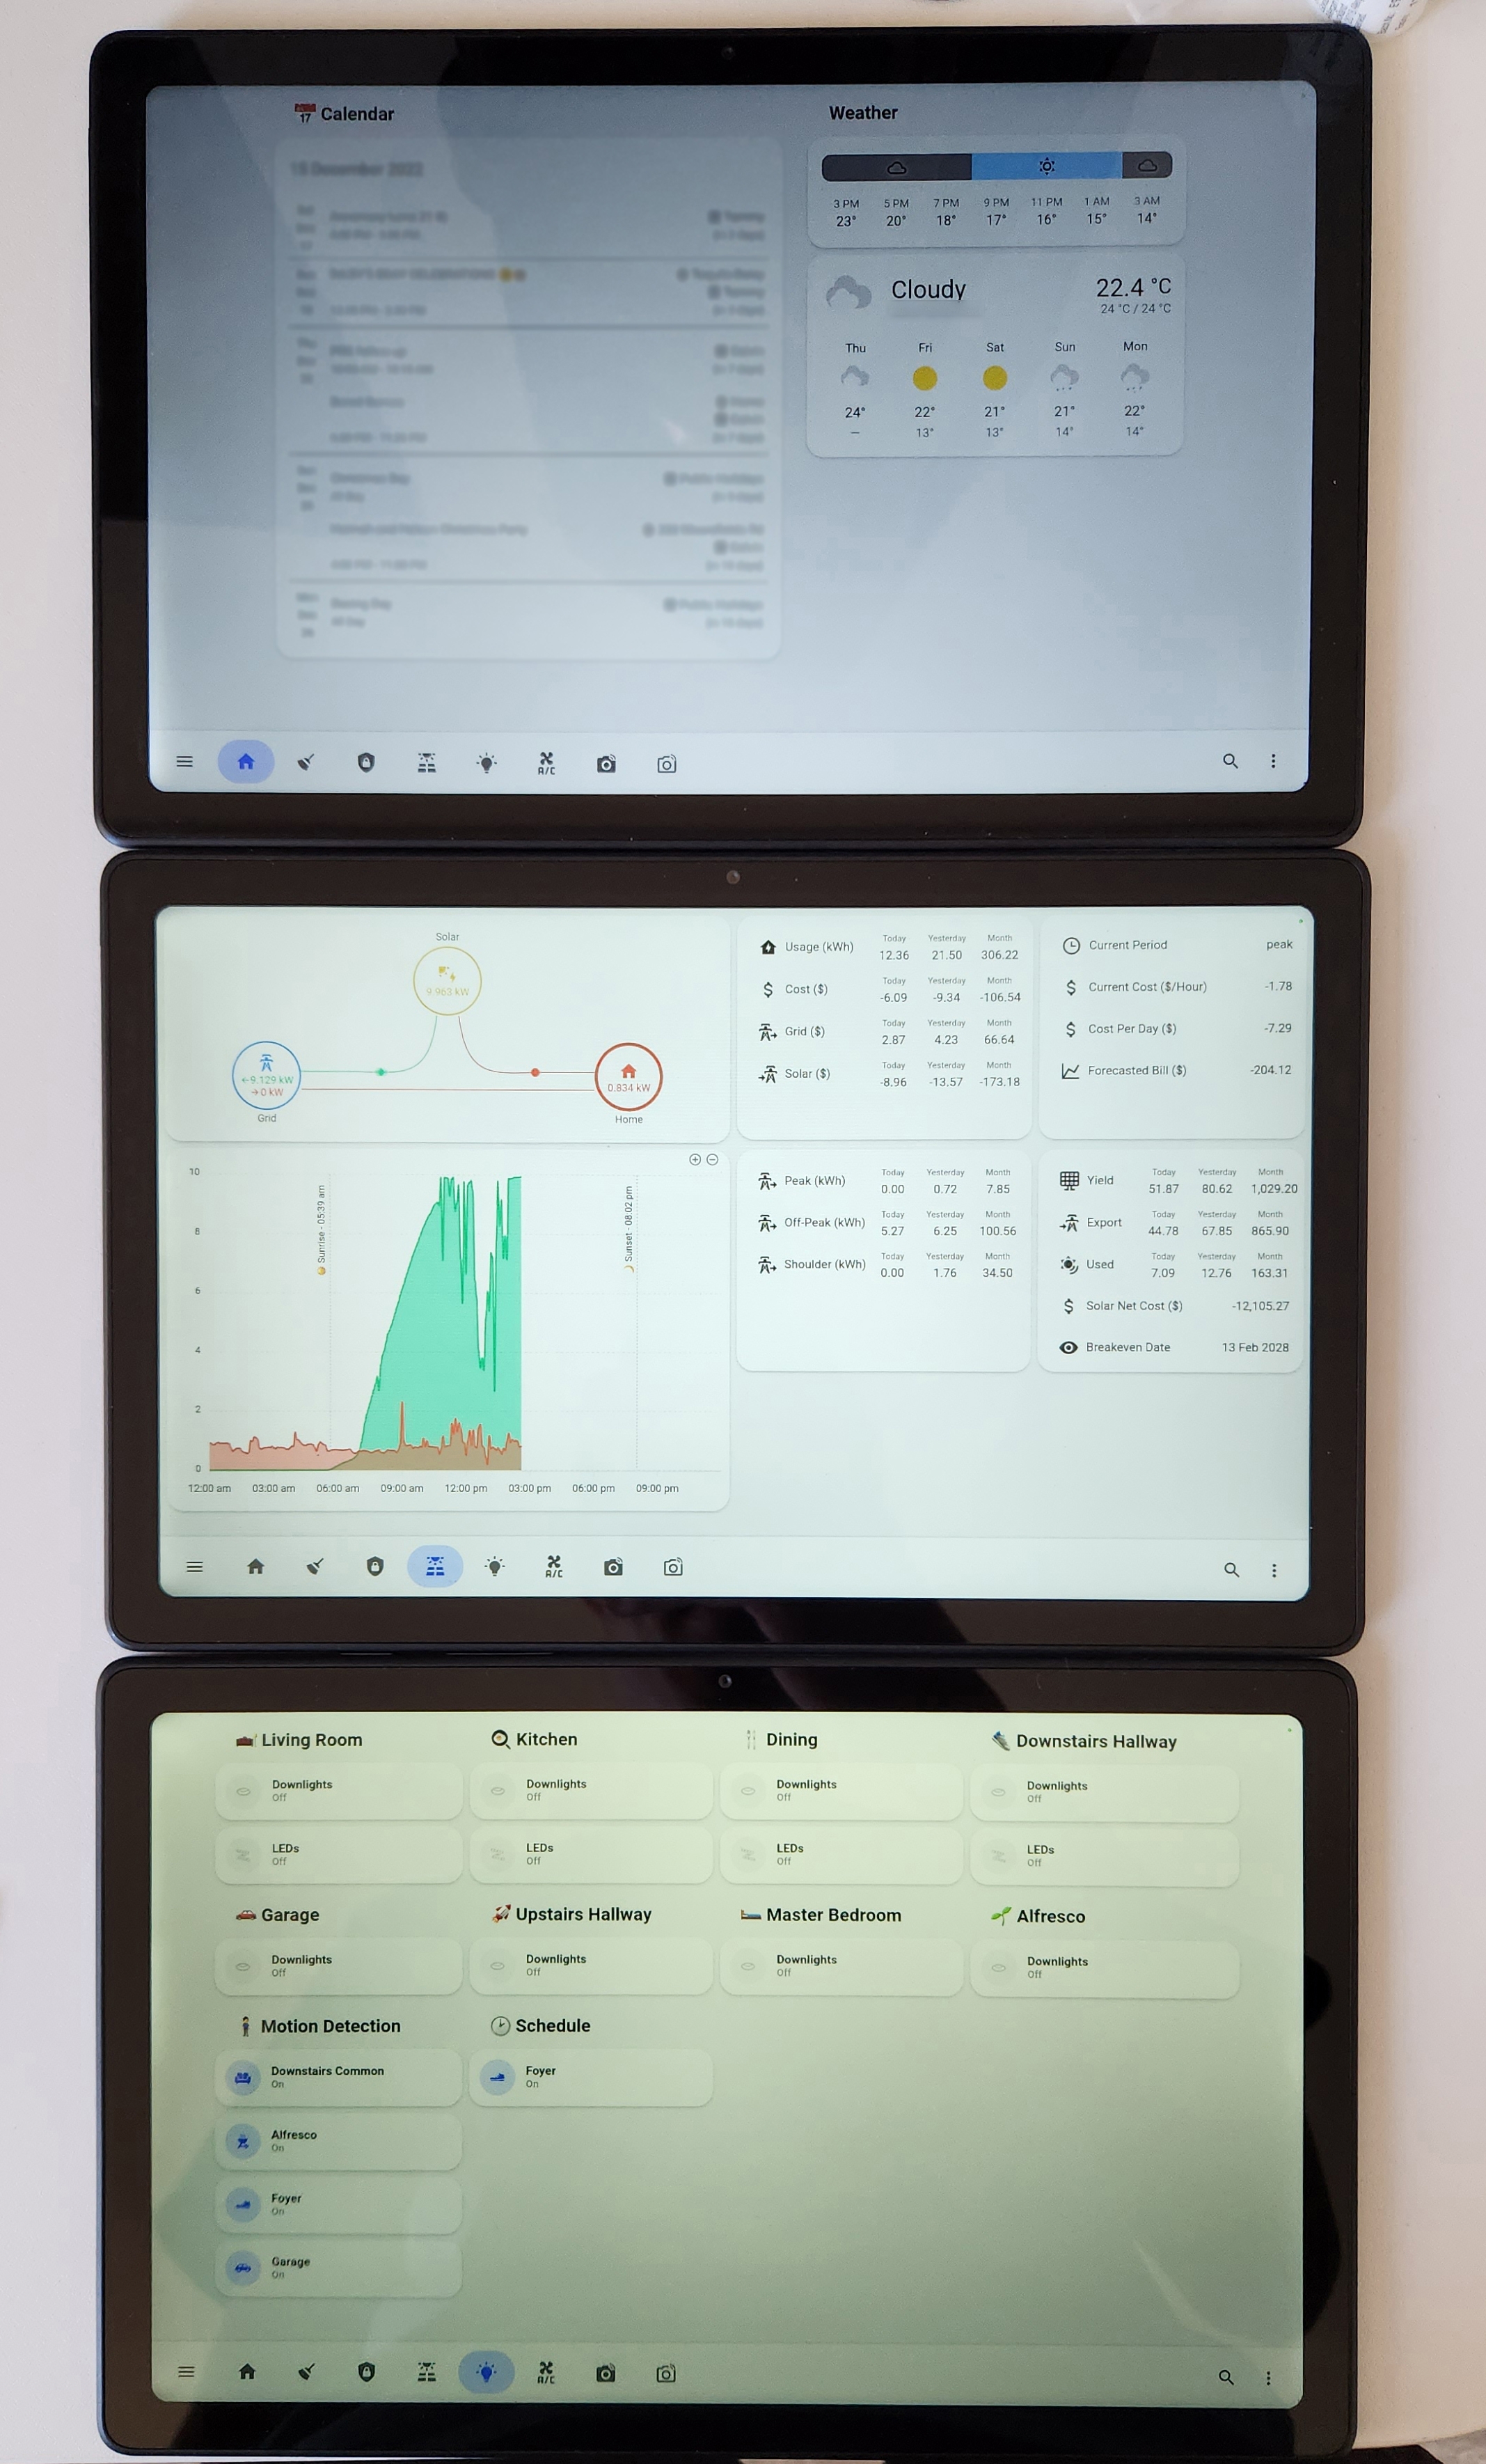
The Home page contains a weather forecast and calendar view of me and my wife's personal calendars.

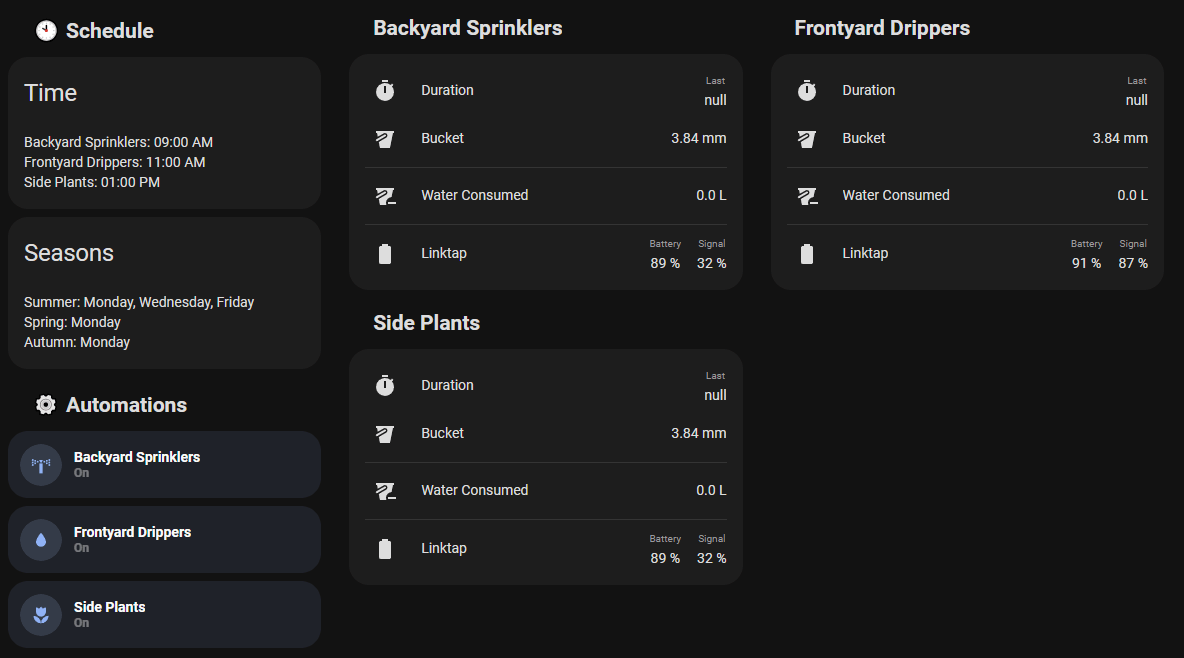
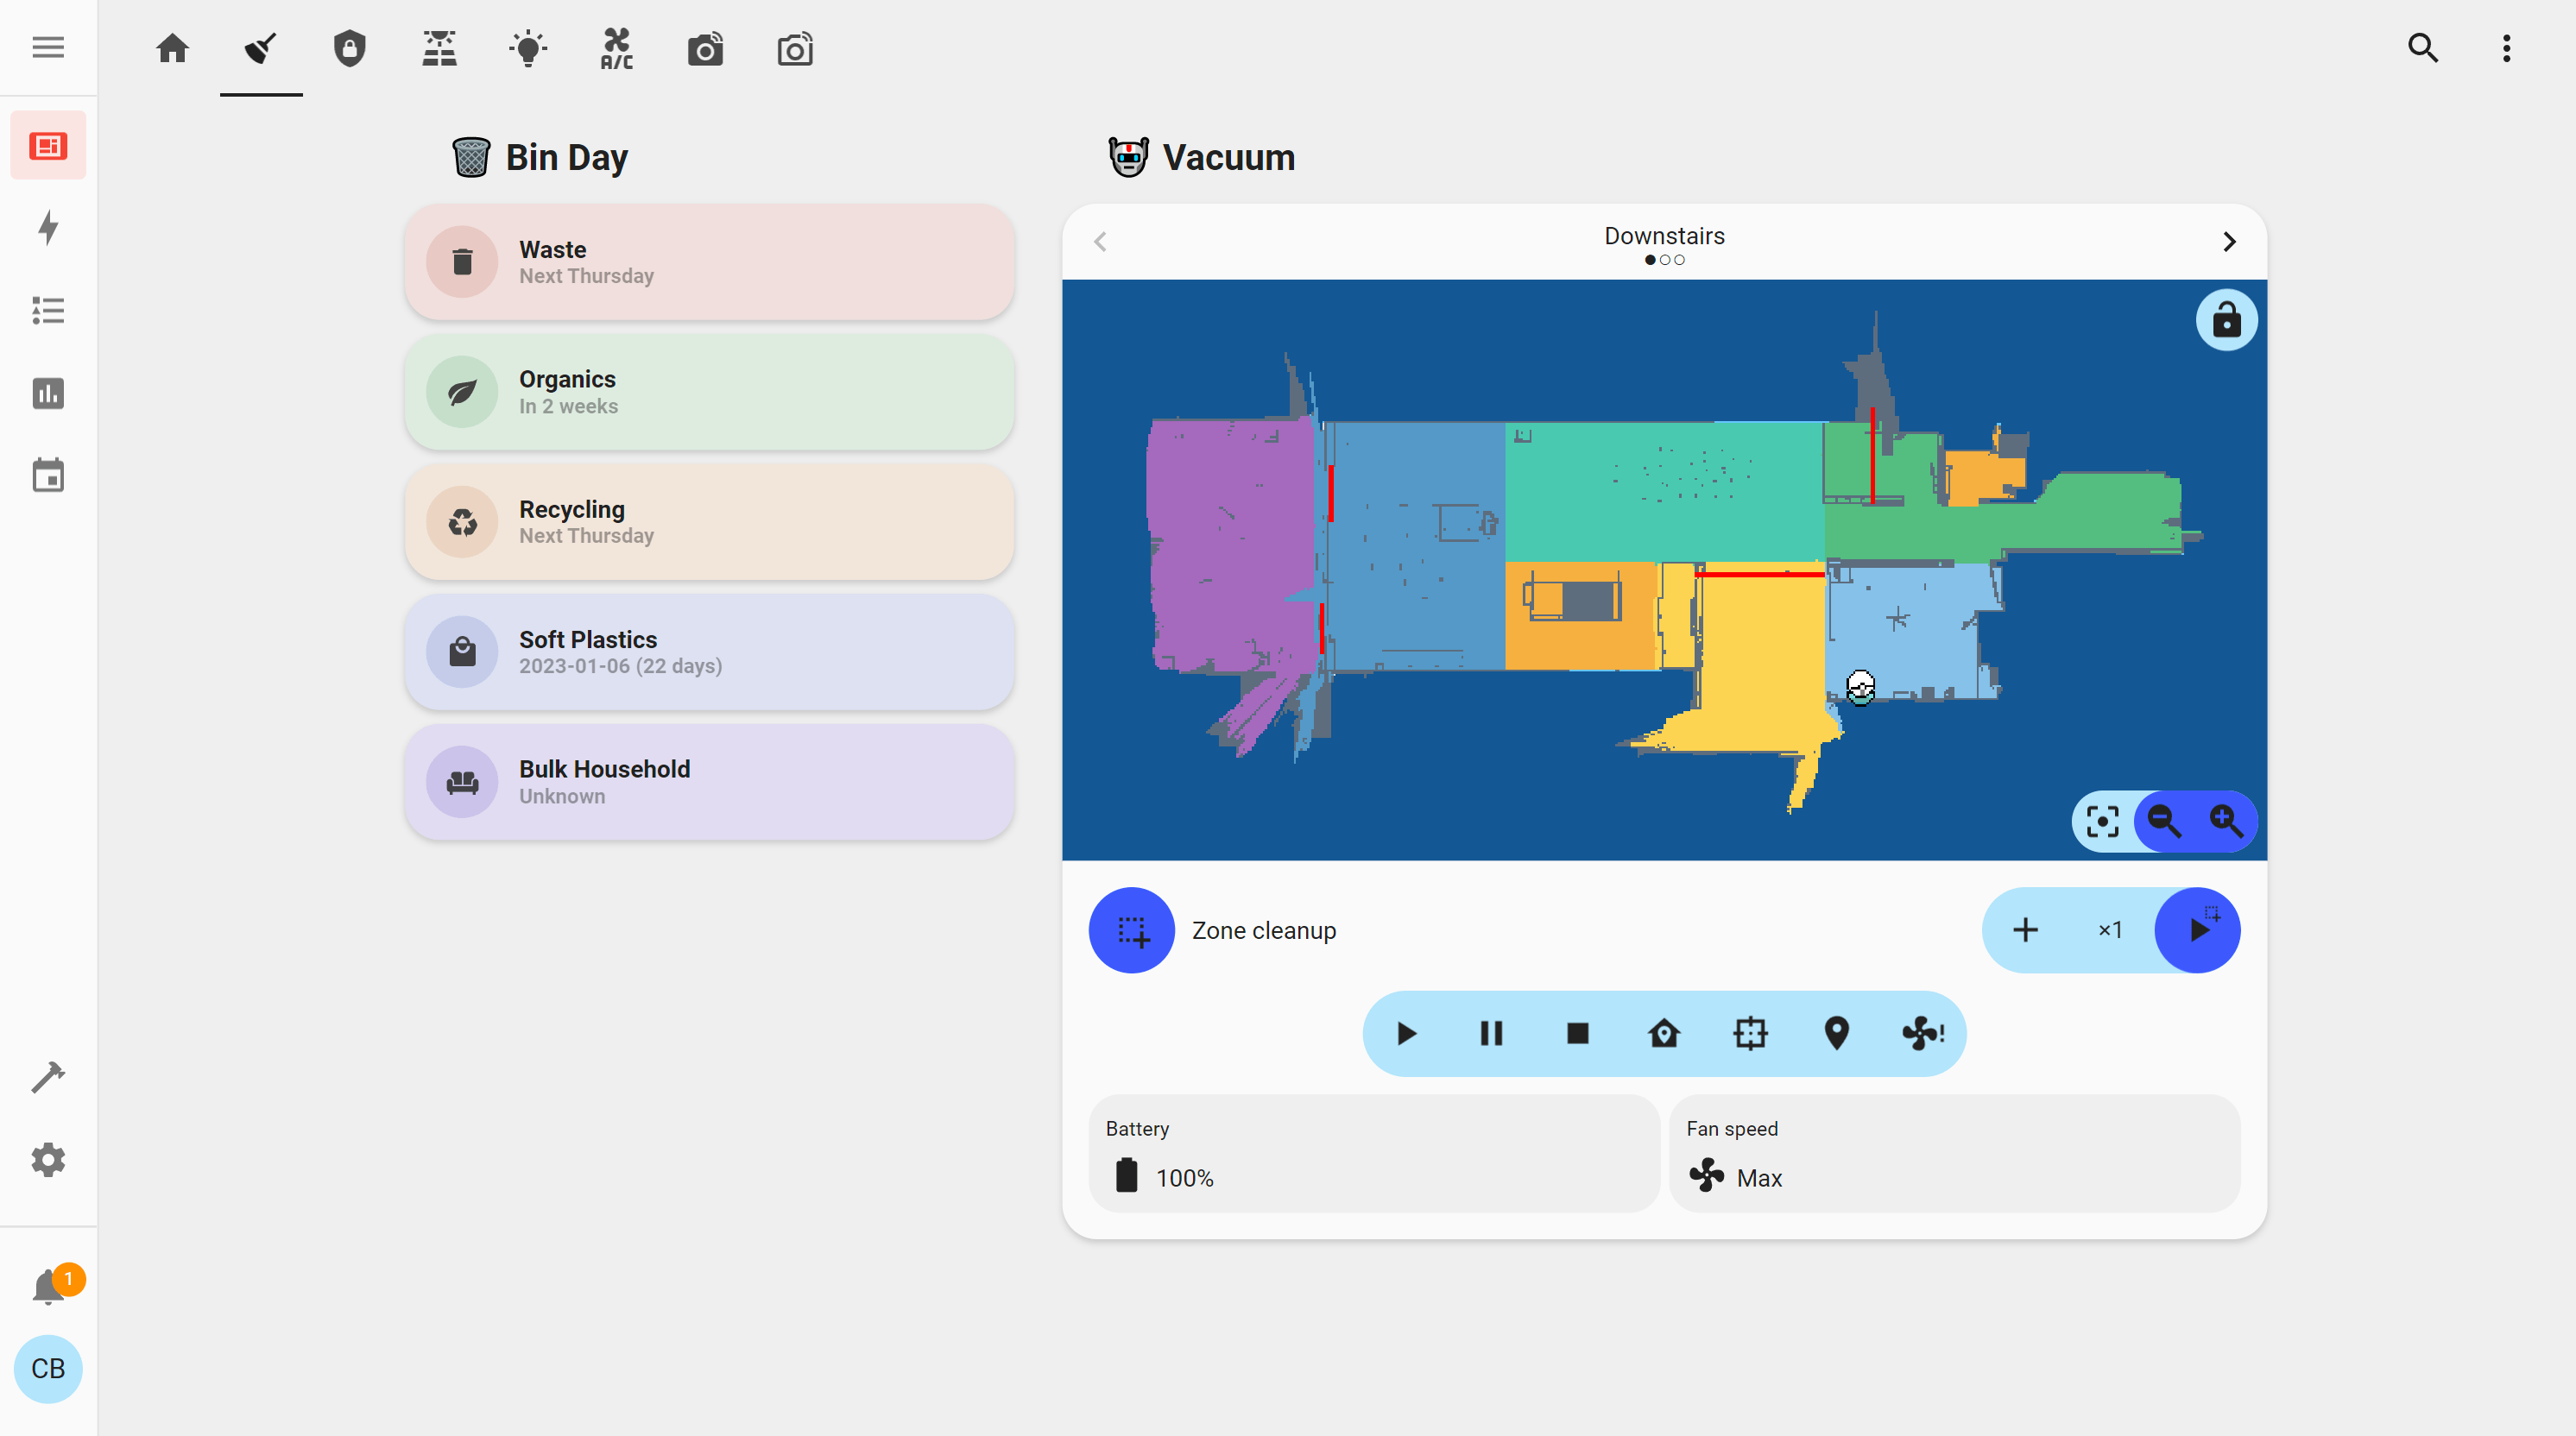
The Cleaning page contains our bin collection schedule and control of our robot vacuums.
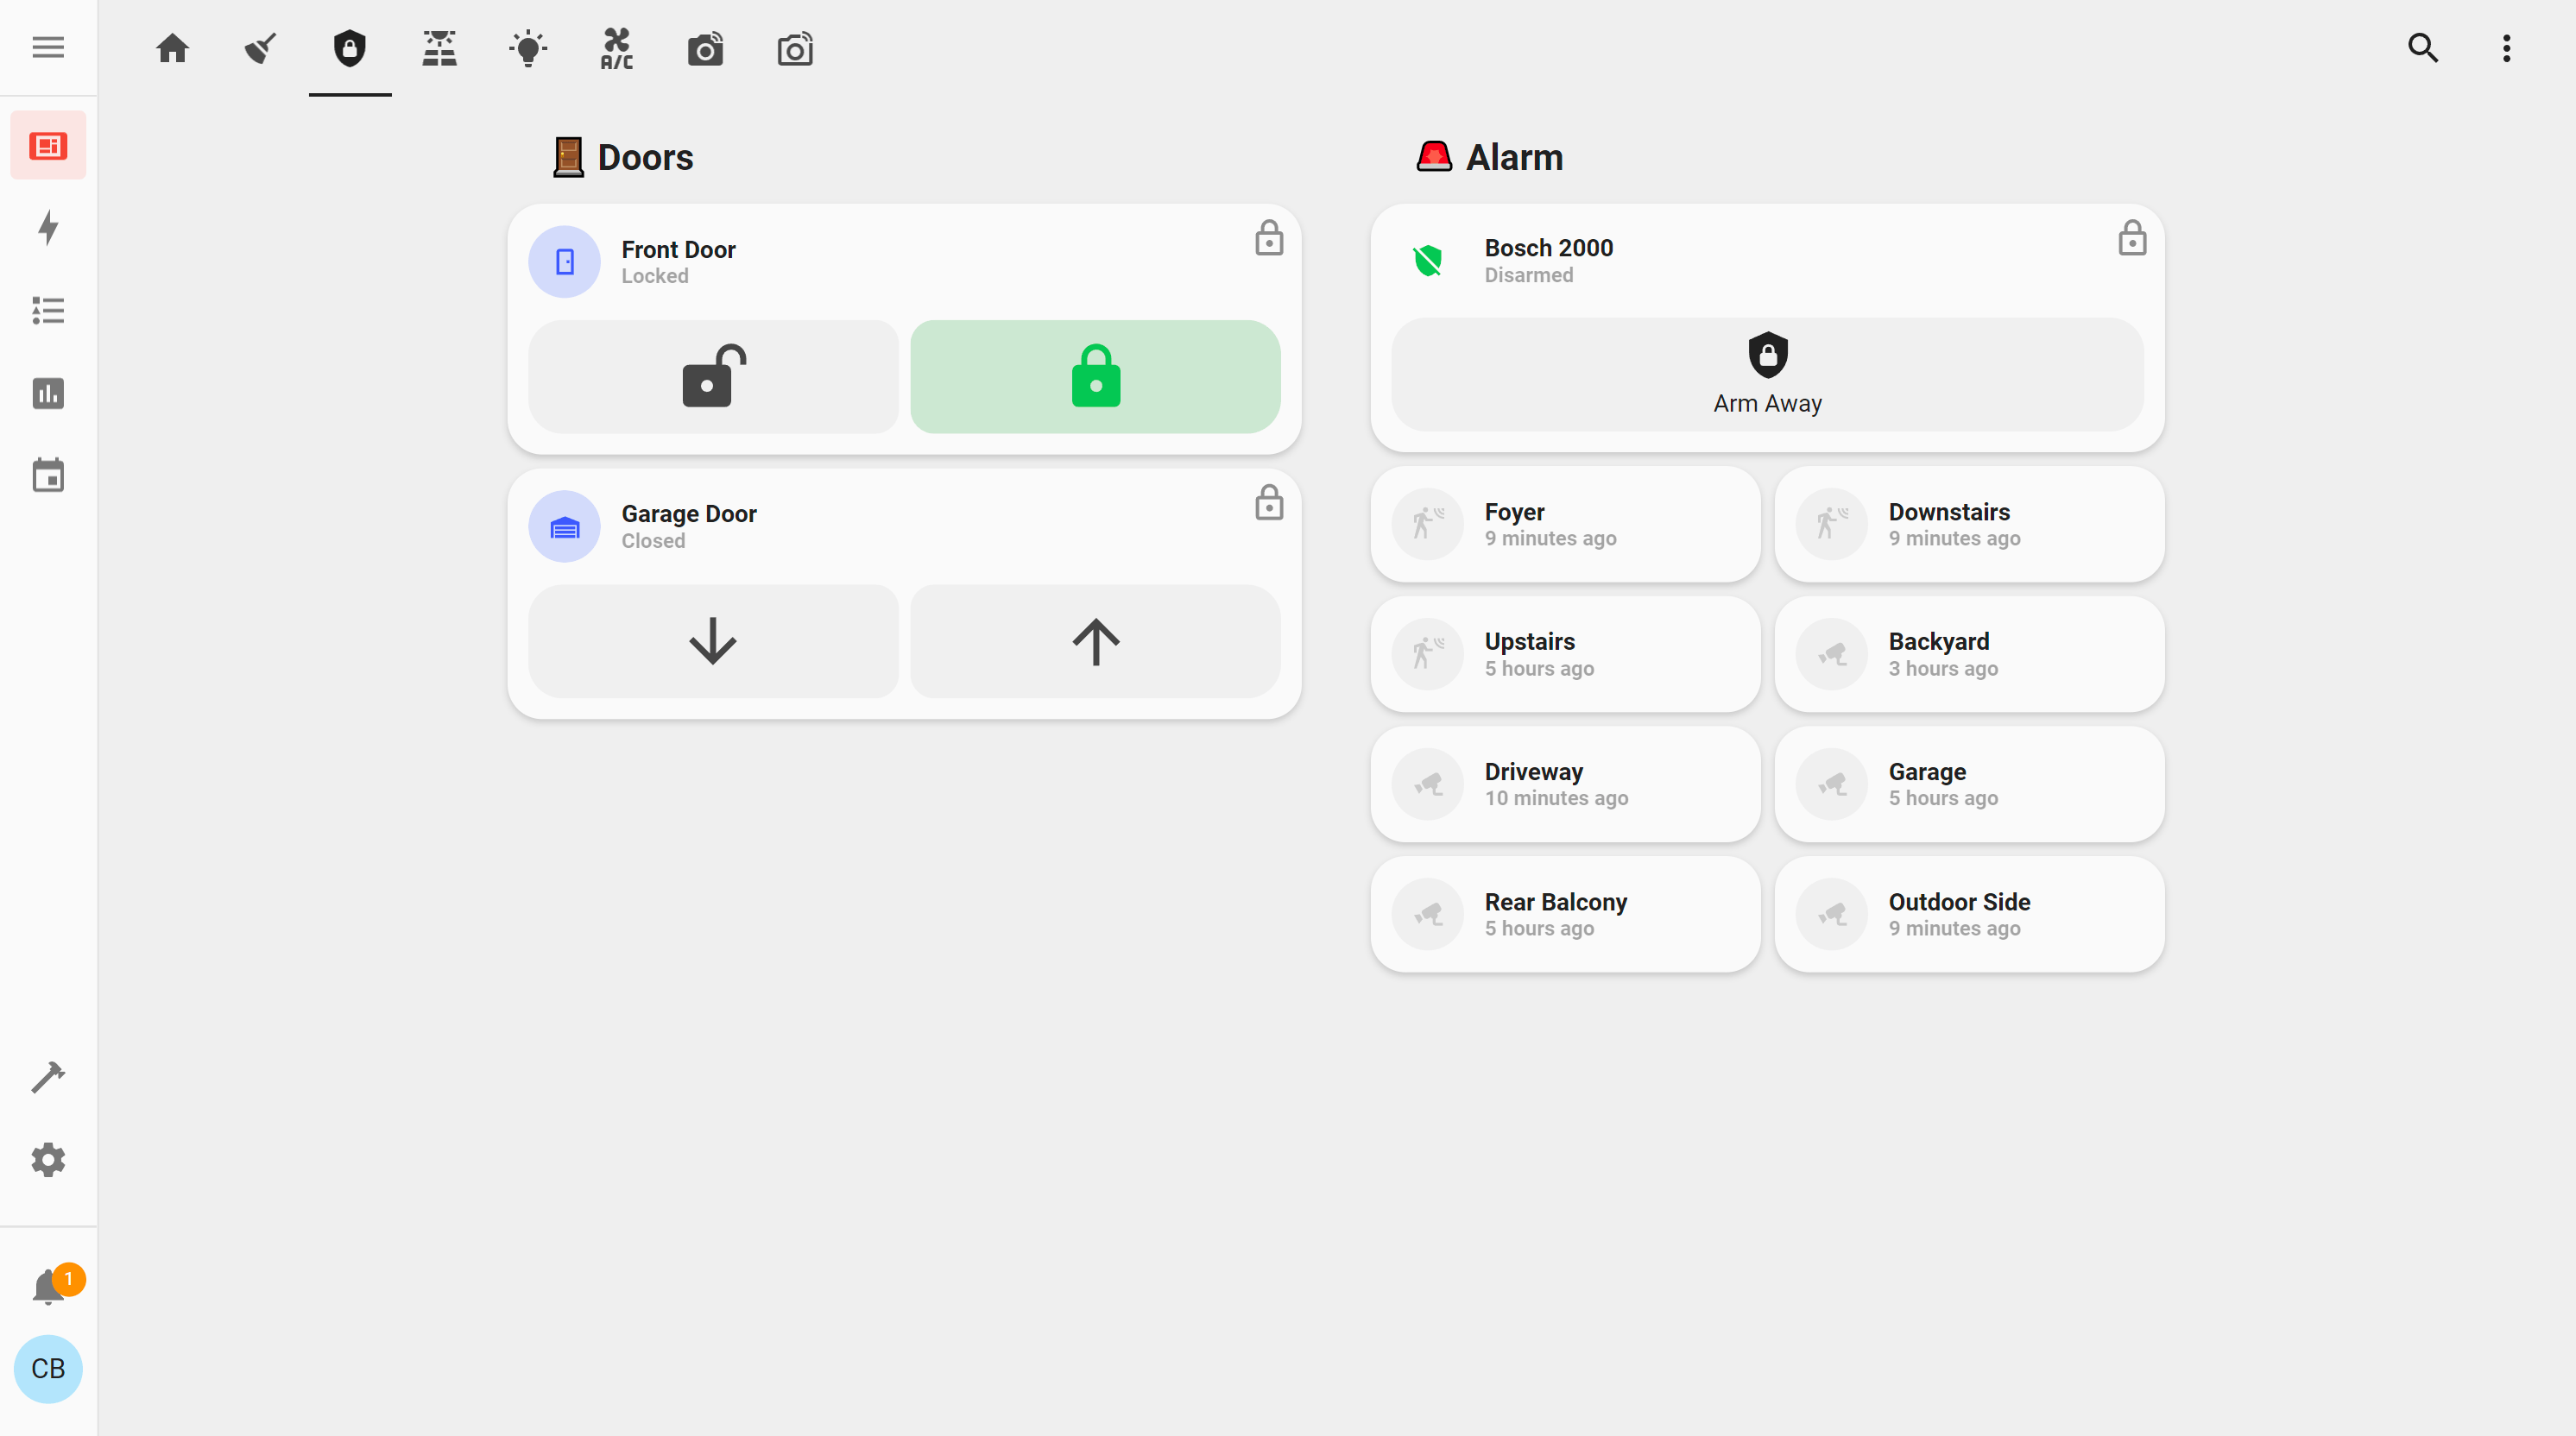
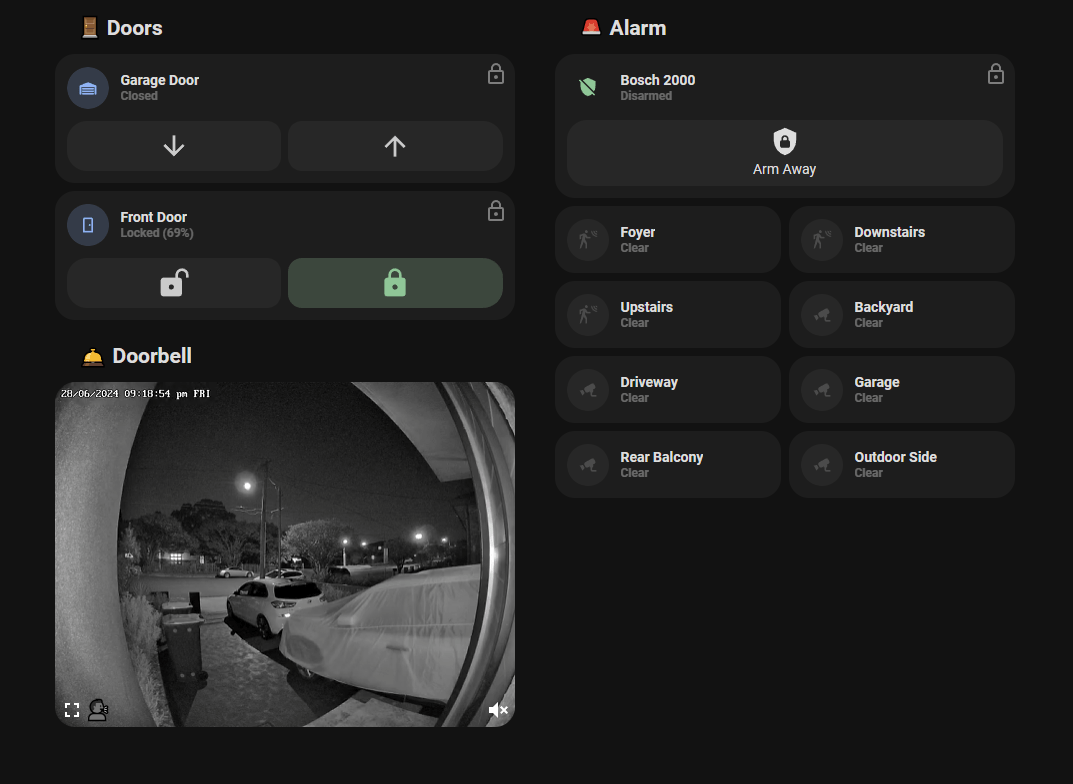
The Security page contains controls for the entryways and alarm system. To prevent accidents, the entryways need to be unlocked with a double-clicked.
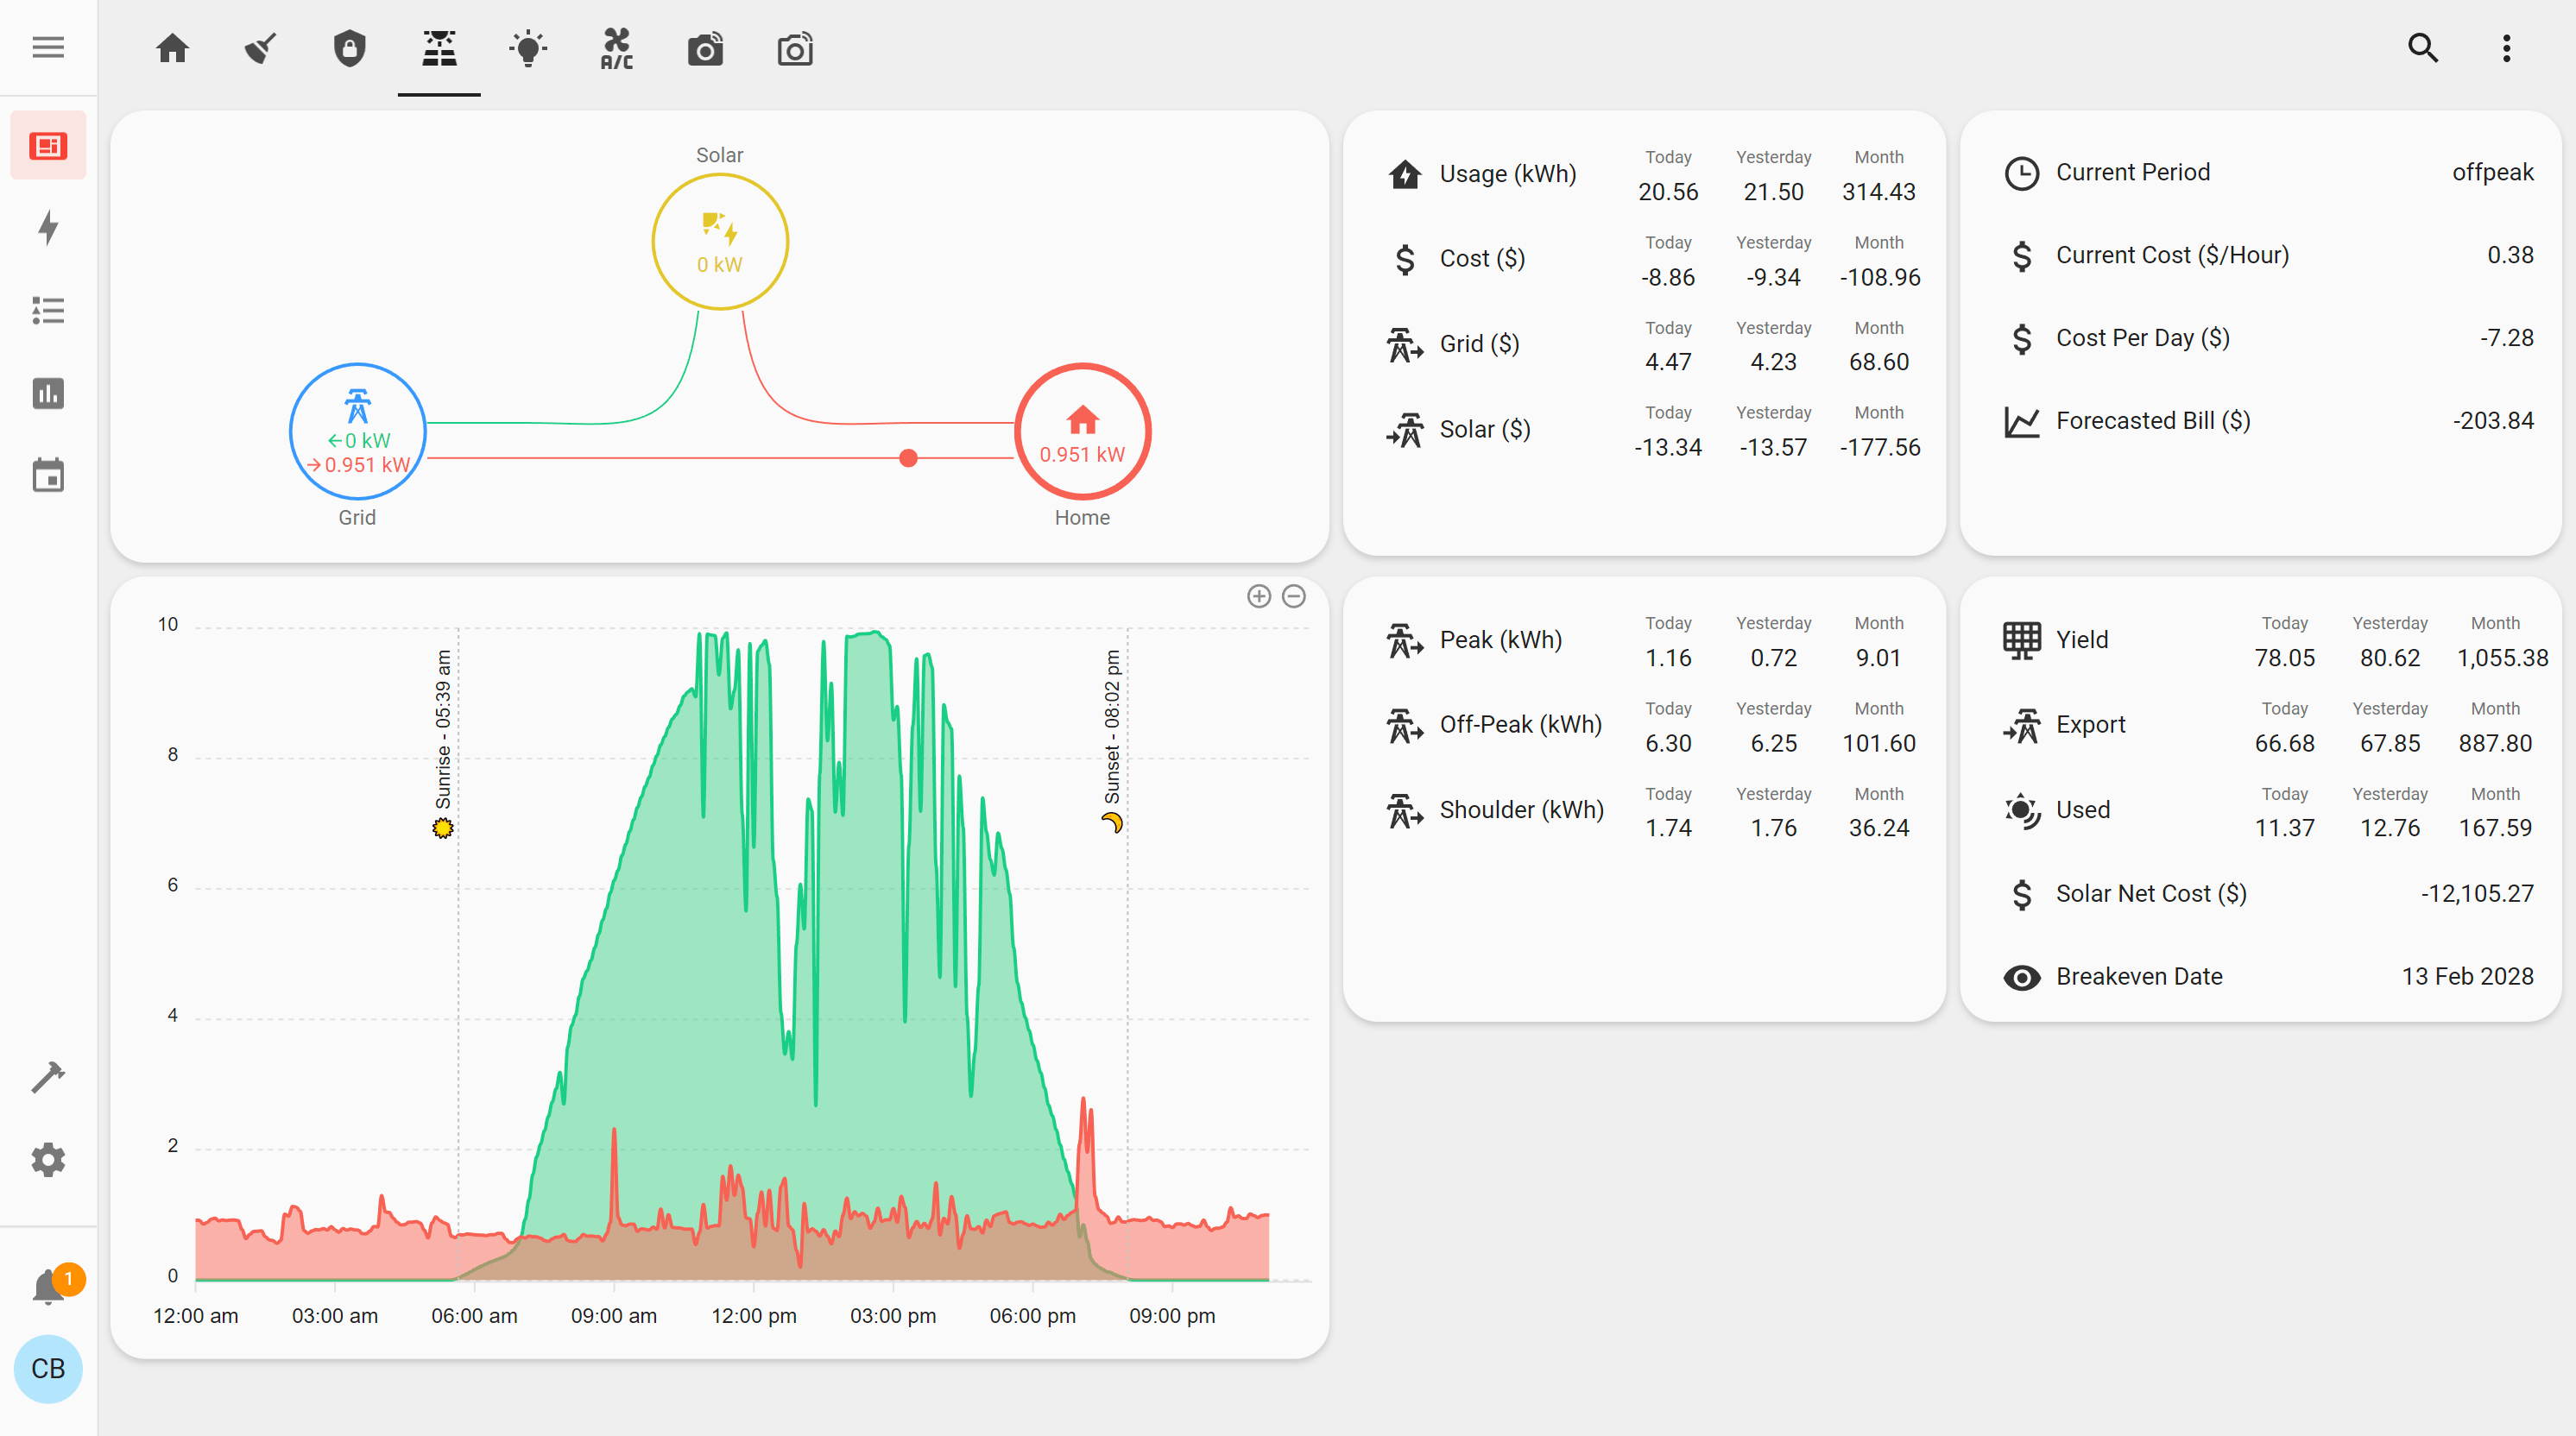
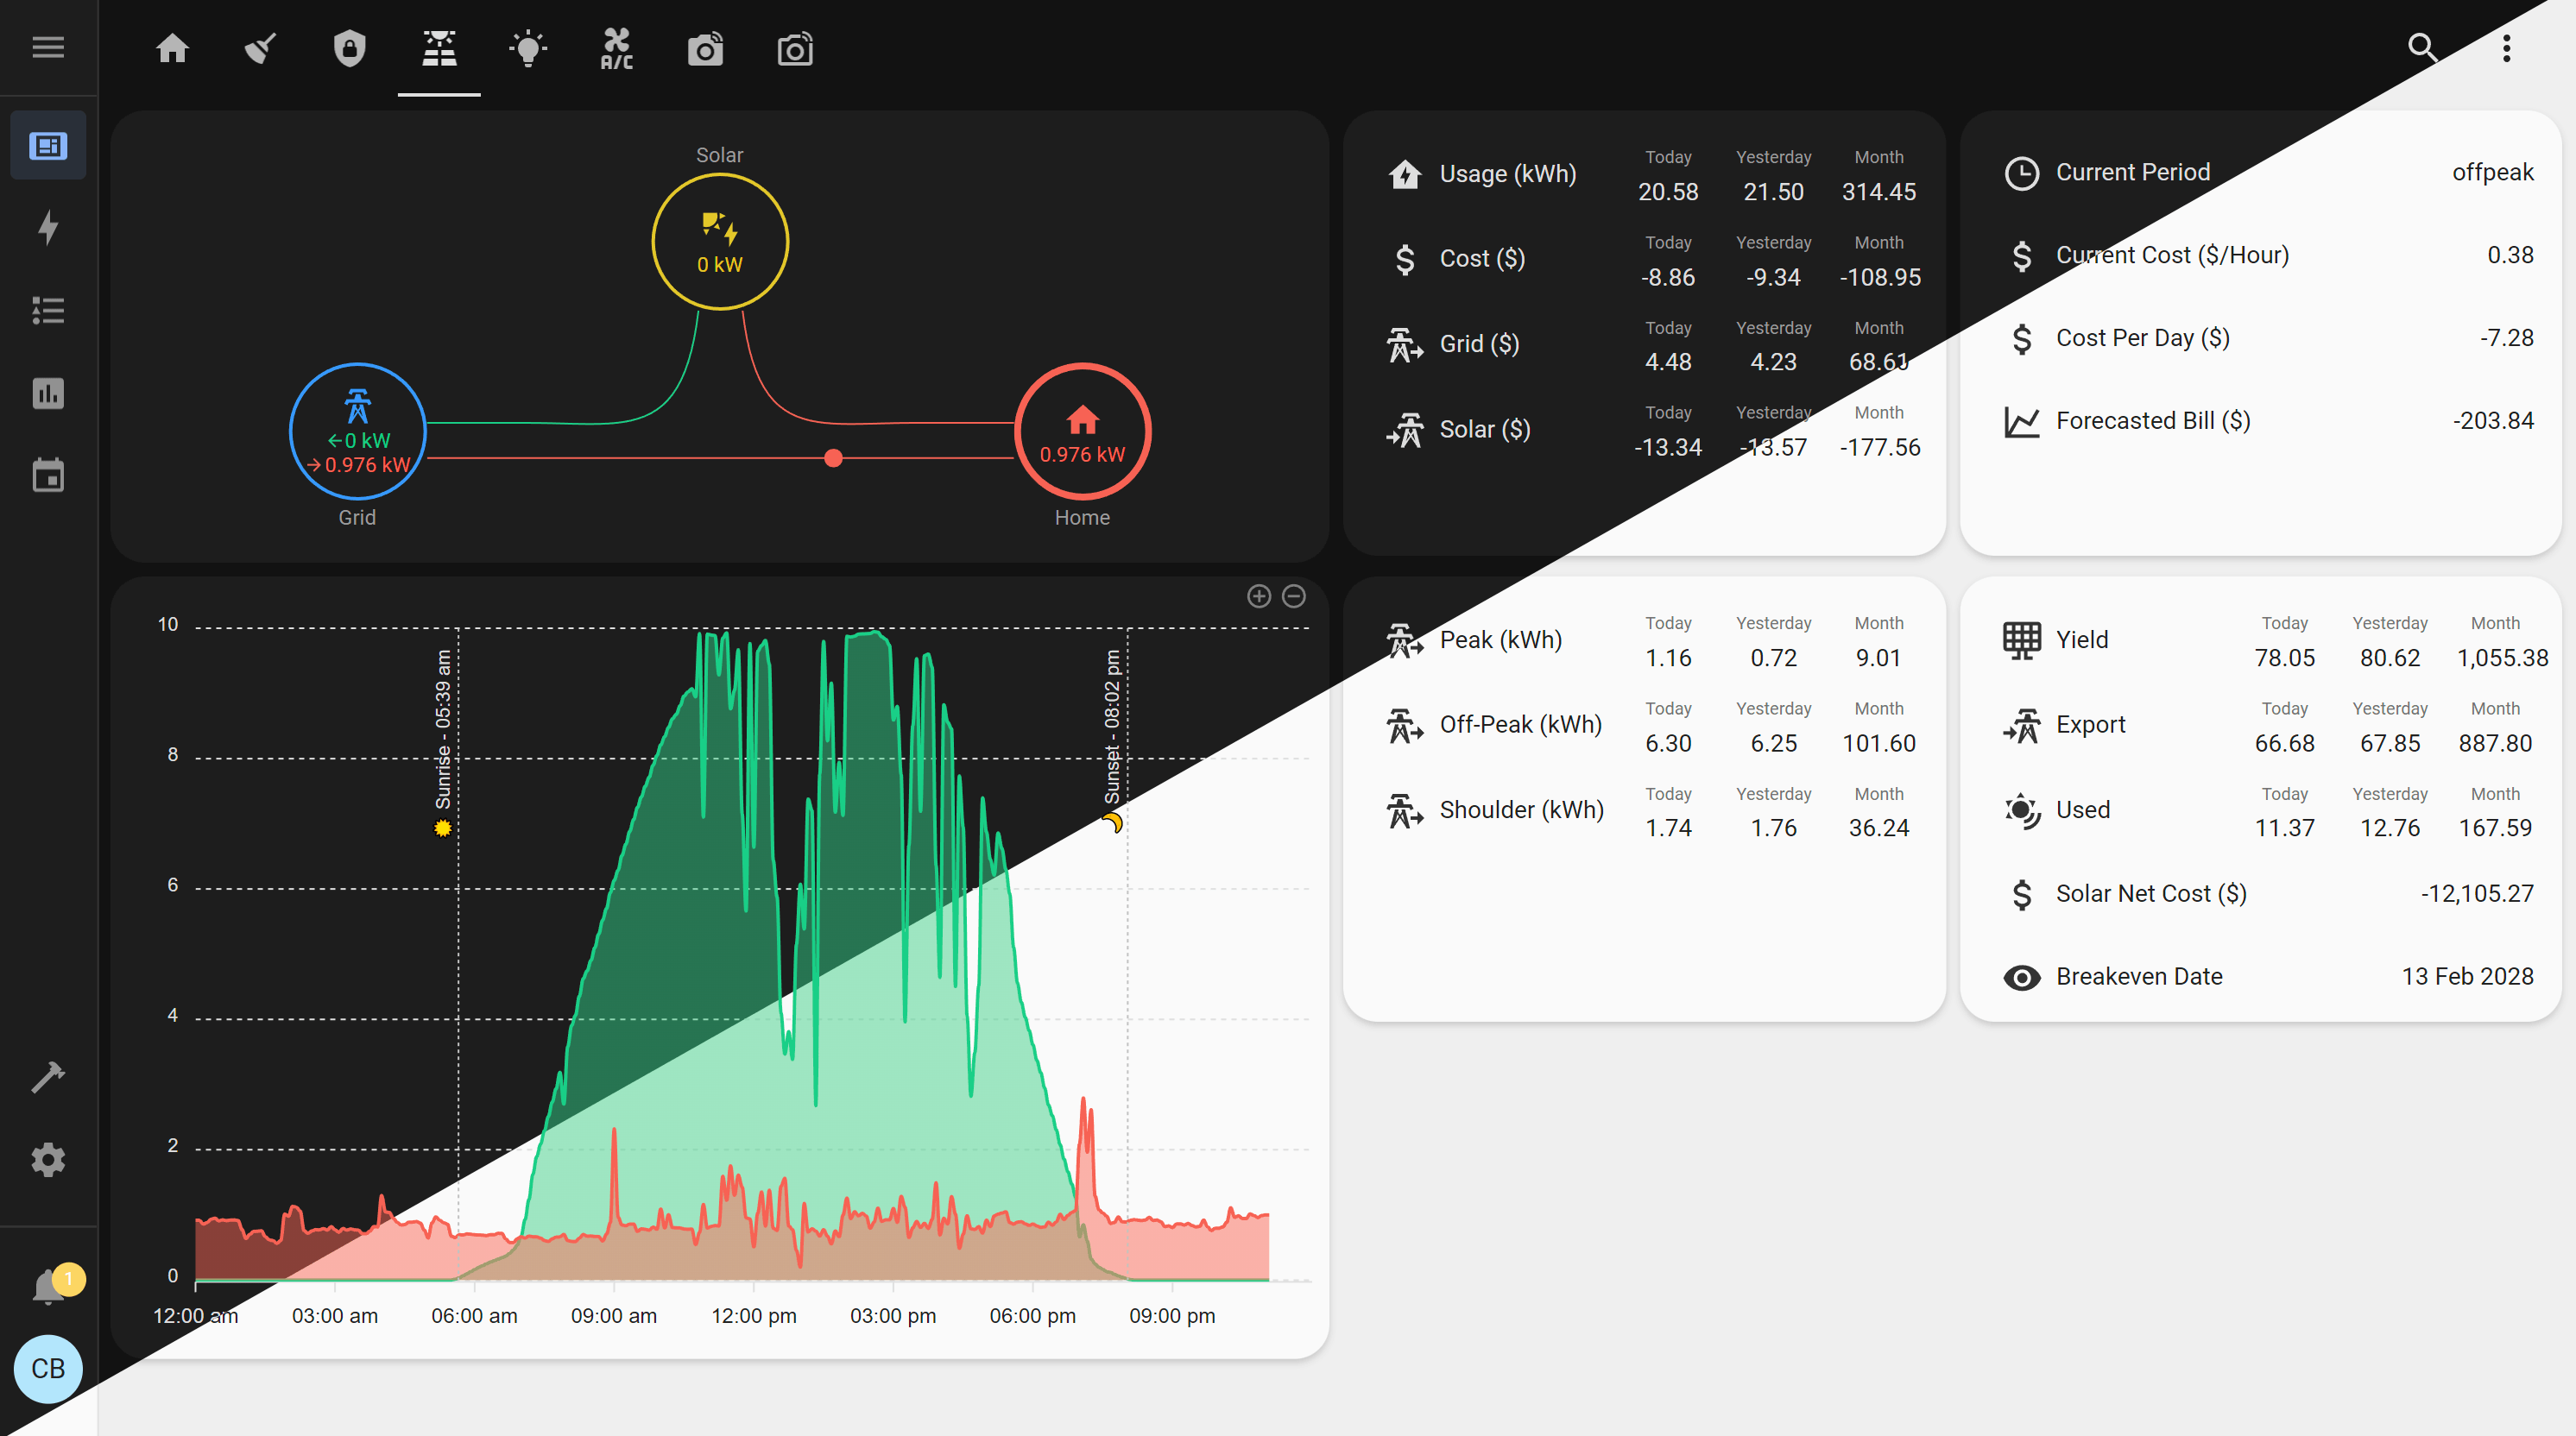
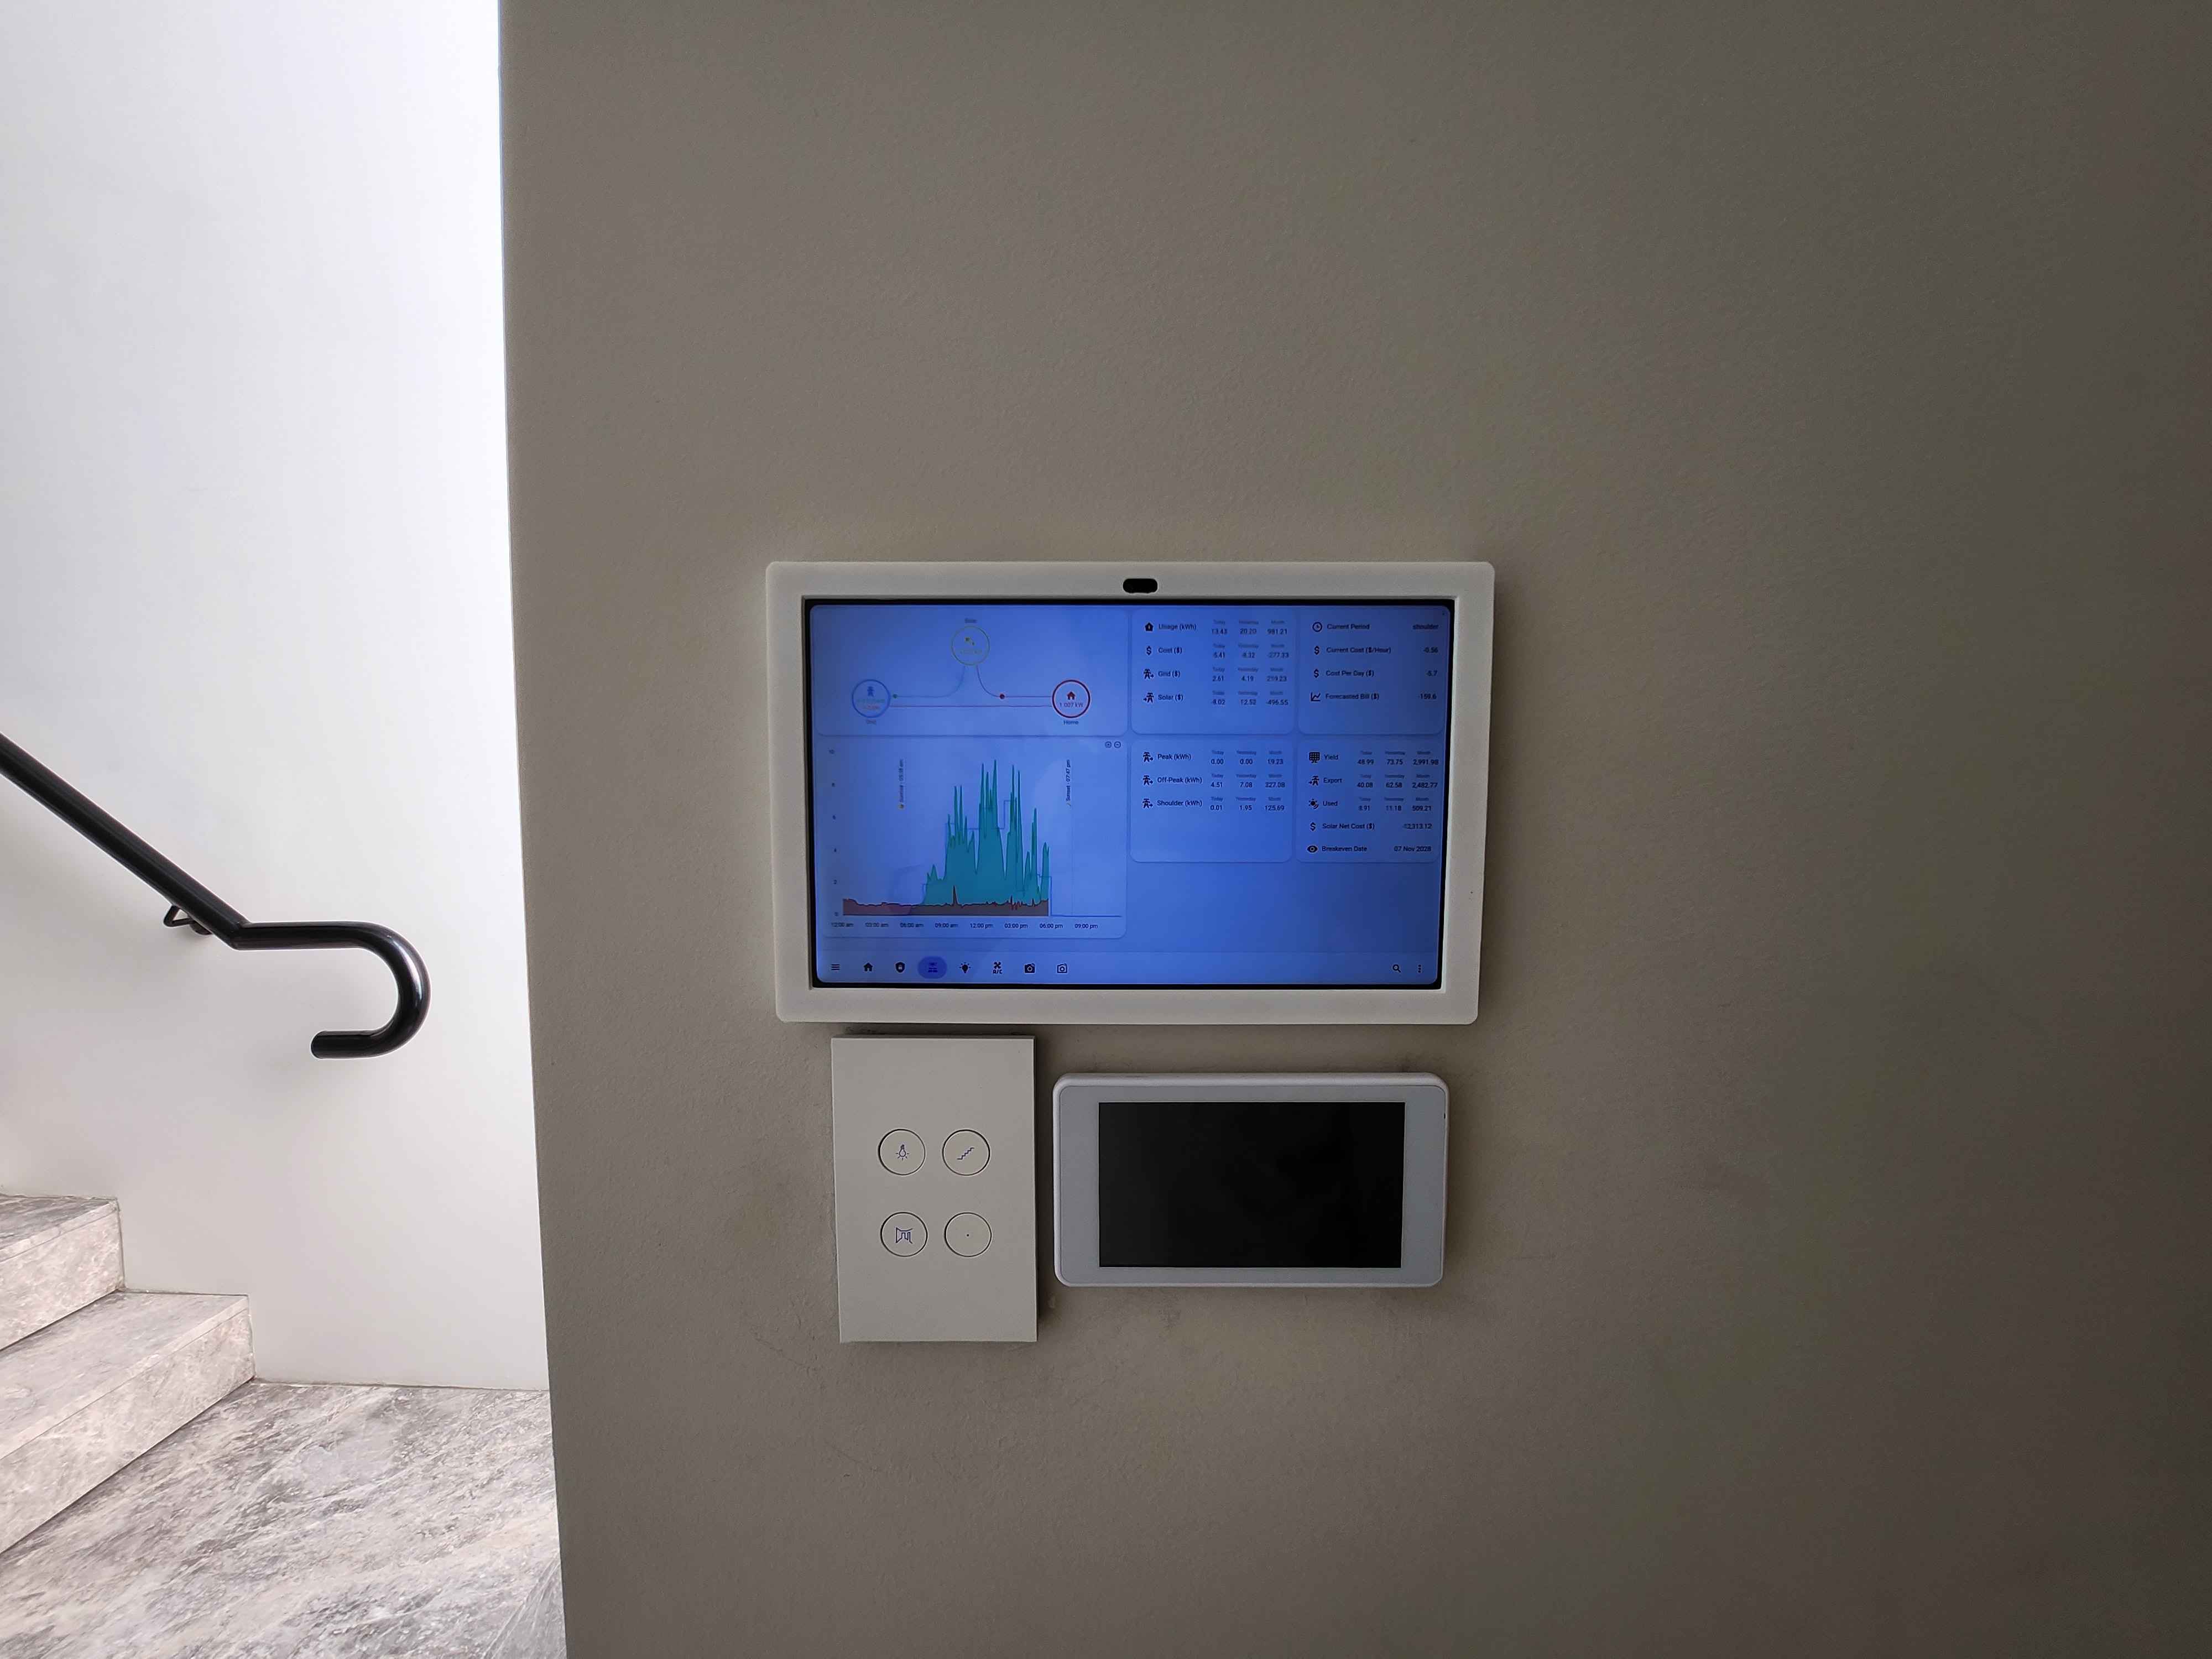
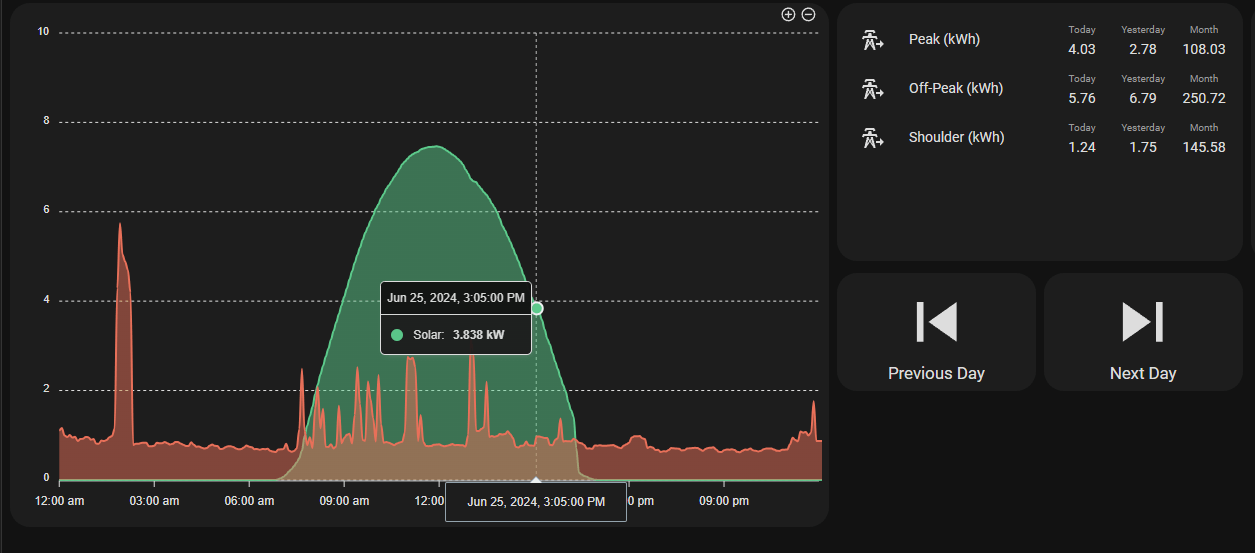
The Solar page contains all information about our solar system. I will expand on this in a future post.
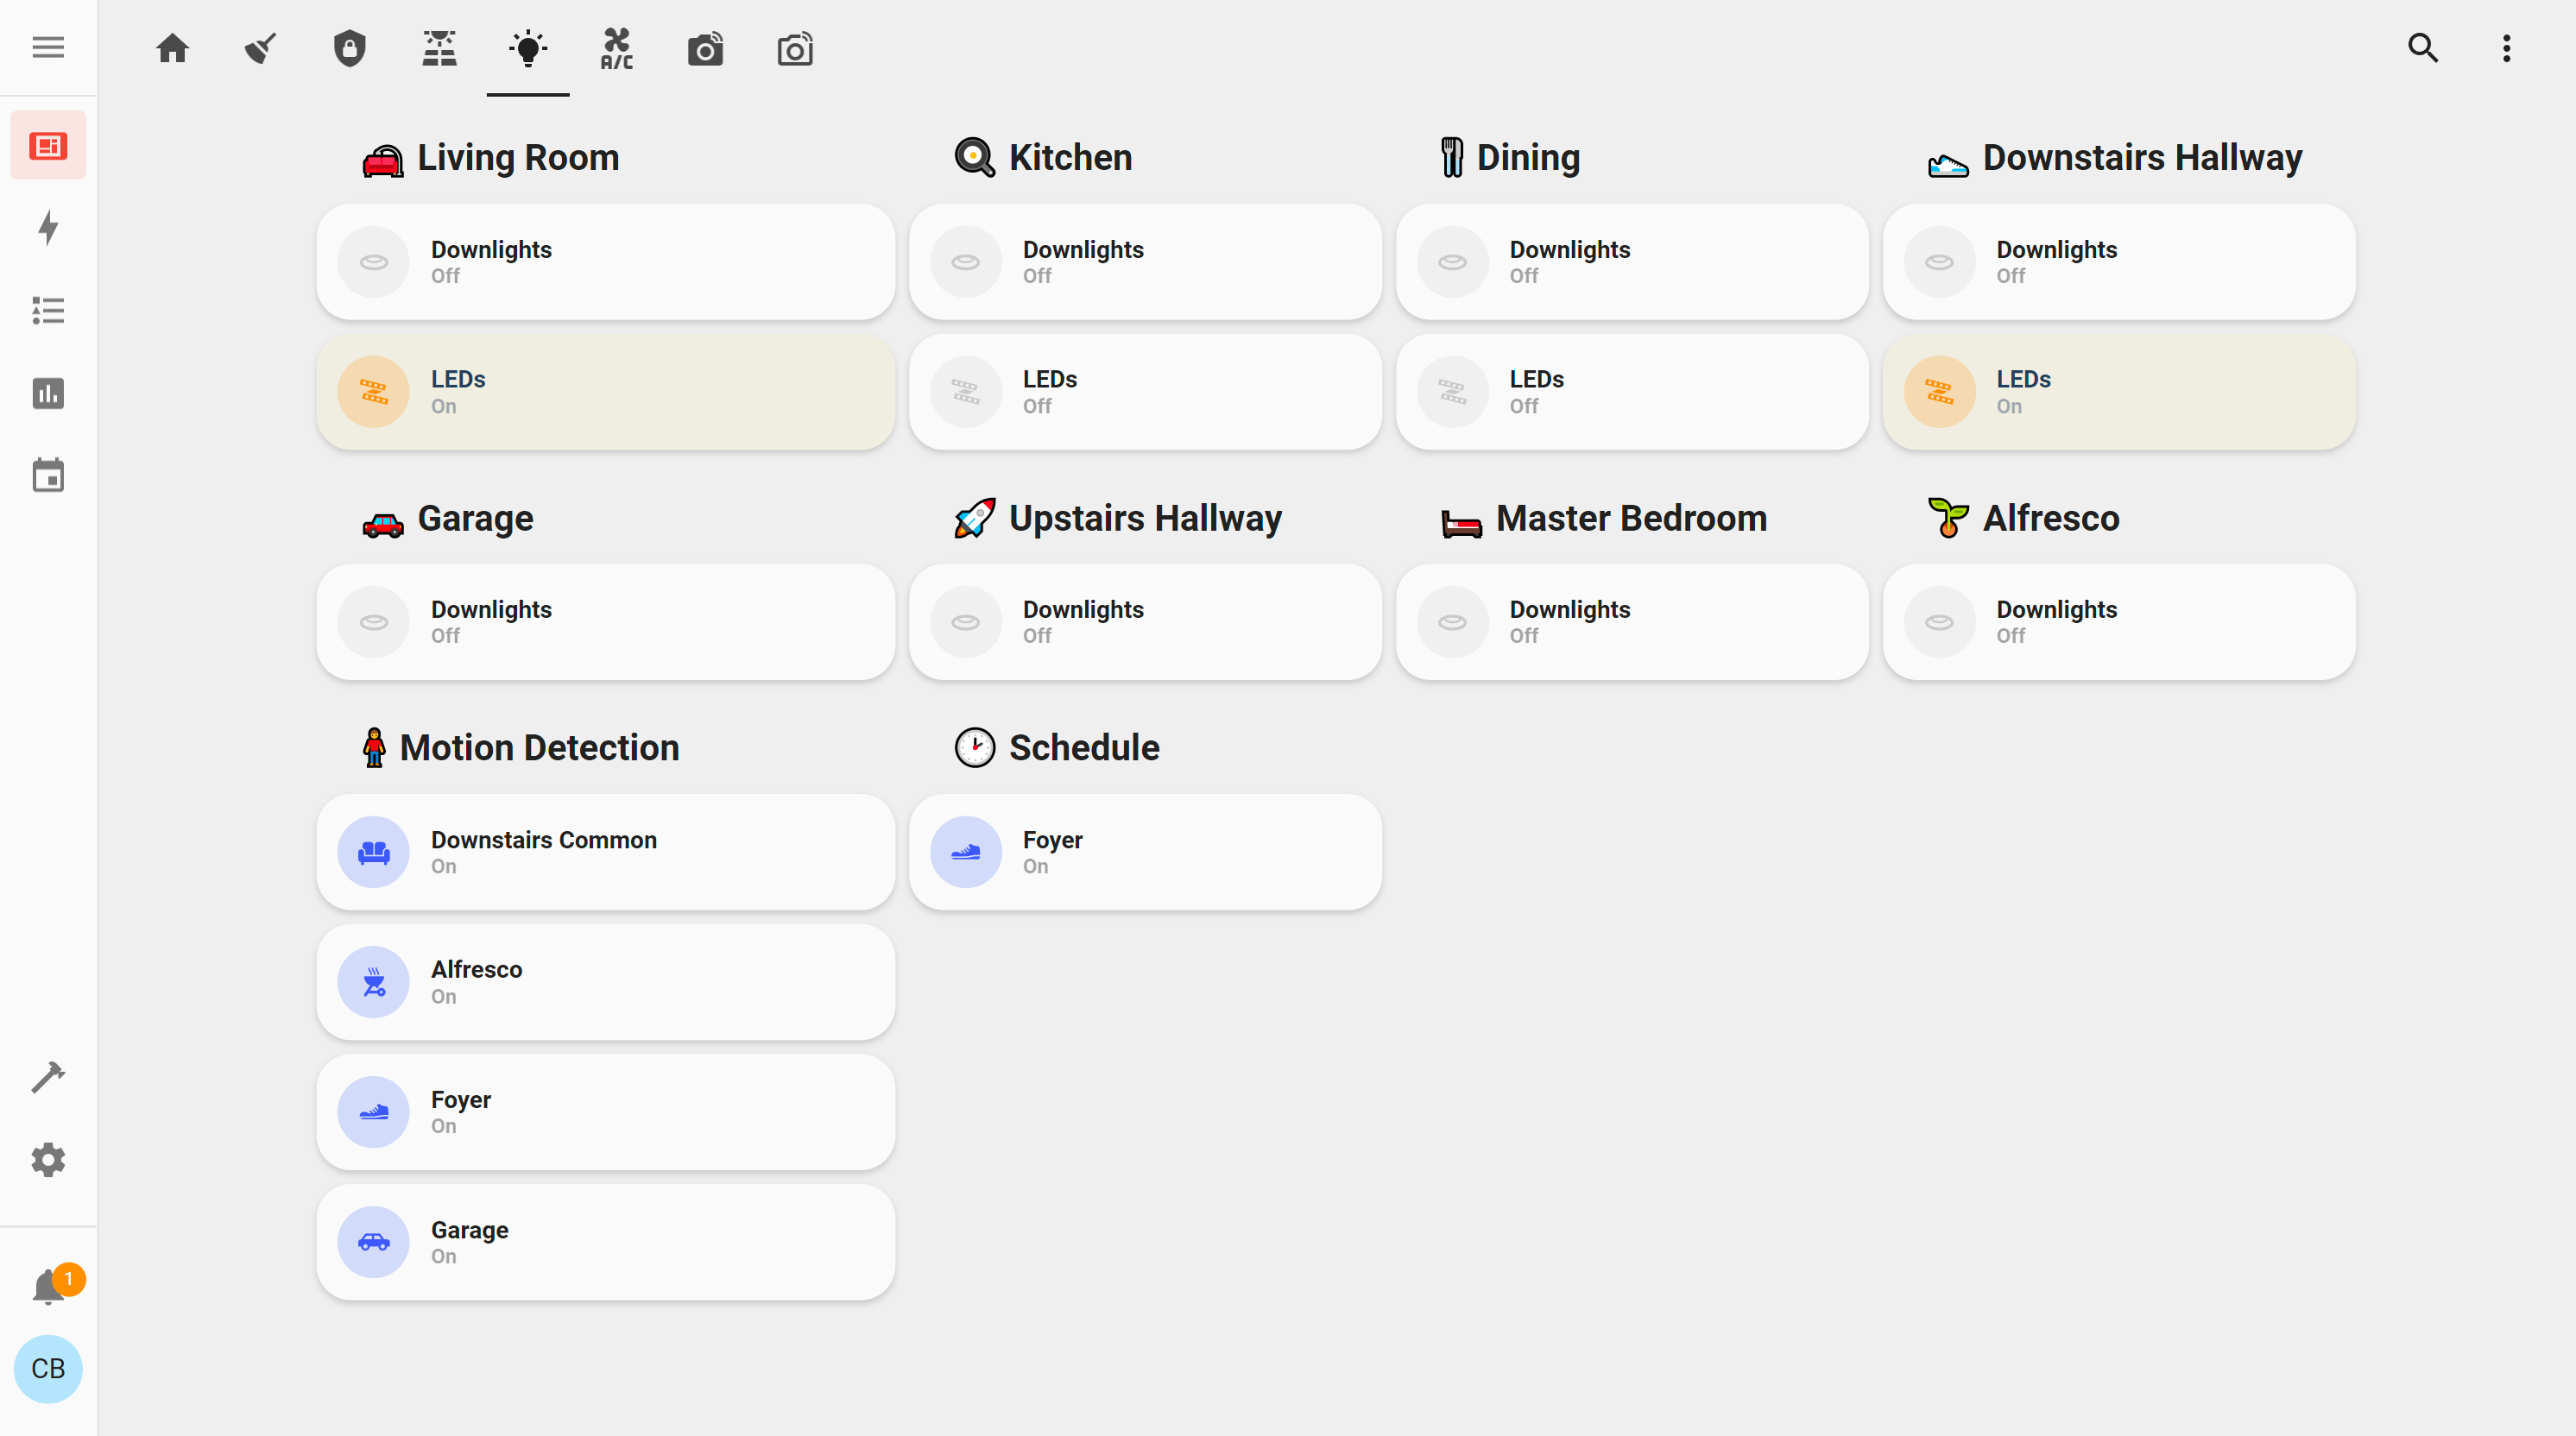
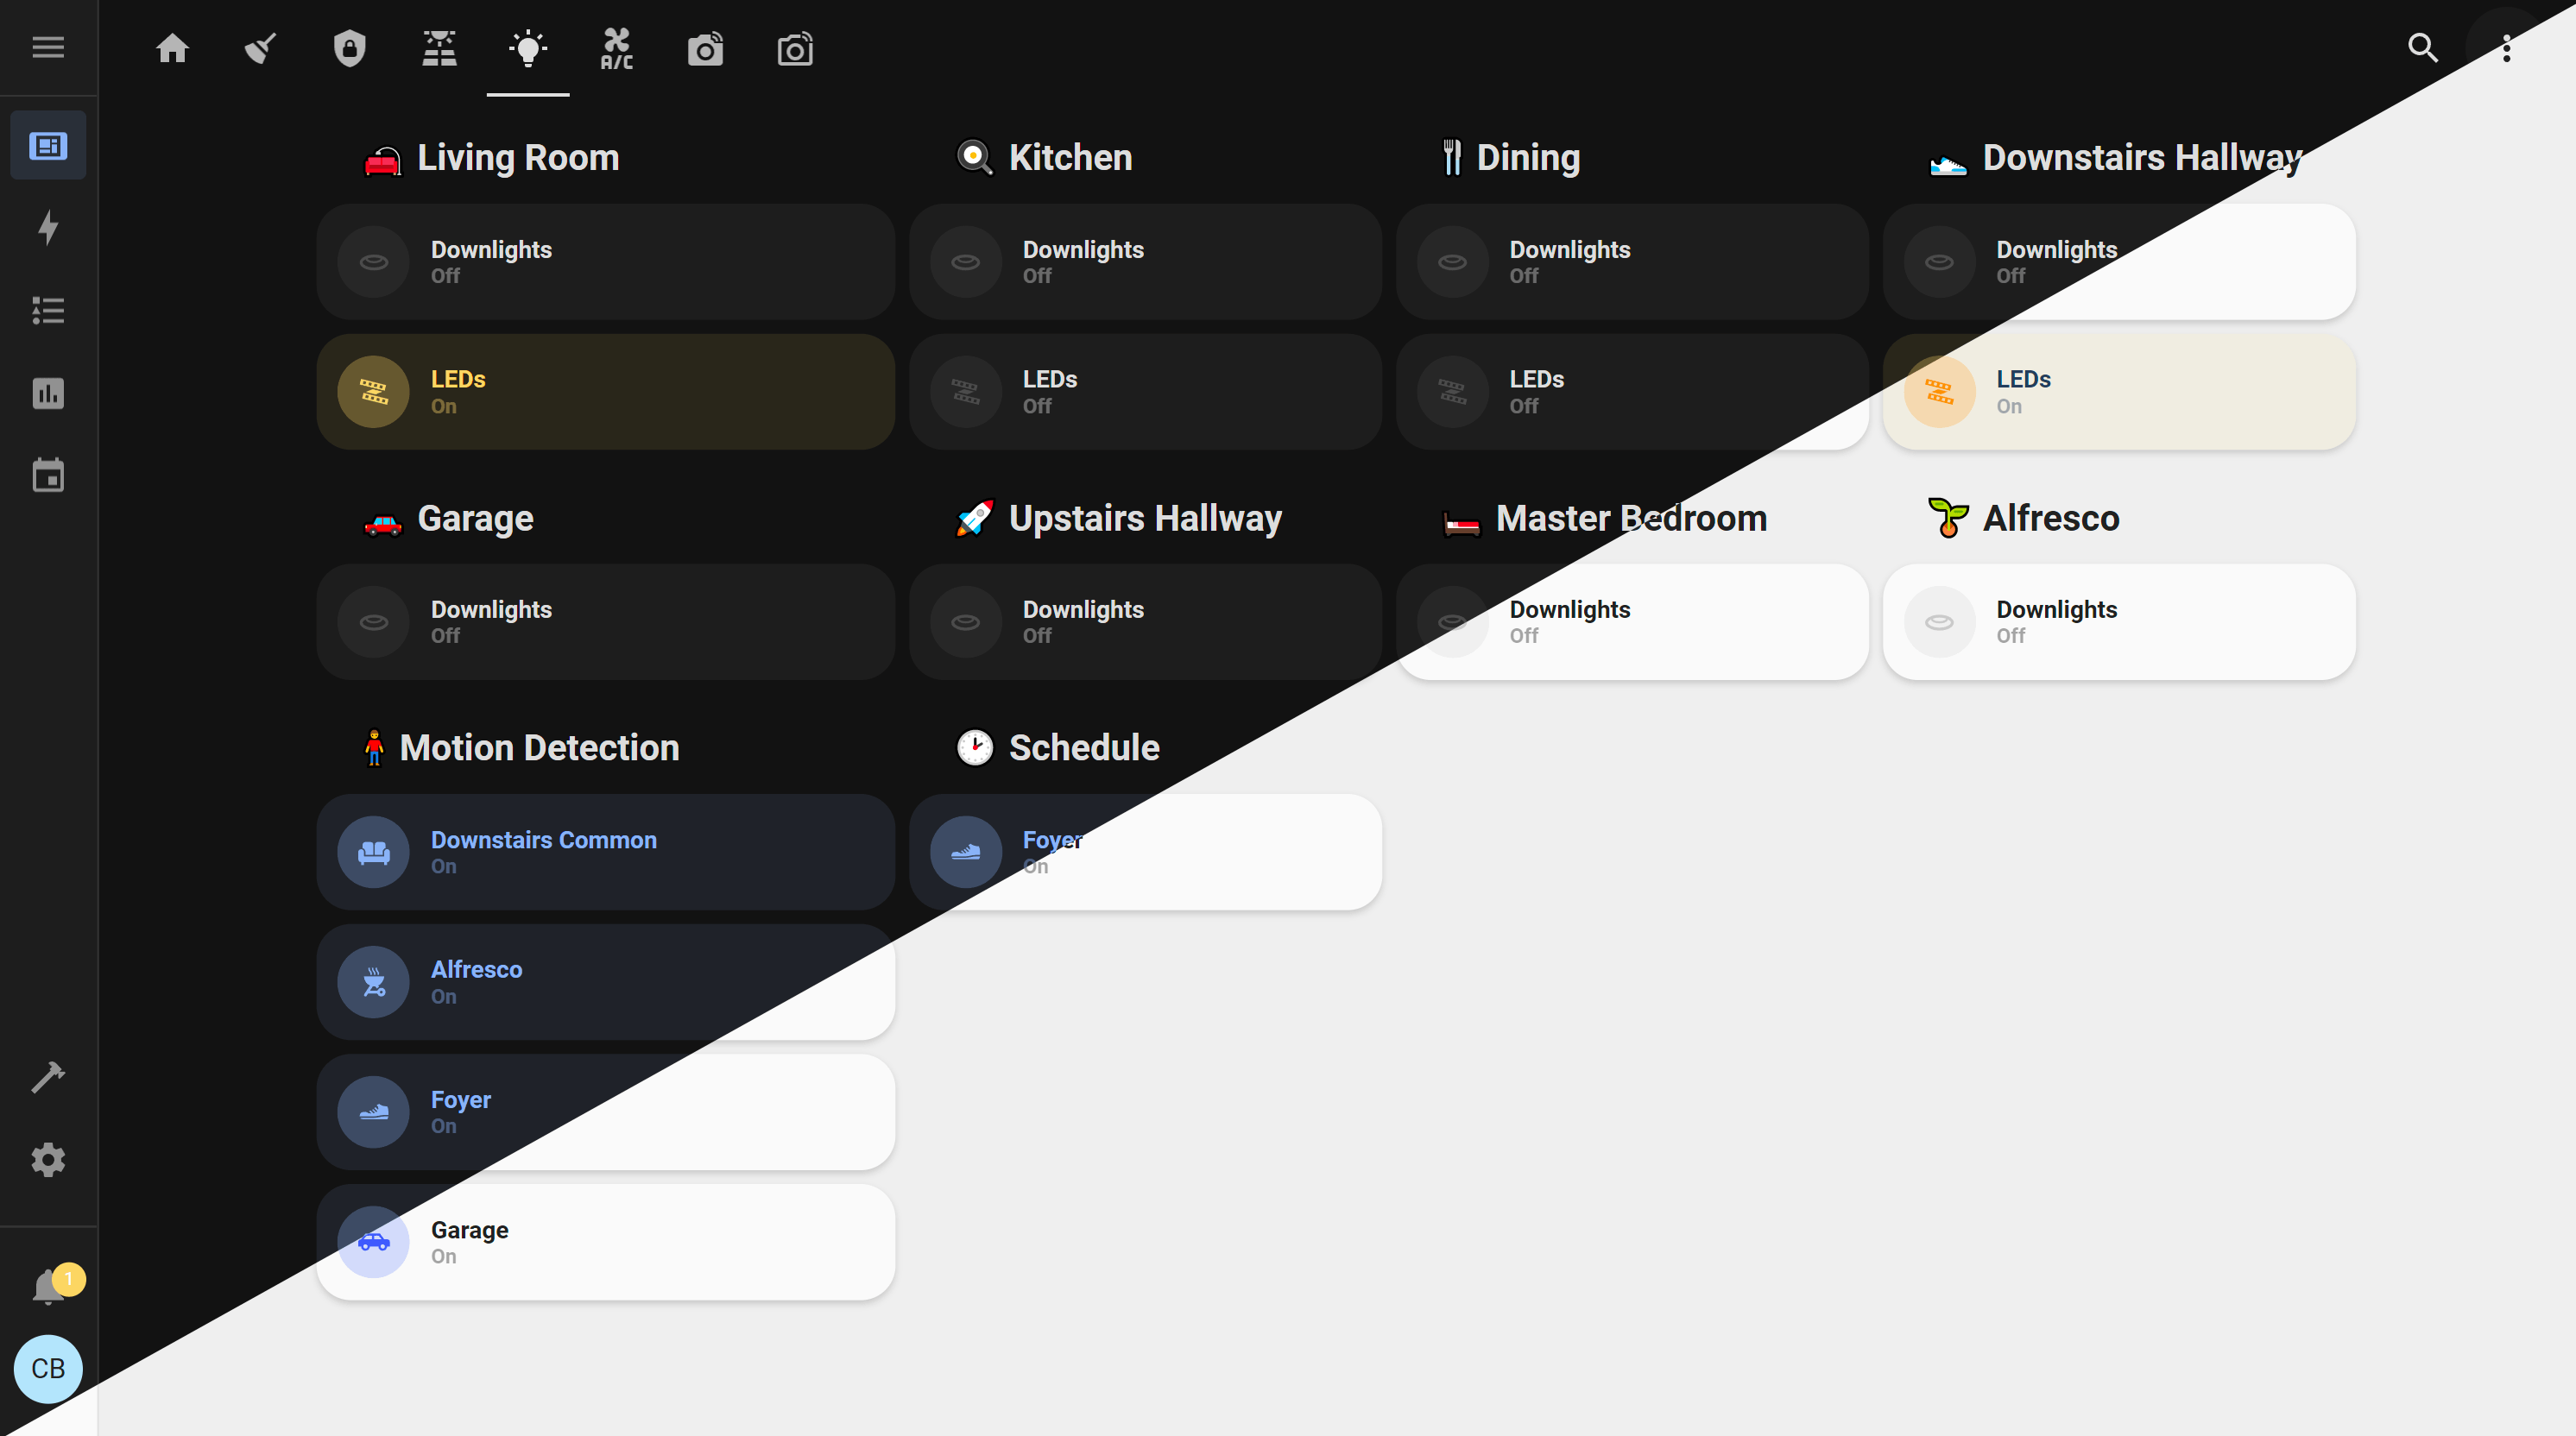
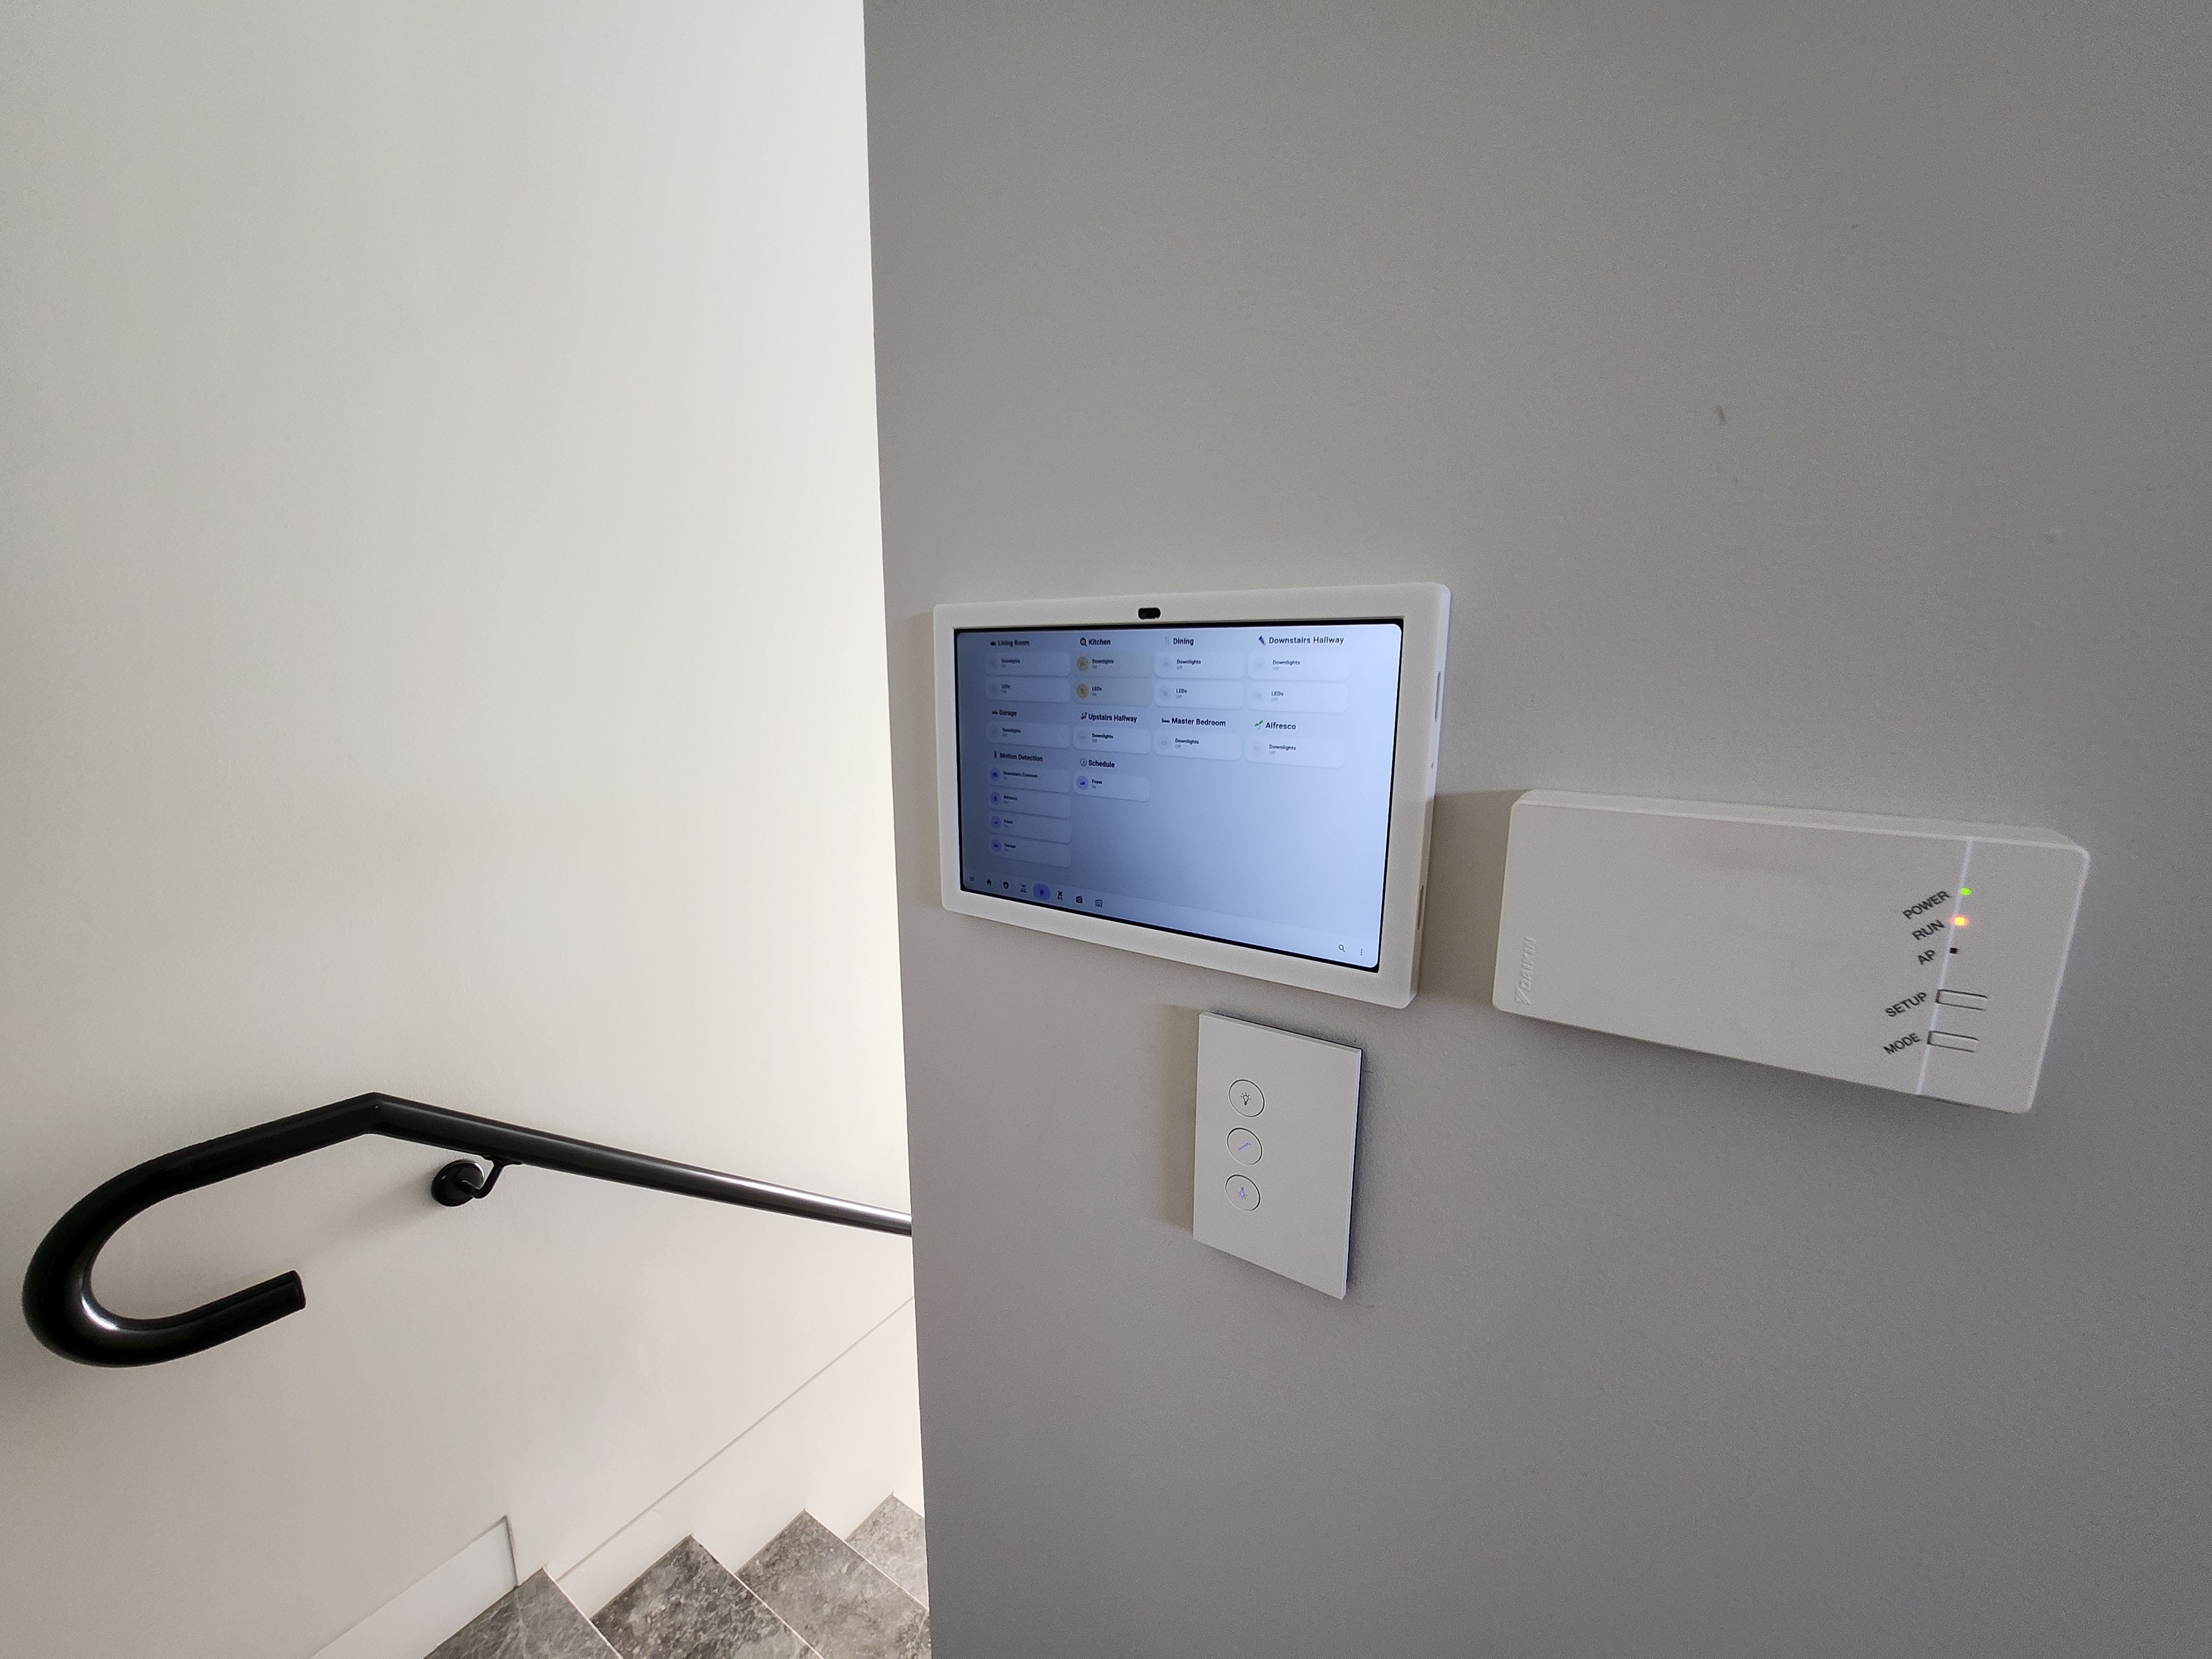
The Lighting page contains controls for all the smart lights in our home.
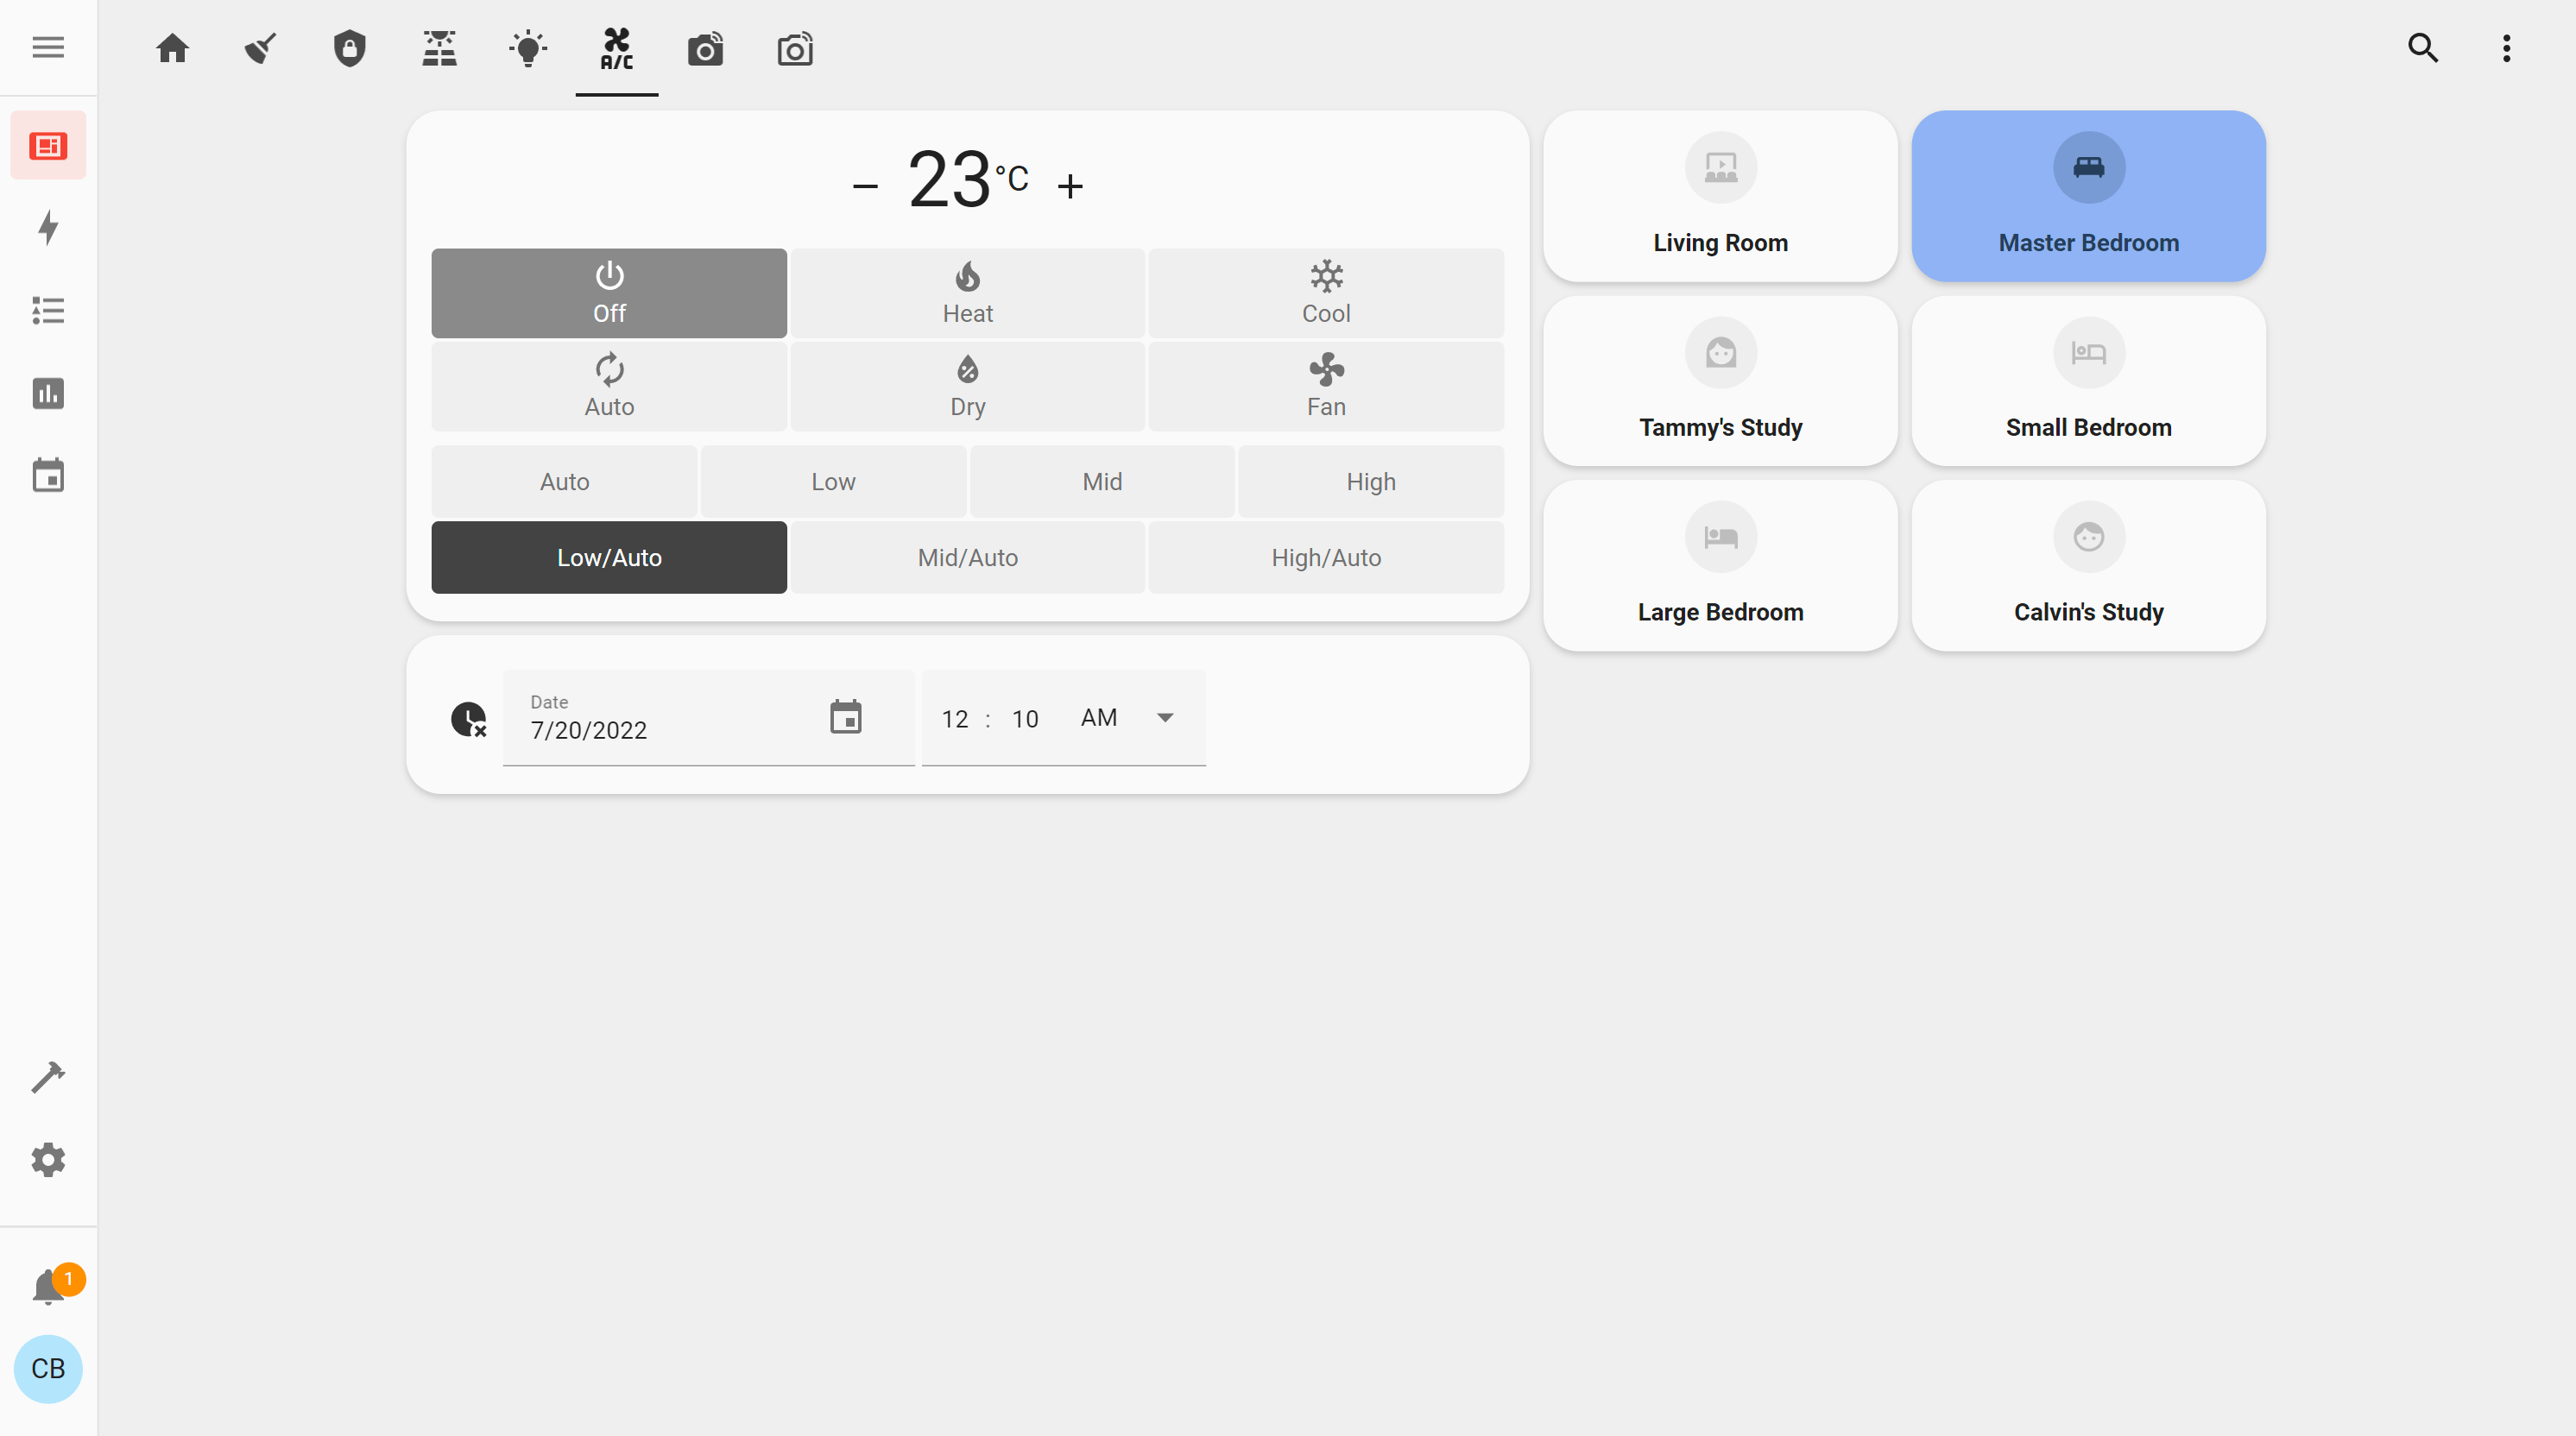
The Air Conditioning page controls our whole home ducted air conditioning system.
The Indoor Cameras and Outdoor Cameras pages show a real-time view of the security cameras in our home.
Dark Mode
Each dashboard page is available in both light and dark mode. This setting can be found under User Profile settings. Selecting Auto will follow the operating system setting, and in the Android app, it will match the device's theme.
I relied heavily on card-mod 3 by @thomasloven to ensure colours were appropriate for both light and dark mode. It was not possible to determine the theme and have separate colours for both light and dark mode.
Mobile
I've made the dashboards mobile and tablet-friendly using the layout-card by @thomasloven. It supports a CSS Grid layout which allows setting layouts at different breakpoints.
It also works well on my Samsung Galaxy Z Fold4 when unfolded.
Source Code
The source code for my dashboard can be found on my GitHub. It is constantly updated and deployed by Ansible.
To quickly develop a dashboard, I highly recommend using the VS Code Server either as an add-on or standalone with the Home Assistant files accessible to it.

I used custom cards from the UI Lovelace Minimalist and Lovelace Mushroom by @piitaya project. A few other shoutouts for their amazing work:
- multiple-entity-row by @benct
- Atomic Calendar Revive by @totaldebug
- Lovelace Vacuum Map by @PiotrMachowski
- ApexCharts Card by @RomRider
Tablets
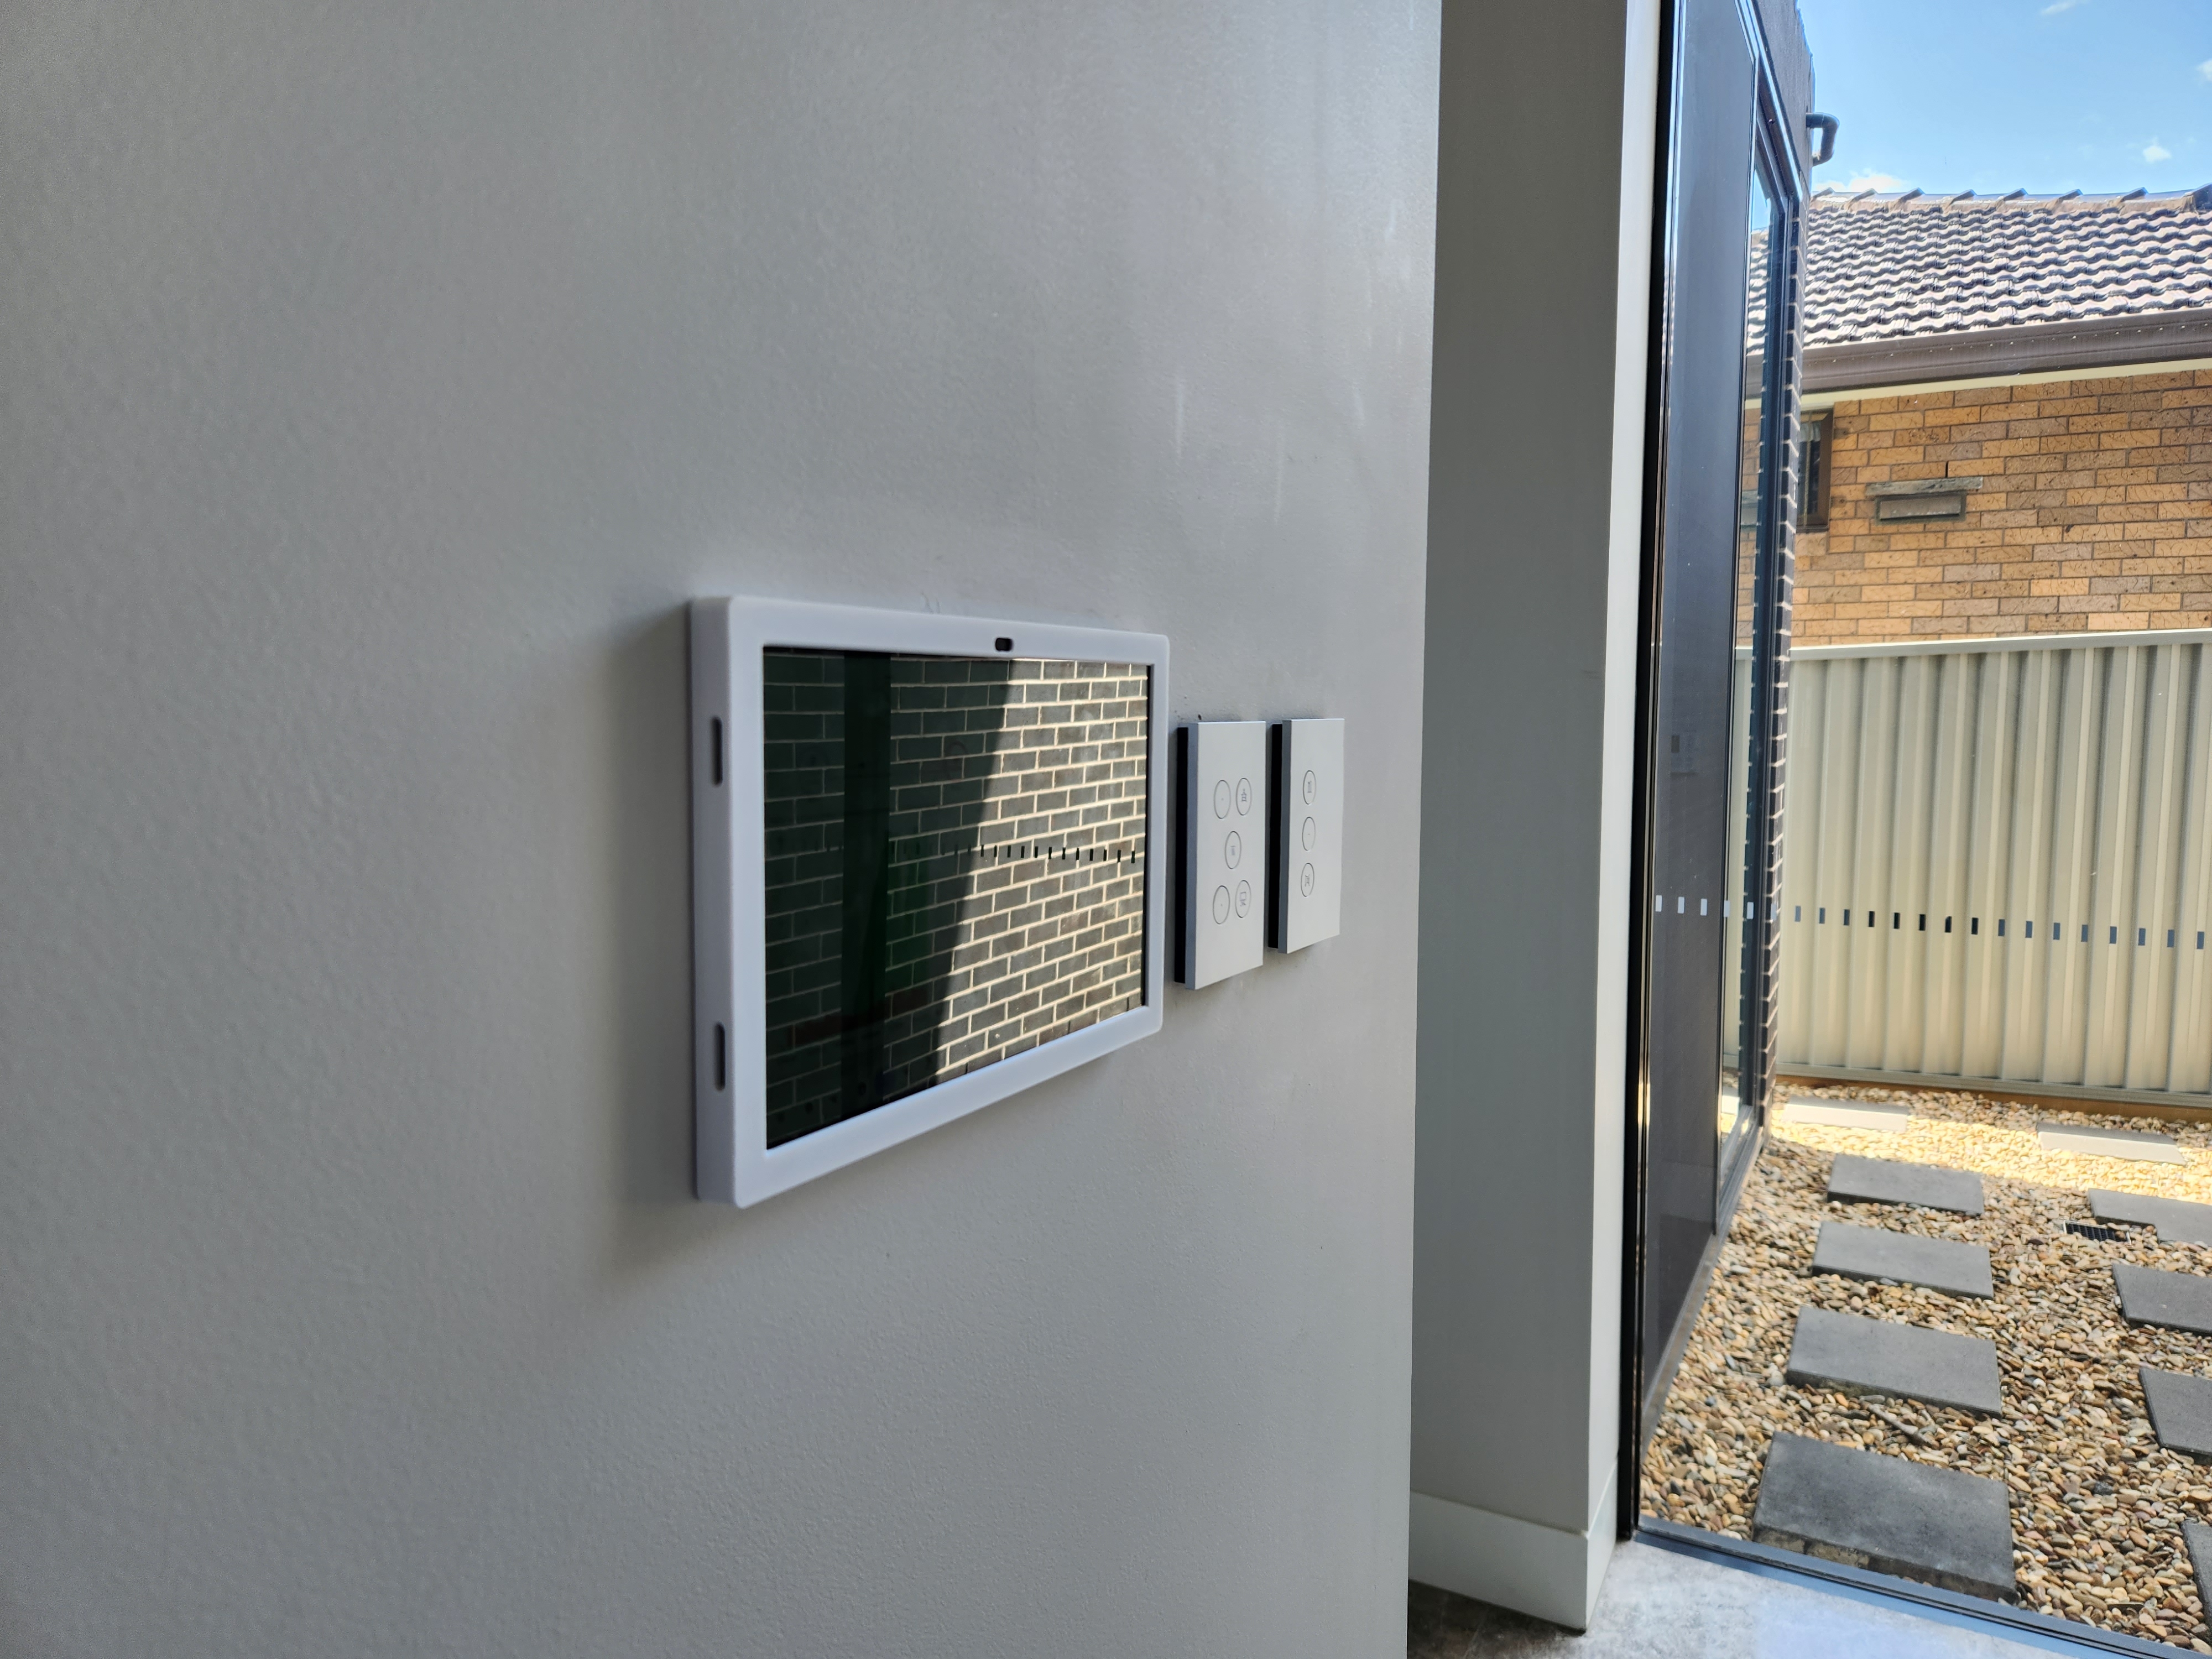
To have quick access to the dashboard, I had tablets installed around the house.
Samsung Tab A7
I went with 3 x Samsung Galaxy Tab A7 2020 (SM-T500/SM-T505) Android tablets. They have a 10.4-inch display, running the Snapdragon 662 and 3GB of RAM. Each cost ~$155 AUD used from eBay and Gumtree. They all run Android 12 and LineageOS is also available.
The other tablet I considered was the more powerful Lenovo Xiaoxin Pad which regularly goes on sale for ~$230 AUD on AliExpress. However, the lack of Widevine, updates (unless on the Chinese ROM, which lacks the Play Store) and higher price turned me off.
Mounting and Power
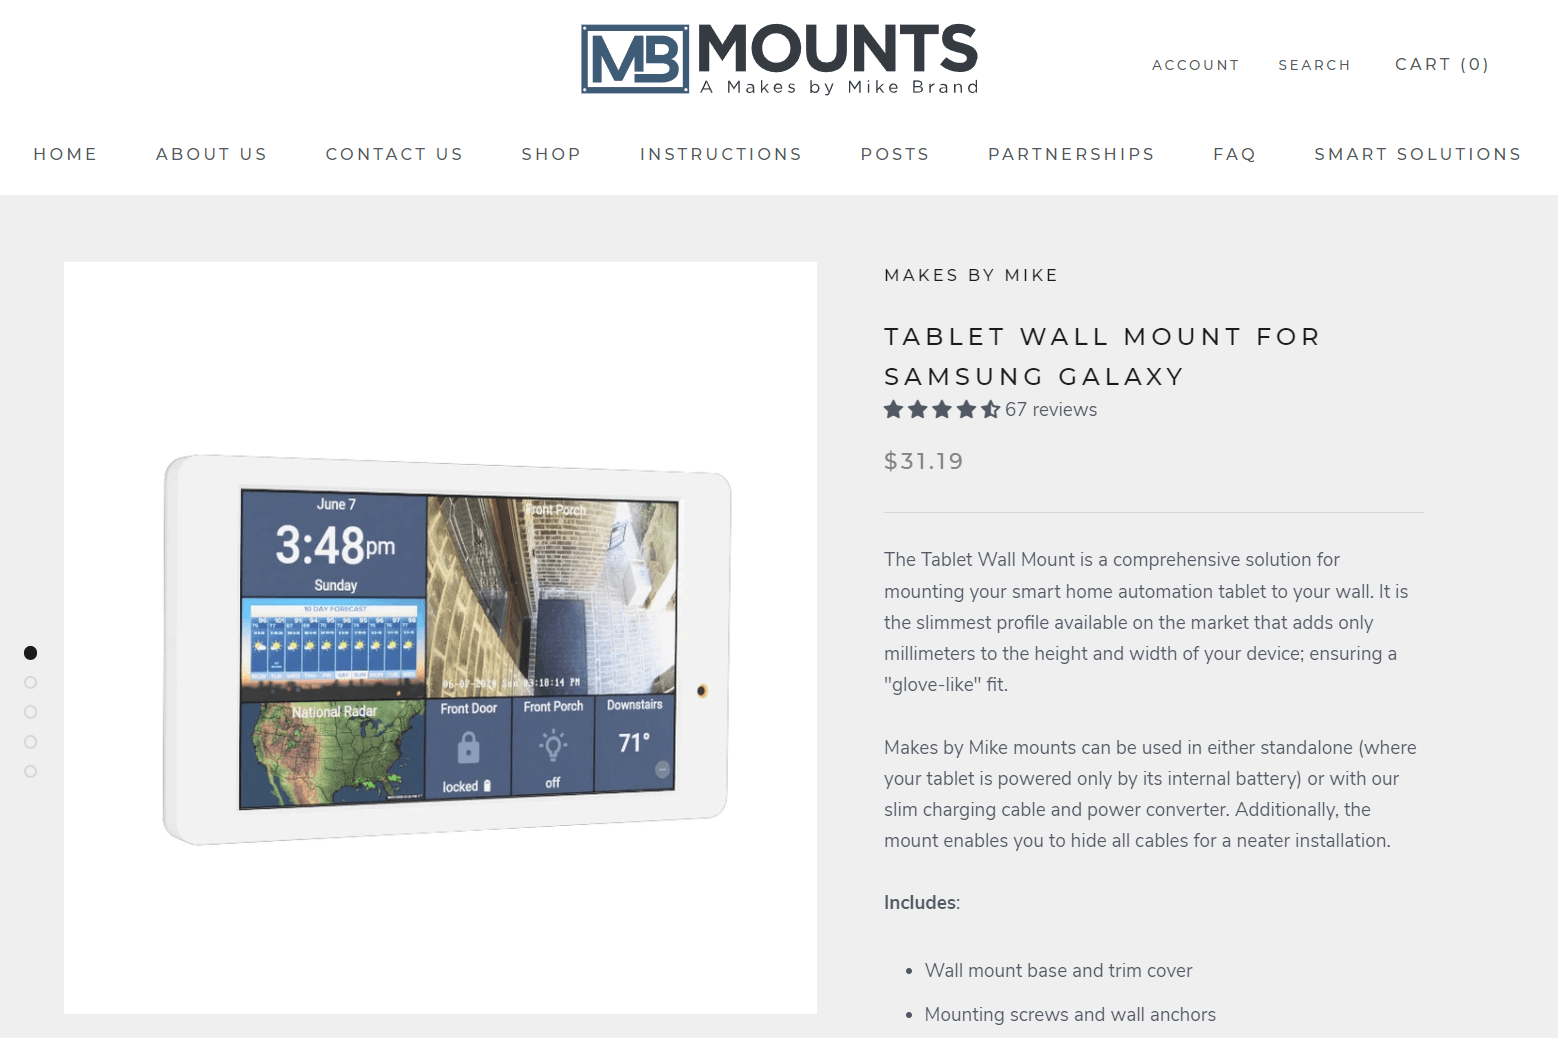
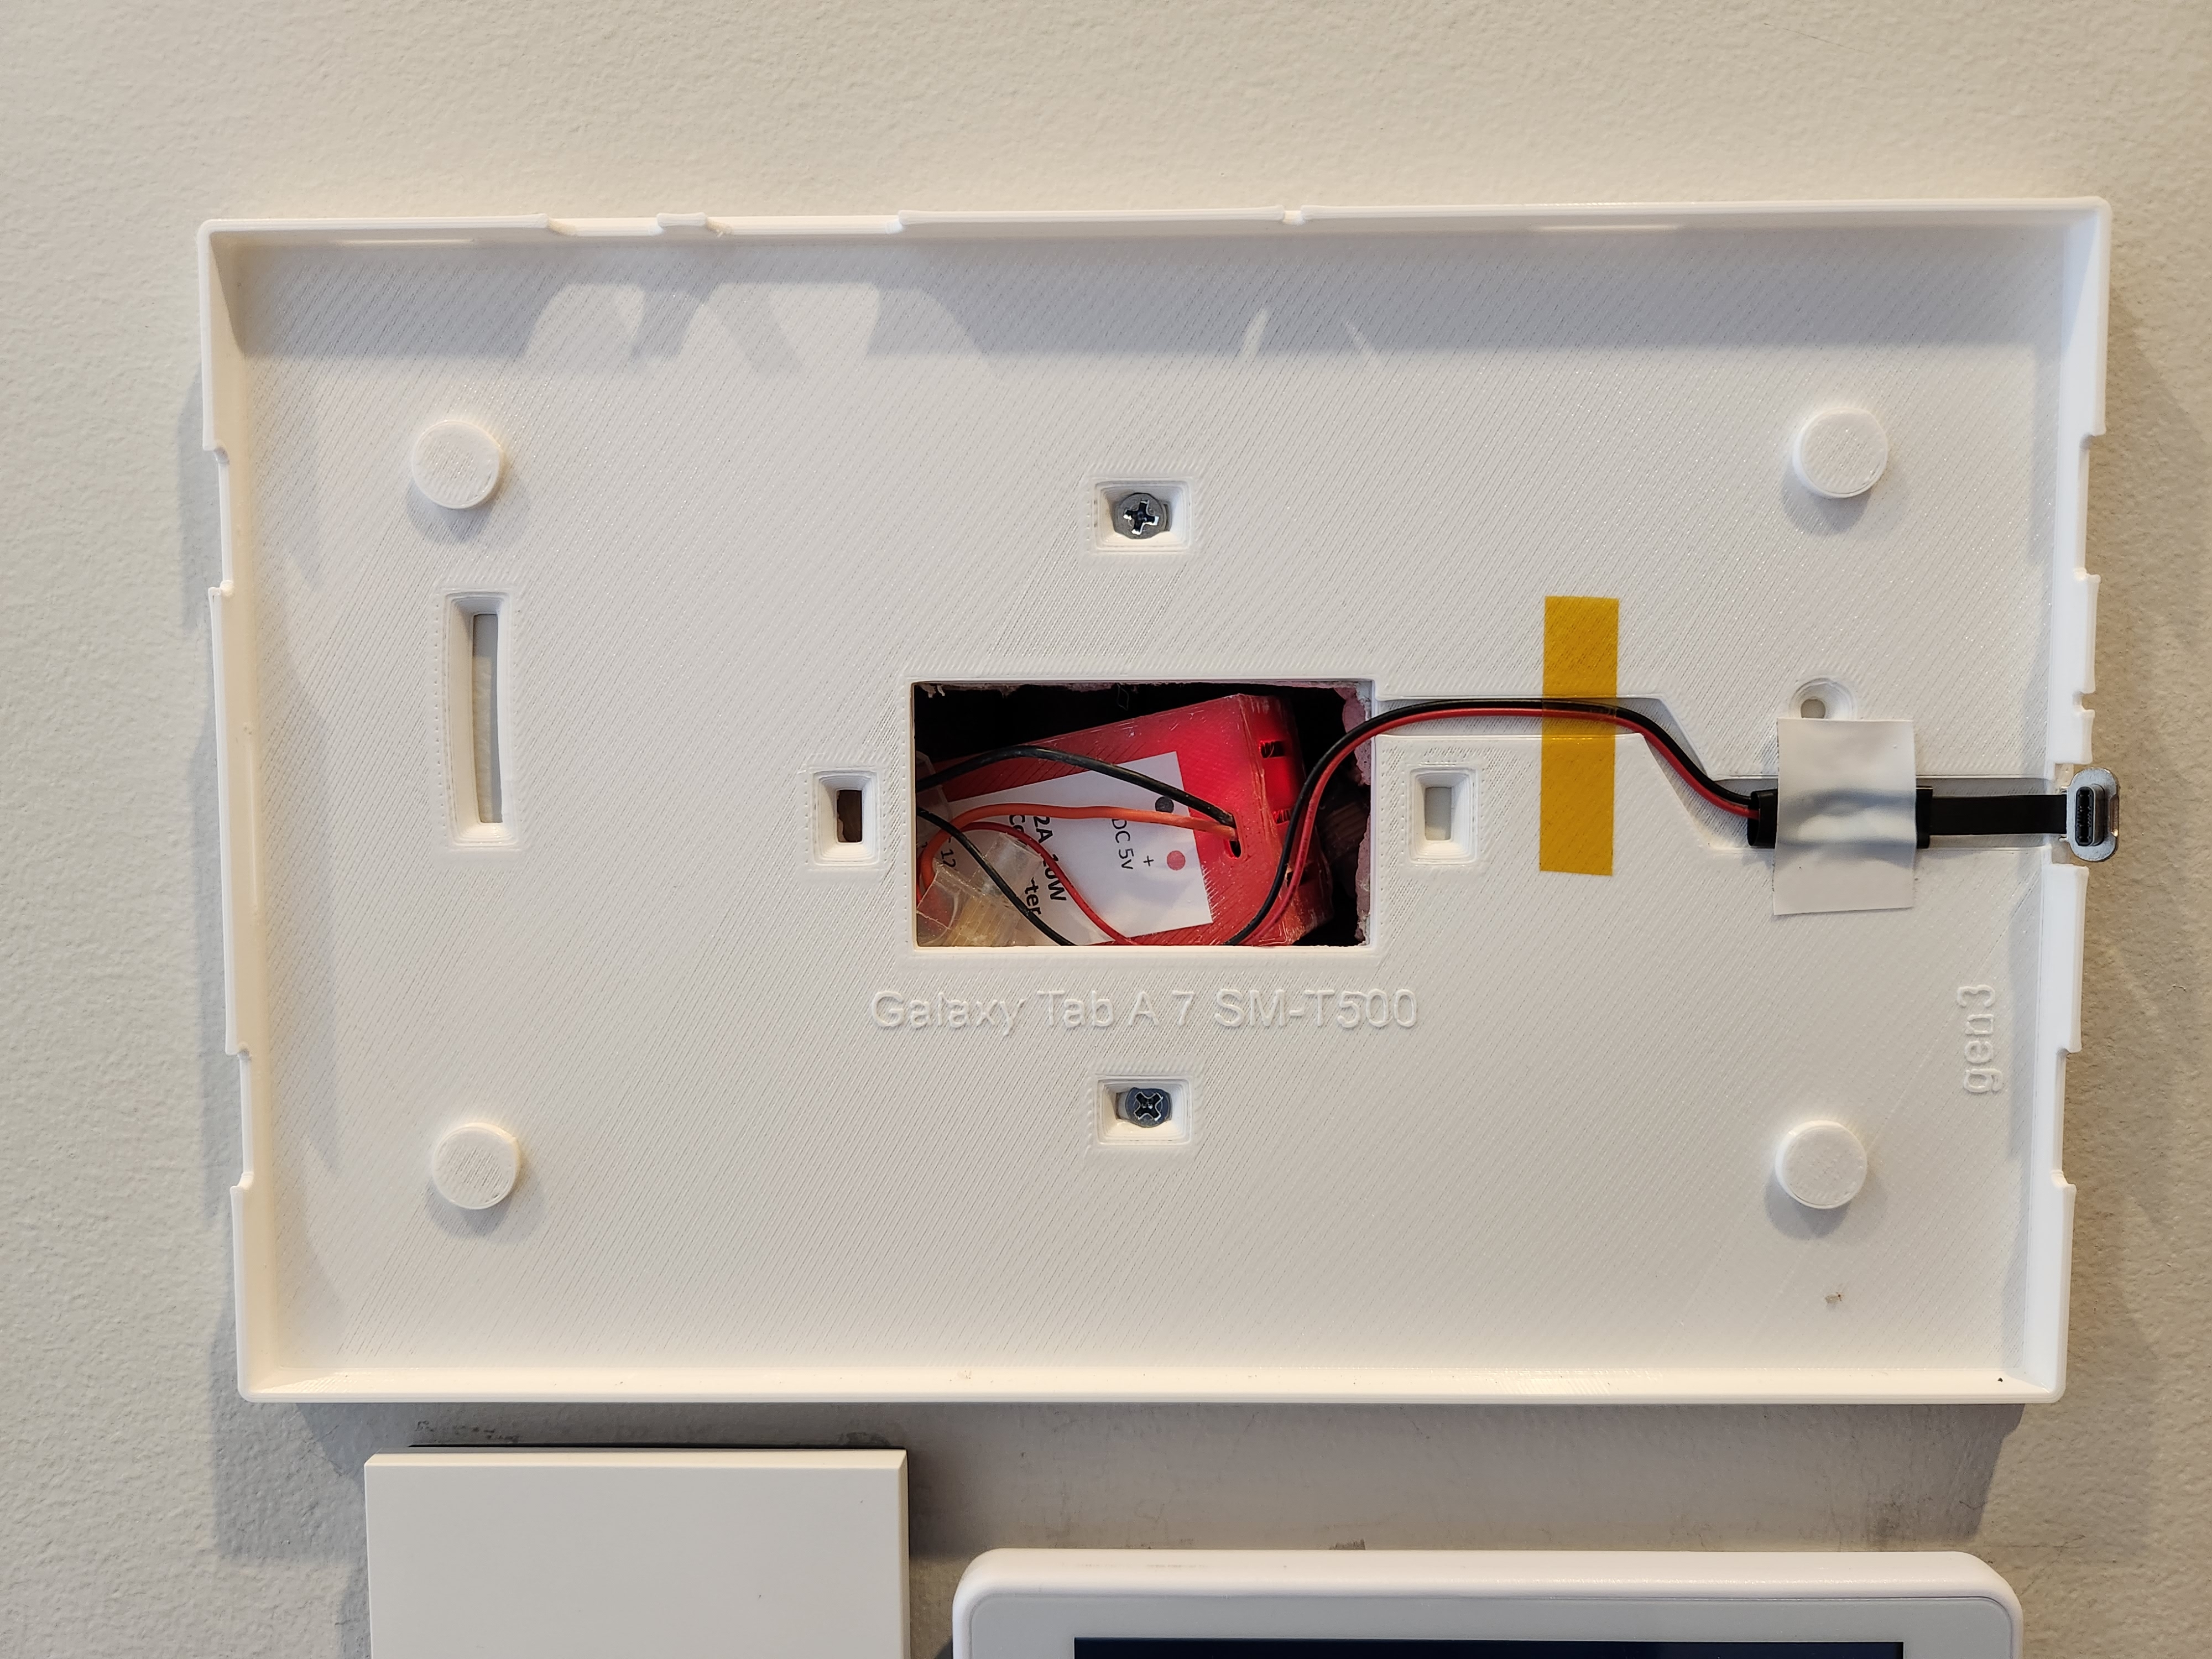
I purchased wall mounts for the tablets from MB Mounts, also known as Makes By Mike. The mounts are 3D printed, come in white or black, and can be customised to open or close all the various sensors and buttons on the device.
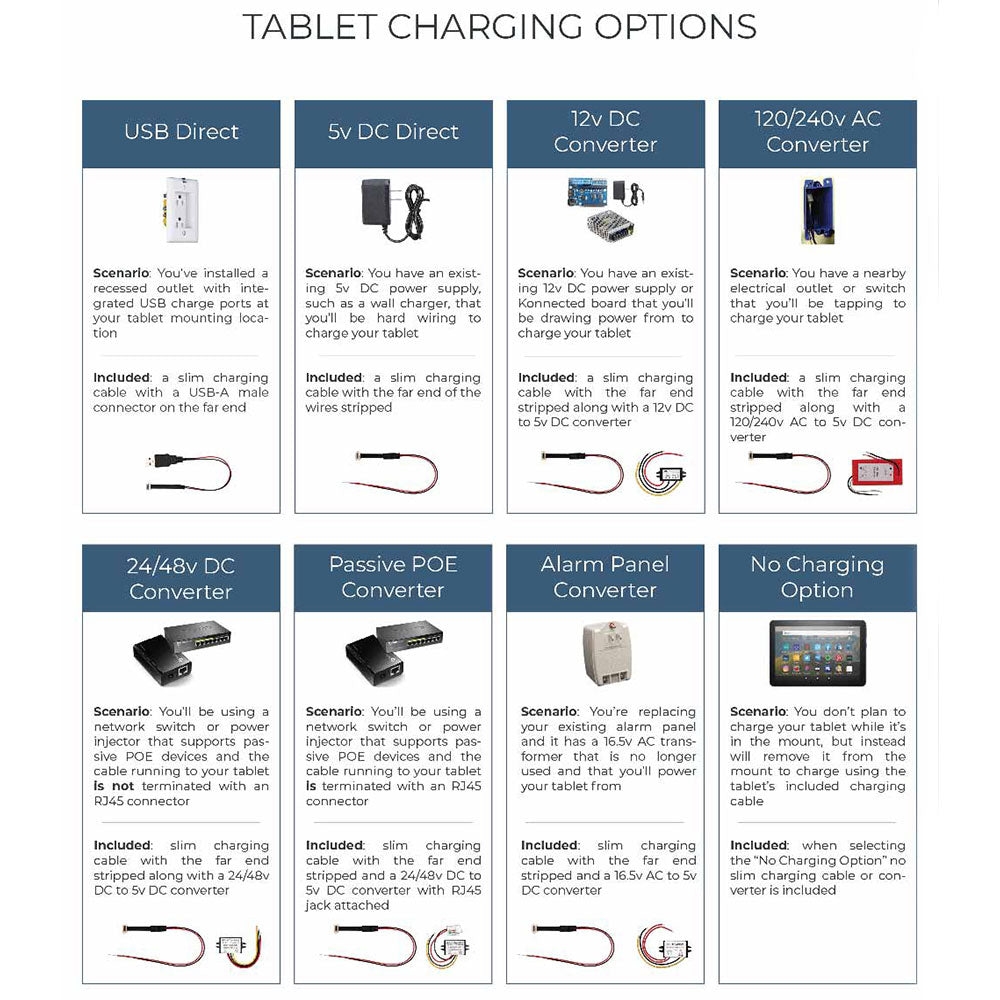
MB Mounts also provide 8 different USB charging options compatible with their mount. I went with the 12/240v AC Converter which took power from nearby light switches and transformed them down to 5v DC.
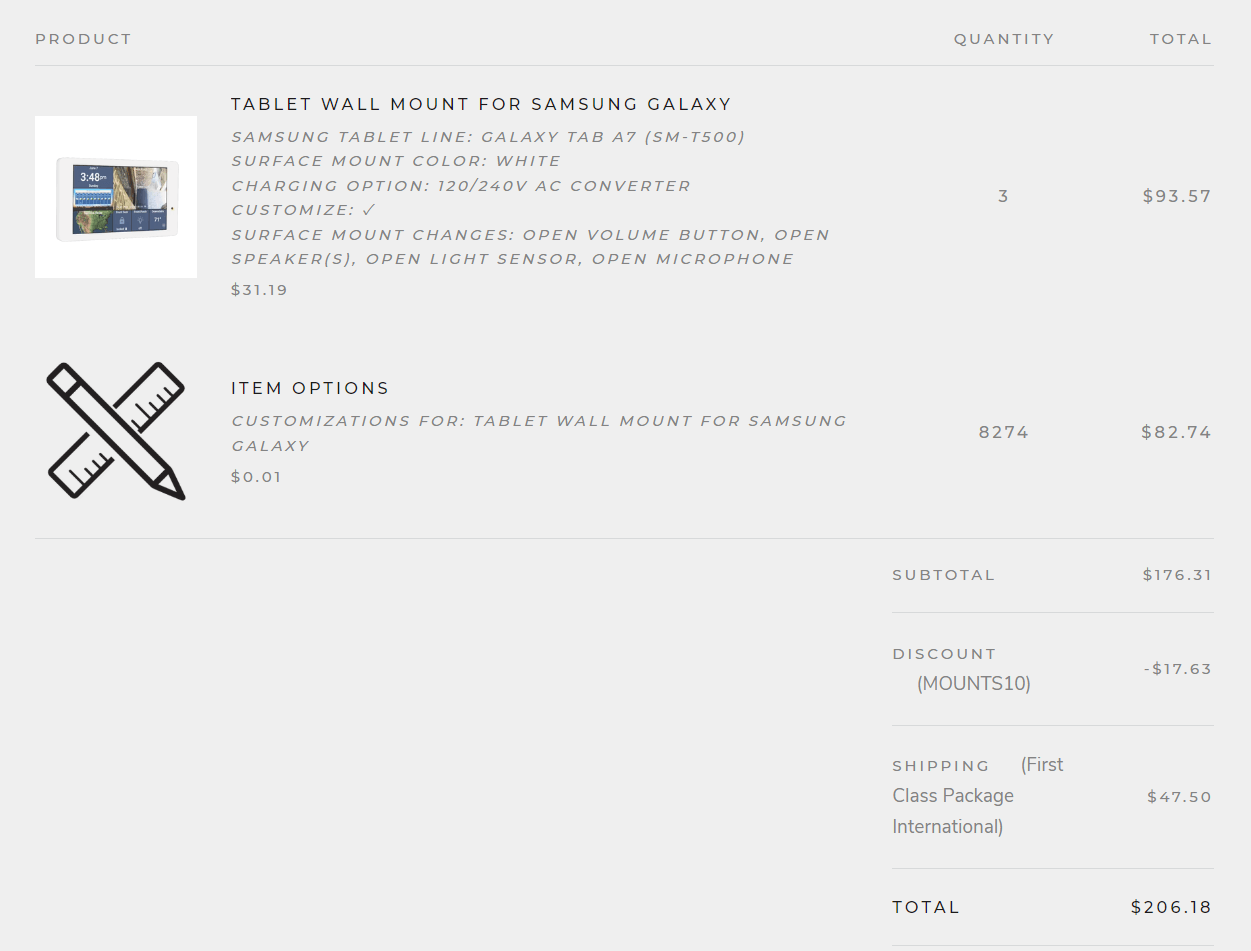
In total, I paid $206.18 USD for the three wall mounts, chargers and customisations.
In Australia, all electrical work must be performed by a qualified electrician. The installation was straightforward with a couple of screws and wire crimps. A neutral cable was also required.
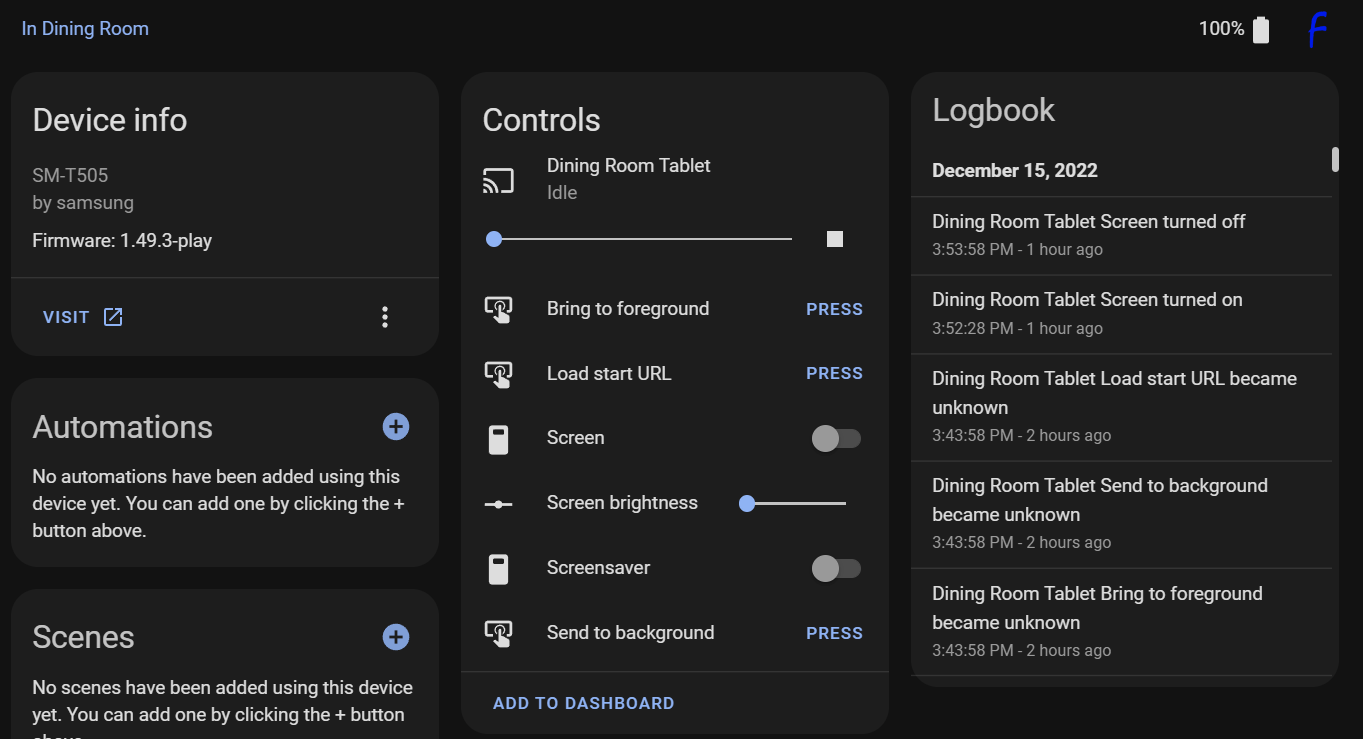
The tablets were installed in Foyer near the front door, in the Dining Room (open floor plan) and by the stairs on the 2nd floor.
Fully Kiosk Browser
To display the dashboards on the tablet, instead of the Home Assistant app or a web browser, I used an app called Fully Kiosk Browser. Fully Kiosk Browser uses the Android Webview to display the dashboard but goes beyond with extra features such as:
- Enabling 'kiosk' mode by disabling common browser features such as history, back buttons, address bars, etc.
- Auto reloading on idle, network reconnects and page load errors
- Fullscreen mode with no system bars
- Autostarting on boot and returning to the app to the foreground after inactivity
- Screen on when the front camera detects motion and turns off on idle. Can also detect faces but I found it buggy.
- Bypasses the lock screen
- Remote control and administration over LAN

It also has an official Home Assistant integration to further integrate its sensors into automations.
Automations
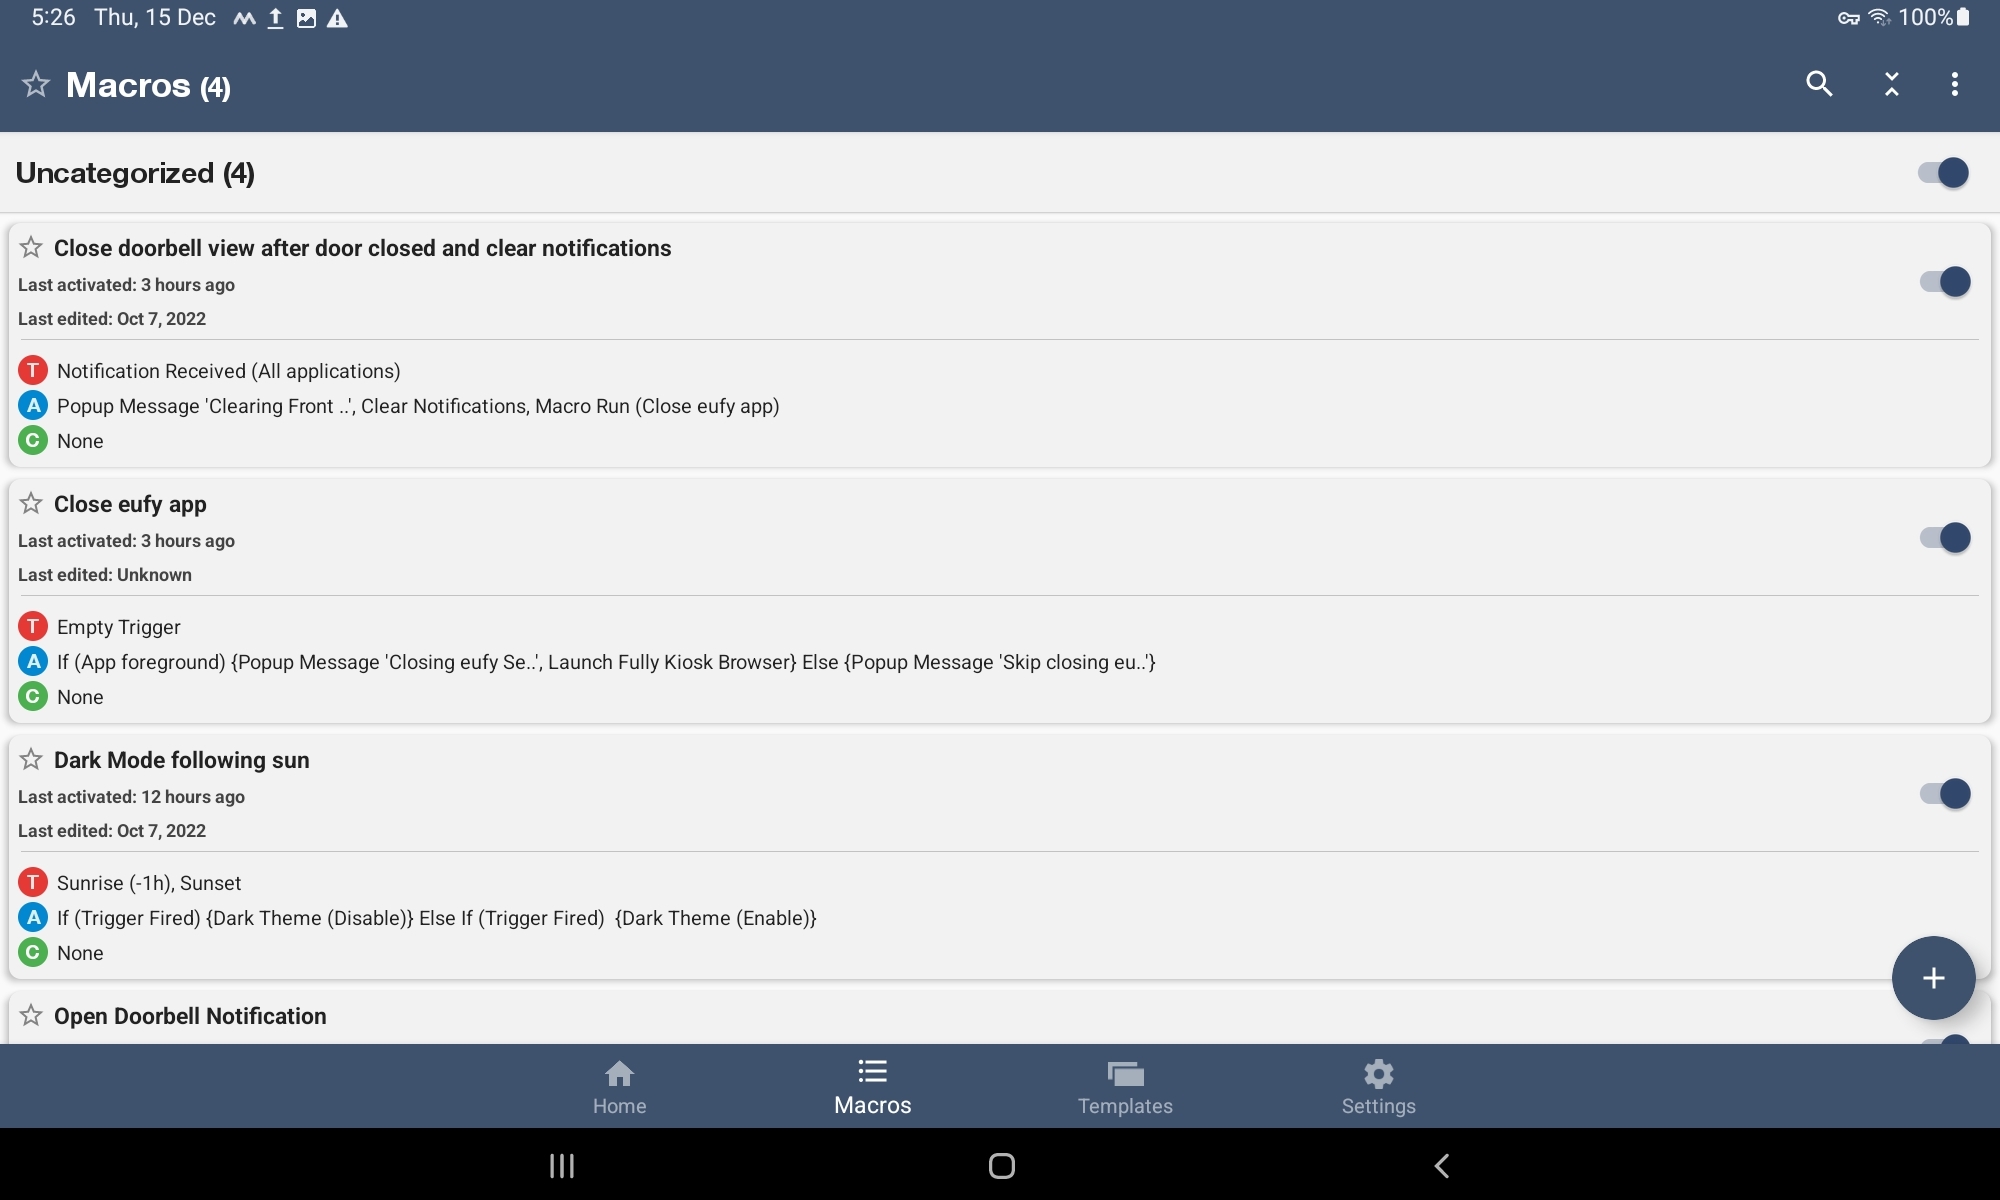
To run automations on the tablet, I'm using MacroDroid. These are simple tasks such as:
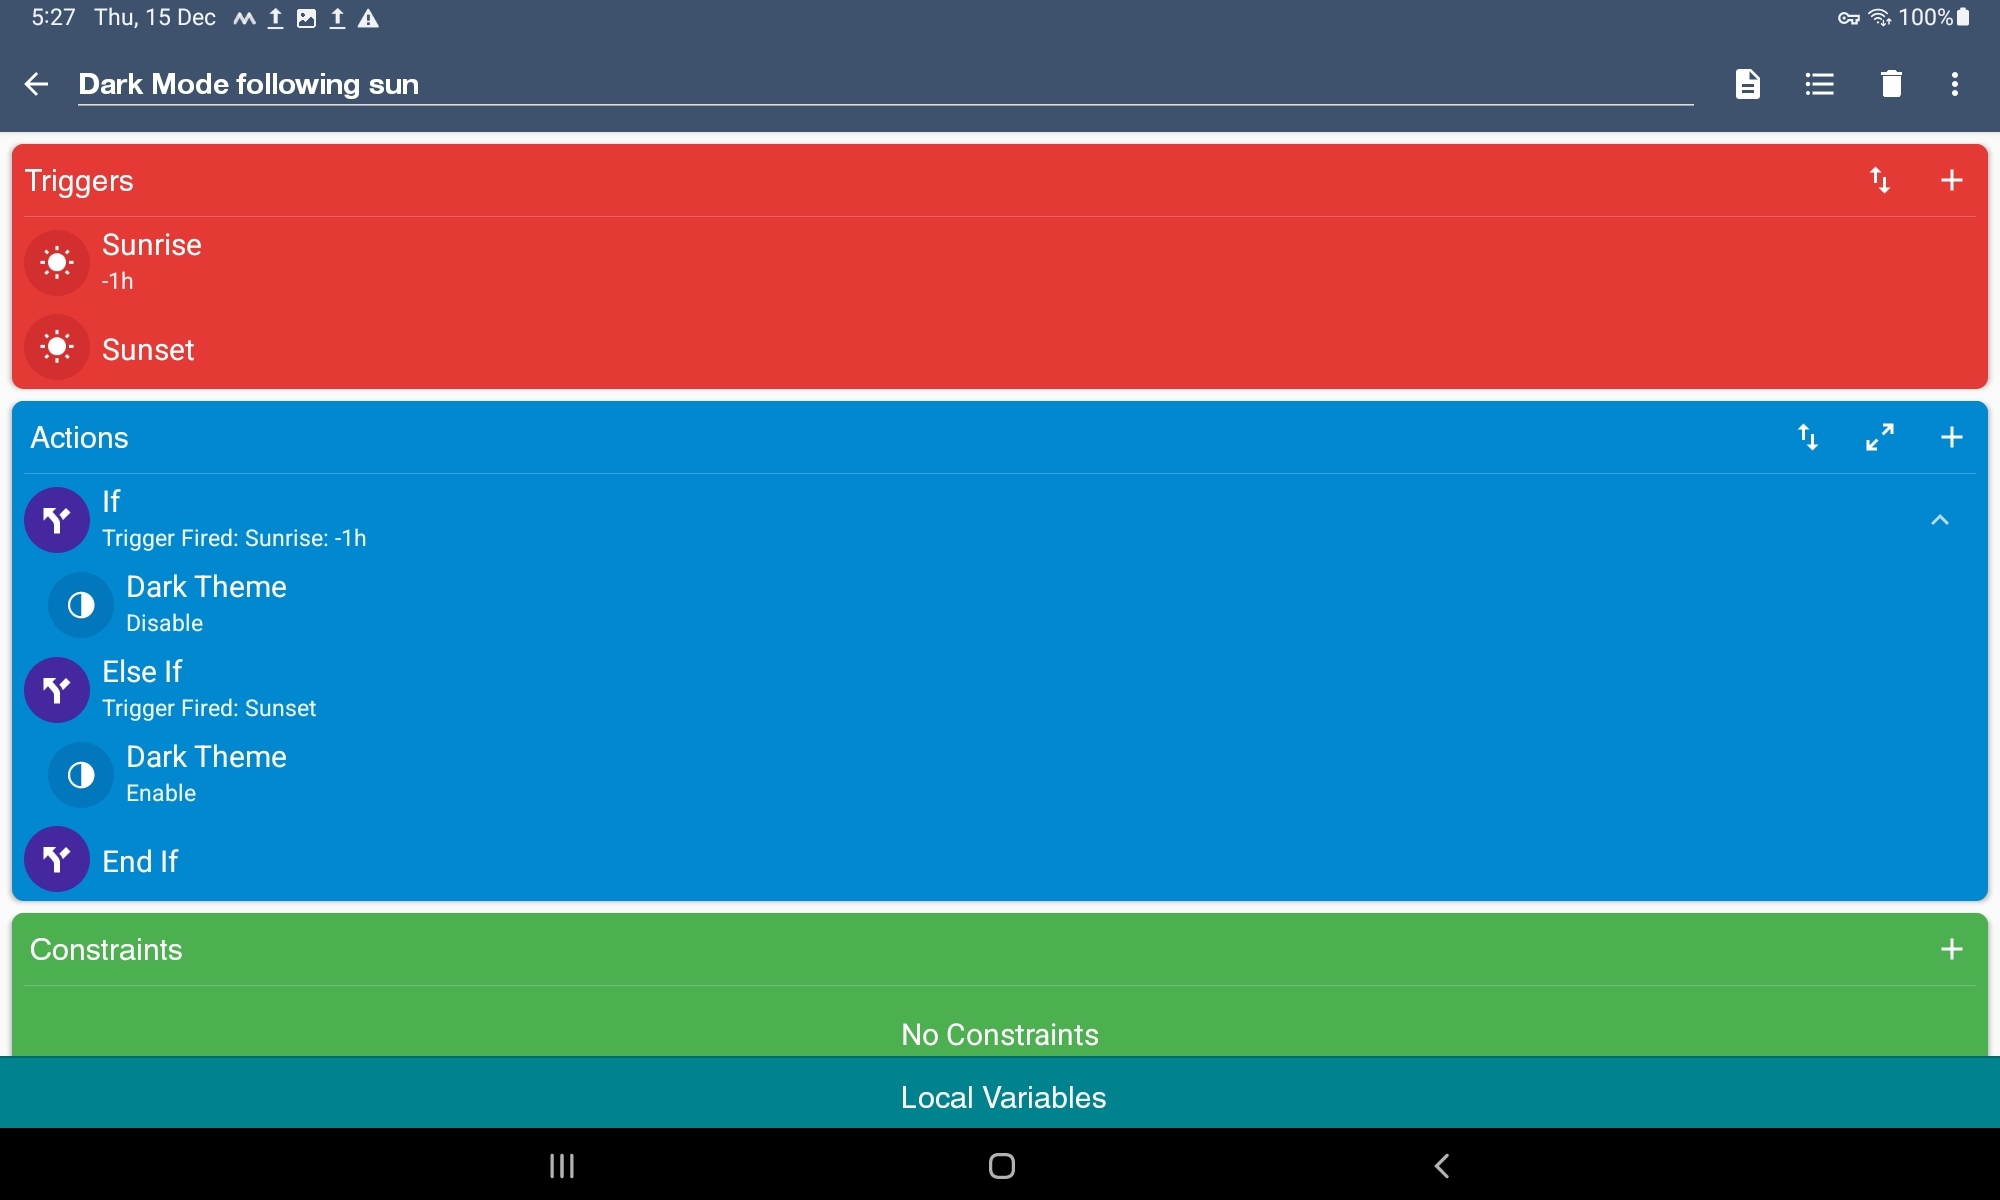
- Enable or disable Dark mode based on the time of day. This also affects the dashboard.
- Tapping on the notification when someone rings the Doorbell to open the Eufy app. The Eufy integration within Home Assistant is too slow and buggy for me.
- Closing the Eufy app after the door is opened, and clearing its notifications.
Tasker is another popular option, but it was having trouble recognising the doorbell notifications.
Disabling Bloat
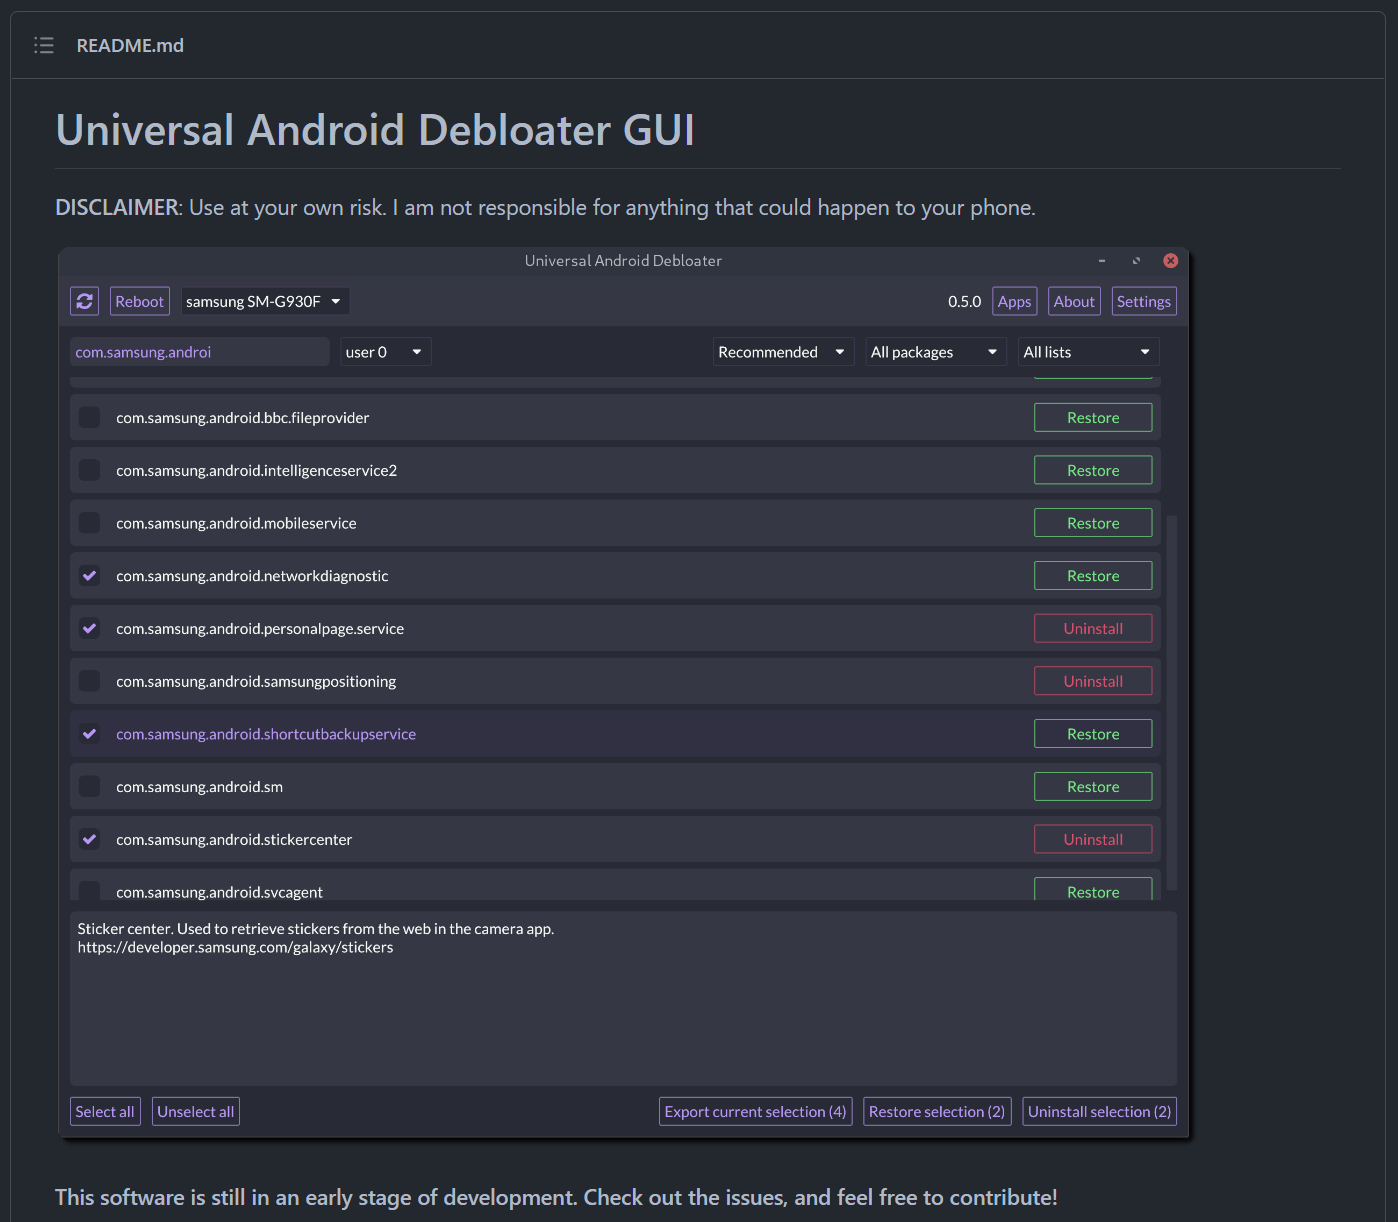
It's no surprise that Android devices come with bloat. I used Universal Android Debloater GUI to disable packages that were constant background services, periodically running or used any resources unnecessarily.
I curated this list by investigating the following:
- Adguard's network usage and request count per app
Settings>Battery and device care>MemorySettings>Developer options>Running servicesSettings>Developer options>Memory
To be extra careful, I ticked the Clear and disable packages instead of uninstalling them option under Settings.
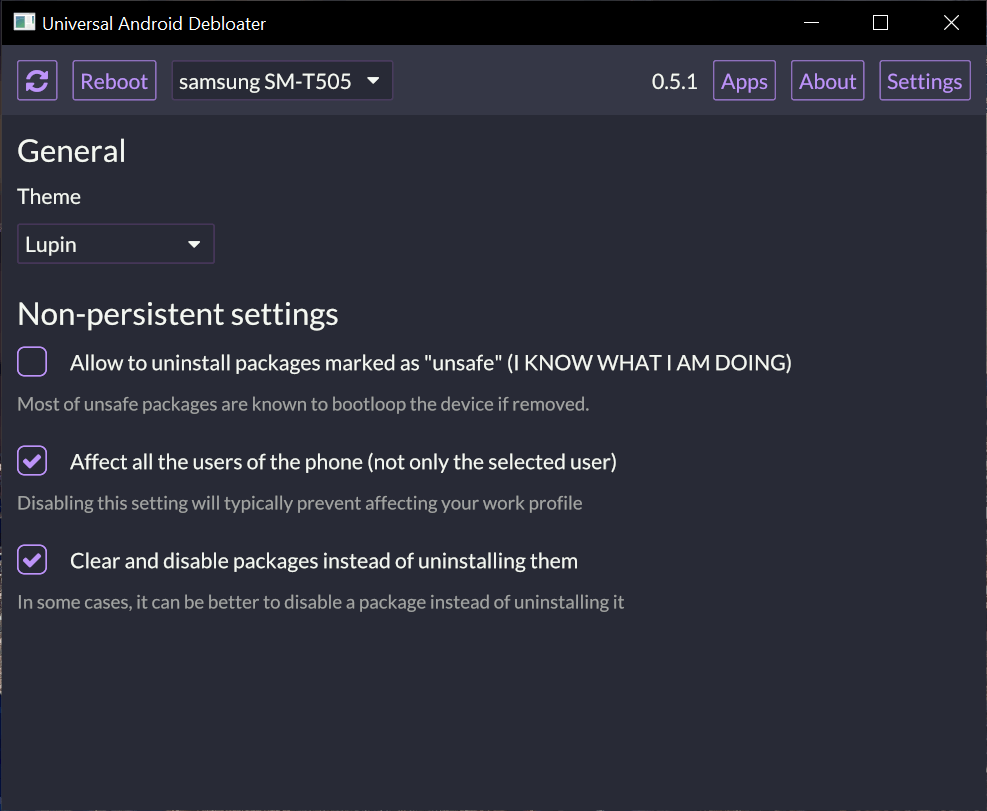
I was able to gain around 350 MB of RAM by disabling this list of applications:
- Application Recommendations (
com.samsung.android.mapsagent) - BBCAgent (
com.samsung.android.bbc.bbcagent) - Calendar (
com.samsung.android.calendar) - Calendar storage (
com.android.providers.calendar) - Call & Text on other devices (
com.samsung.android.mdecservice) - ClipboardSaveService (
com.samsung.clipboardsaveservice) - Configuration update (
com.samsung.android.sdm.config) - Continuity Service (
com.samsung.android.mcfds) - Customisation Service (
com.samsung.android.rubin.app) - Device security (
com.samsung.android.sm.devicesecurity) - DiagMonAgent (
com.sec.android.diagmonagent) - Digital Wellbeing (
com.samsung.android.forest) - FaceService (
com.samsung.faceservice) - Find My Mobile (
com.samsung.android.fmm) - Galaxy Themes Service (
com.samsung.android.themecenter) - Game Optimizing Service (
com.samsung.android.game.gos) - Google Calendar Sync (
com.google.android.syncadapters.calendar) - Group sharing (
com.samsung.android.mobileservice) - HandwritingService (
com.samsung.android.sdk.handwriting) - IPService (
com.samsung.ipservice) - KLMS Agent (
com.samsung.klmsagent) - Nearby Device Scanning (
com.samsung.android.beaconmanager) - Samsung account (
com.osp.app.signin) - Samsung Push Service (
com.sec.spp.push) - Smart View (
com.samsung.android.smartmirroring) - SoundAlive (
com.sec.android.app.soundalive)
Finally, other options I changed within the settings:
- Disabled Bluetooth (Under
Connections) - Disabled Nearby Device Scanning (Under
Connections>More connection settings) - Disabled Location (Under
Location) - Enabled Battery Protection to only charge up to 85% (Under
Battery and device care>Battery>More battery settings)
Updates (2024)
Sharing updates I've made to my dashboards.
On the Solar page, I've added Previous and Next buttons to change the time range of the graph.
On the Security page, I've added the a live feed of the doorbell with two-way audio. This page opens automatically whenever the doorbell is rang.
I've created a new gardening page, which I will touch on later in another blog post.