
Now that our pfSense installation is set up and working, we will have to wrap up our installation with a few necessities such as VMware Tools. You can find follow along our installation in Part 1, Part 2 and Part 3.
Part 4: Necessities and Wrap-up
Install Native VMWare Tools for pfSense
VMware Tools are available for FreeBSD, if you selected it as the virtual machine's operating system. VMware Tools are important for increasing performance by allowing it to interact better with its hypervisor. It is extremely important in pfSense because it offers 10Gbp network cards via the vmxnet3 driver.
Ensure your pfSense can access the internet.
1. Access the pfSense shell
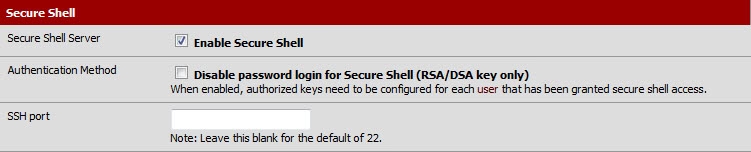
Either through the console (option number 8) or by enabling Secure Shell (SSH) within 'System -> Advanced'. Connect to pfSense via any SSH utility you have if you prefer SSH (e.g. Putty).
Enable SSH in within the pfSense web interface via 'System -> Advanced'.:
2. Enable downloading of packages
pfSense by default prevents you from downloading packages for good reason, it could break your firewall! The safest thing to do would be to build the packages on a separate system and copy them over to pfSense. But if you insist to be able to install packages straight from the pfSense shell (like me) there is a simple workaround.
First you will need to change where pfSense gets its packages from. As of this post, pfSense 2.1.4 is based off FreeBSD 8.3-RELEASE-p16. Find the URL that fits your version. Run the follow commands in the shell: For 64 bit:
setenv PACKAGESITE "http://ftpmirror.your.org/pub/FreeBSD-Unofficial-Packages/83amd64-default/Latest/"For 32 bit:
setenv PACKAGESITE "http://ftpmirror.your.org/pub/FreeBSD-Unofficial-Packages/83i386-default/Latest/"Once the package site has been set, install 'perl'
pkg_add -rv perlFinally install the compatibility library for your version of pfSense
For 64 bit:
pkg_add -rv compat6x-amd64For 32 bit:
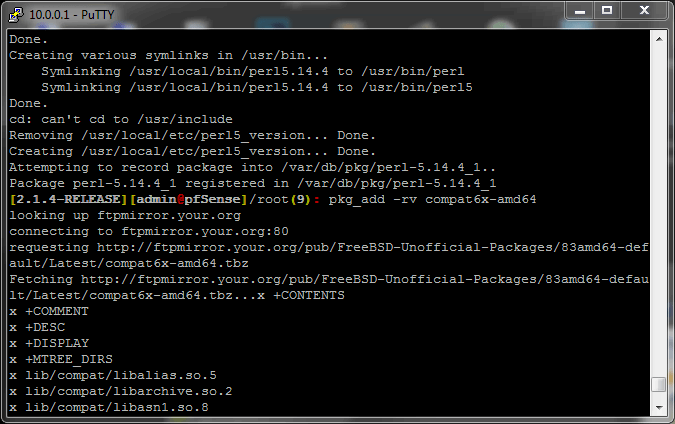
pkg_add -rv compat6x-i386Use Putty to SSH into pfSense. Putty makes it easier to copy and paste code instead of typing it which almost always leads to spelling mistakes.:
3. Load VMware Tools into pfSense
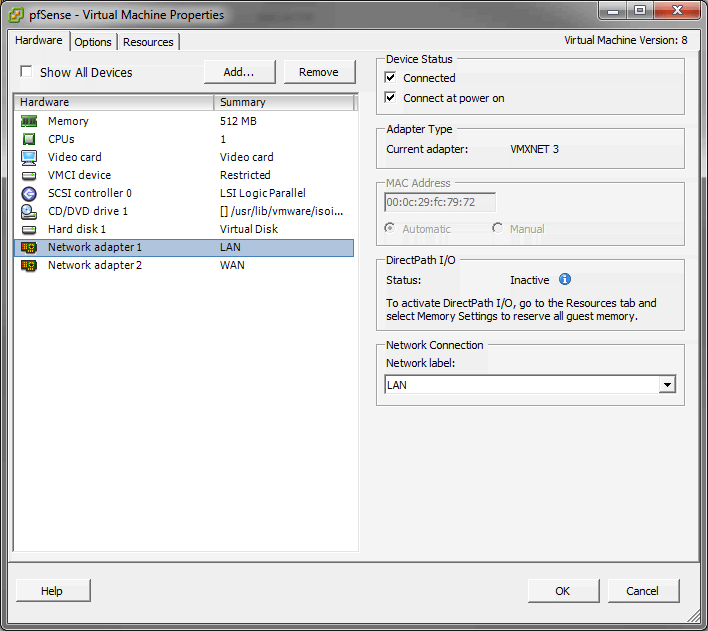
Open the vSphere Client and connect to your ESXi host. Locate your pfSense VM and ensure the Guest OS matches FreeBSD (32 or 64 bit depending on your version). This lets ESXi know which VMware Tools package to provide it with.
I am running the 64 bit version of pfSense. This lets VMware know which version of VMware Tools to install.:
Open a console to the pfSense virtual machine and click: 'VM -> Guest -> Install/Upgrade VMware Tools'
or if you are in VMware workstation: 'VM -> Install VMware Tools'
4. Mount and install VMware Tools
Run the following line by line to mount the the VMware Tools disk, unpack its contents and install i:
mount -t cd9660 /dev/acd0 /mnt/
cd /tmp
tar xvzf /mnt/vmware-freebsd-tools.tar.gz
cd vmware-tools-distrib/
./vmware-install.pl -d
If it fails to install the first time, run the final line again for a reinstall.
Remove the leftovers after the installation:
rm -f /etc/vmware-tools/not_configured5. Set VMware Tools to start on boot
A script is required to add the compat6x library to boot time or VMware tools will not start properly. Enter these lines into the shell:
echo '#!/bin/sh' > /usr/local/etc/rc.d/000-ldconfig.sh
echo '/sbin/ldconfig -m /usr/local/lib/compat' >> /usr/local/etc/rc.d/000-ldconfig.sh
echo '/usr/local/etc/rc.d/vmware-tools.sh restart' >> /usr/local/etc/rc.d/000-ldconfig.sh
echo '/usr/local/bin/vmware-config-tools.pl -d' >> /usr/local/etc/rc.d/000-ldconfig.sh
chmod a+x /usr/local/etc/rc.d/000-ldconfig.sh
As bad as this is script is, it seems to fix the problem where the vSphere Client says it is not running even though everythng else says it is (terminal commands, guest VM options, VMXNET3 working). VMware Tools also does not start because it wants to run through setup again. Hopefully this fixes all of that.
6. Add the VMXNET3 network cards
Shutdown the VM either through the shell (type exit then choose option 6) and add the VMXNET3 NICs as desired to replace your WAN and LAN network cards.
You have to shutdown the virtual machine first before removing and adding network adapters. Make sure the adapter type is VMXNET3. Note the MAC addresses as well.:
7. Configure the VMXNET3 network adapters
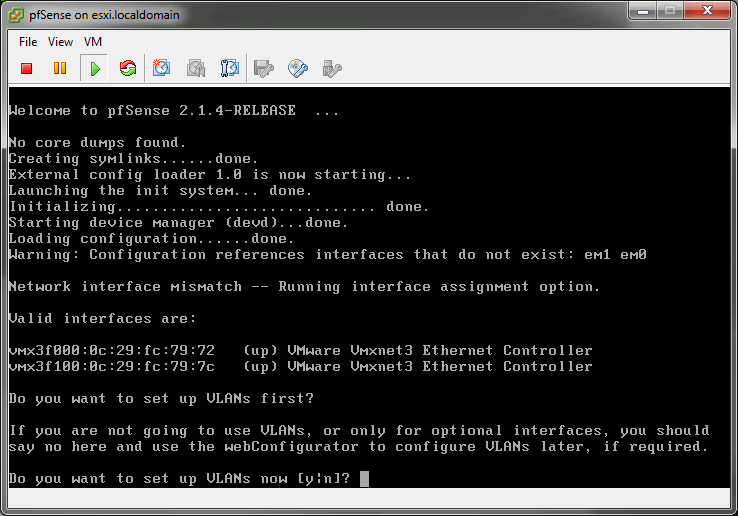
Power on the VM and pfSense will alert you to set the interfaces once again. It you did everything correctly, they should show up as 'VMware Vmxnet3 Ethernet Controller'.
NOTE THEM DOWN BEFORE PFSENSE SCROLLS!
pfSense will notify you there is a network interface mismatch by swapping the network cards.:
You will have to enter vmx3f0 or vmx3f1 depending on the interface (not the entire name). Make sure you link the correct network adapter to the correct interface. Check the MAC addresses like we did in Part 2.
Specify the network adapter which has been allocated for both your WAN and LAN. They will be either vmx3f0 or vmx3f1.:
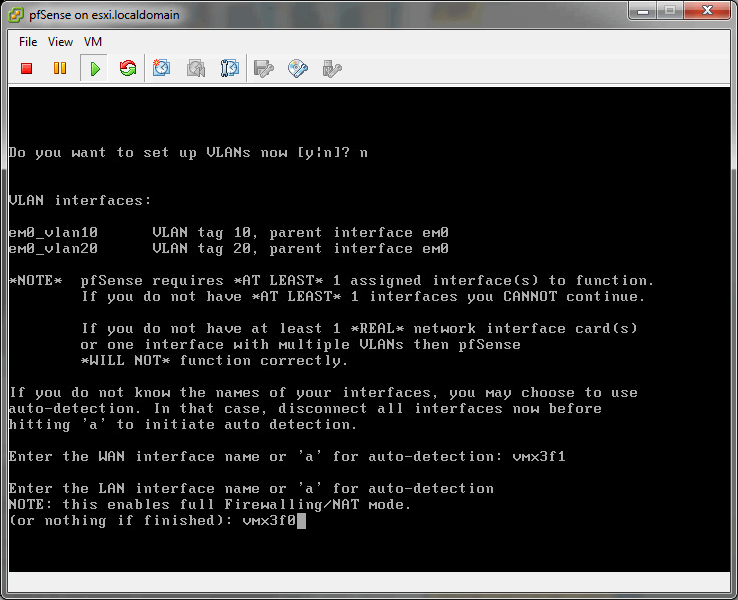
Link the MAC addresses to the VM's settings if you are unsure which is the LAN and WAN.
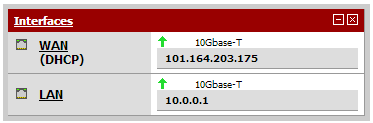
8. Make sure everything is working!
VMware Tools should be successfully installed natively on pfSense
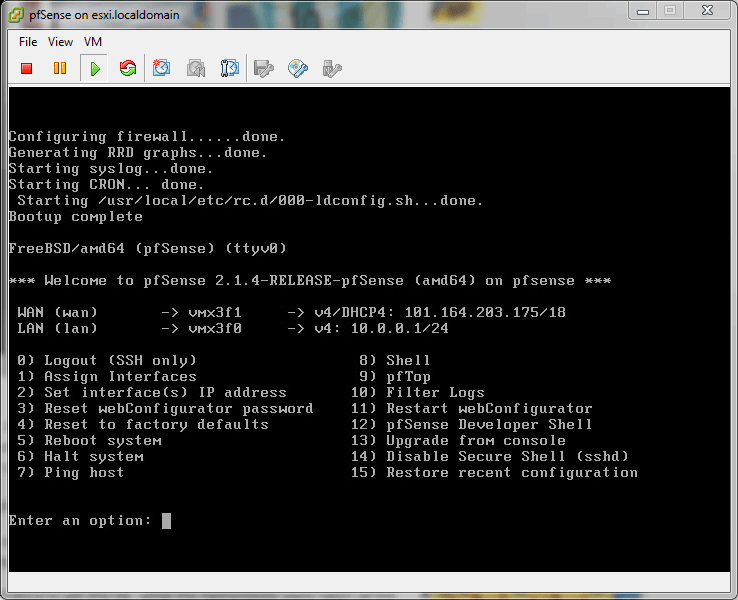
When finished, pfSense will return to its usual screen retaining all your previous changes and IP addresses.:
10Gbps networking!:
Credits:
Give ESXi a static IP
You wont be able to access your ESXi box through the vSphere Client as ESXi would not have a working IP address at this moment. It is best to give it a STATIC address over a DYNAMIC (DHCP) address as pfSense is a VM which starts after ESXi boots up. Therefore ESXi would not be able to obtain an address from DHCP and you would not be able to connect to it.
1. Access your ESXi box however you can
Either by a physical monitor and keyboard, KVM or IPMI (which may not work as it also needs its own IP address. Simply unplug and replug it to refresh its IP and find it under DHCP Leases in pfSense.)
2. Hit F2 and log in
Provide your ESXi credentials, typically the username is 'root'
3. Configure the management network
Select 'Configure Management Network' then 'IP Configuration'.
4. Enter your new details
Highlight the radio and press space to select static. Enter an IP address that is not within the DHCP range you have specified in pfSense.
Set pfSense to start up with ESXi.:

5. Restart the network configuration
Return to the main screen and restart when your management network when prompted. You should now be able to connect to it from the vSphere client through its new and static IP address.
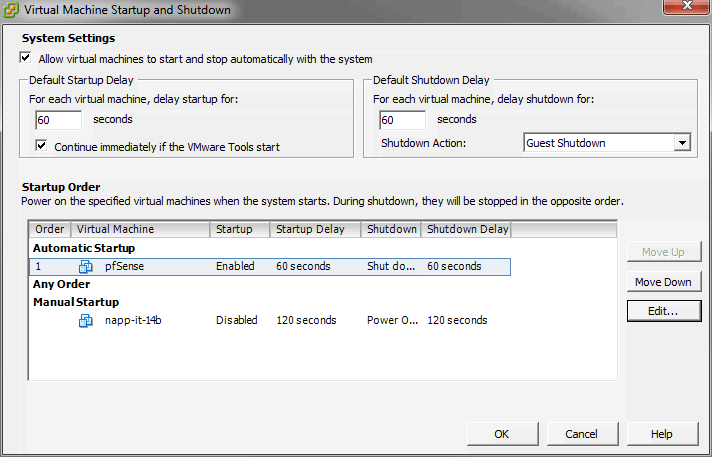
Make pfSense auto-start with ESXi
If pfSense is now your router, it is very important to auto-start it with ESXi.
- Open the vSphere Client and connect to ESXi
- Select your host and click on the 'Configuration' tab
- Select 'Virtual Machine Startup/Shutdown' and click on 'Properties...' in the top right corner.
- Select the VM and click 'Move Up' until it reaches Automatic Startup. Adjust the delay if necessary. Click 'OK' when done.
Ensure all the details are correct.:
Ending thoughts
Our installation may be finished but pfSense offers many more features than such a router, firewall, DNS and DHCP server. In the future I will cover a range of popular features, packages and guides for pfSense that I feel aren't covered well enough.
- pfSense is now your router, it must be on and running to get a connection to the Internet
- Don't put your server into maintenance mode, ESXi will never start pfSense and you wont be able to access it without plugging and unplugging a bunch of things to be able to access the vSphere client and exit maintenance mode.
- Make regular back ups of the pfSense VM. One wrong move and your network will collapse.
- Always give static addresses to important infrastructure like ESXi, IPMI, IMM, Switches, Modems and of course, pfSense.