
Oracle Cloud Infrastructure (OCI) provide a very generous free tier that is capable of running a highly available Kubernetes cluster.
Preface
Back in August, I wanted to try out Tailscale, a mesh VPN built on WireGuard. Unfortunately, they didn't use traditional username/password logins. Instead, it required an identity provider, such as Google, Microsoft, GitHub, Apple, or OIDC. My first instinct was to use my own OIDC (Authelia), but that created a paradox; if I'm not home and the server fails, my OIDC fails too, locking me out of the VPN I would need to fix it.
Free Tier Resources
OCI accounts, whether free or paid, have a set of resources that are free of charge in the home region of the tenancy, for the life of the account. Using the Always Free resources, you can provision a virtual machine (VM) instance, the networking, load balancing, and storage resources needed to support the applications that you want to build. With these resources, you can run a small-scale Kubernetes cluster. The search for this solution led me to discover the generous free tier from Oracle Cloud for hosting.
OCI Kubernetes Engine (OKE)
OCI Kubernetes Engine (OKE) is the managed Kubernetes service provided by Oracle, similar to GKE/AKS/EKS provided by the other major cloud providers. With a managed Kubernetes service, the control plane is handled by the cloud provider while the user manages the nodes and pods.
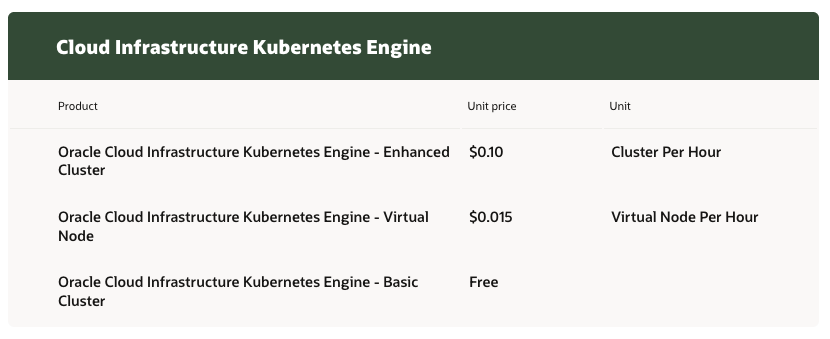
OKE provides basic and enhanced clusters. From the pricing page, a basic cluster is free of charge, while enhanced clusters are $0.10 per hour. The differences between them are covered in the OCI docs.
Compute
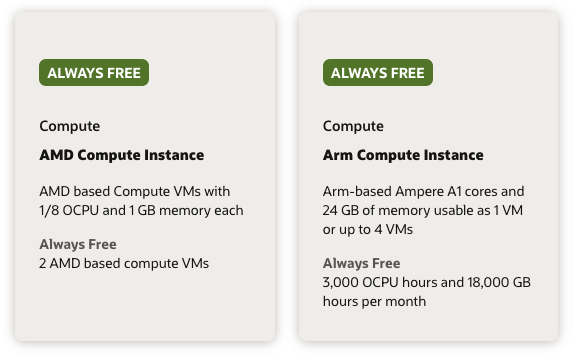
Two compute instances shapes are listed as always free:
- 2 x
VM.Standard.E2.1.Micro: AMD 1/8 OCPU and 1 GB memory - 1 to 4 x
VM.Standard.A1.Flex: ARM Ampere A1 cores and 24 GB of memory
The AMD instances are too small and not supported by OKE anyway. The ARM instances, however, provide a total of 4 ARM vCPUs and 24 GB RAM that can be split across 1 to 4 instances. It makes the most sense to either do two (2 CPU/12 GB) or four (1 CPU/6 GB) nodes within Kubernetes for high availability and even distribution of resources.
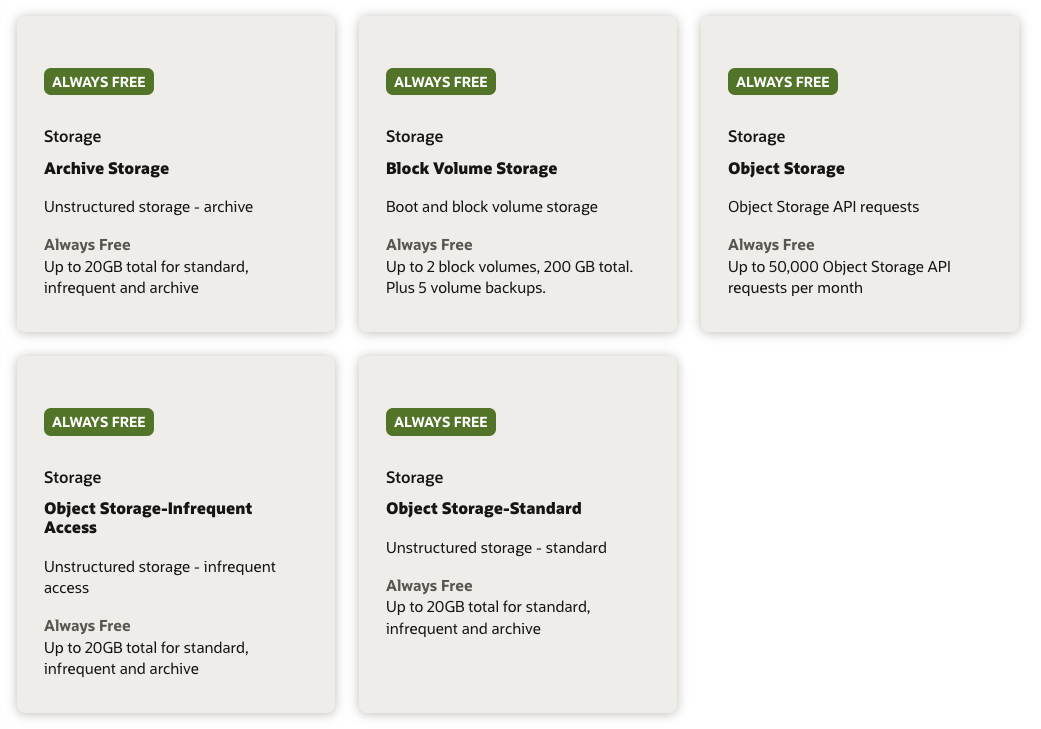
Storage
Up to 2 block volumes, 200 GB total is included in the Always Free resources. Furthermore, 20 GB of object storage is also included.
The 200 GB total applies to both boot volumes (50 GB minimum) and block volumes combined.
The "up to 2 block volumes" limit refers to additional block volumes, not including the boot volumes that are required for the compute instances. With a managed Kubernetes service, each PersistentVolume creates its own cloud-backed block volume, which could easily take it over the limit. This can be overcome by maximising the boot volume (i.e. 100 GB for two instances) and using Ceph/Rook, OpenEBS or Longhorn (see below) to use it as a PersistentVolume.
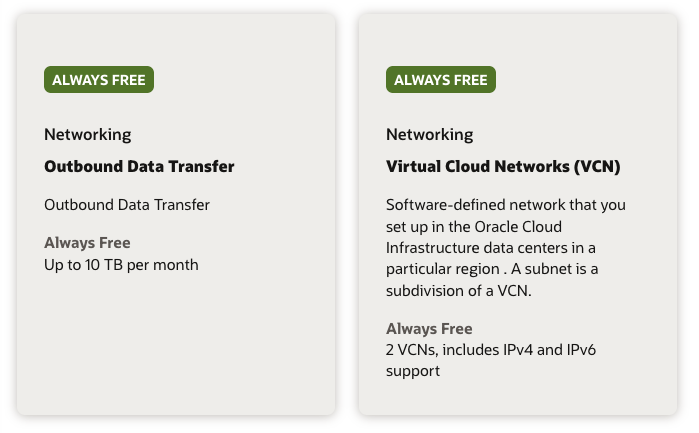
Networking
Two Virtual Cloud Networks (VCNs) can be created in the Always Free tier. This includes all its associated resources such as Subnets (unlimited), NAT Gateways (1), Service Gateways (1), Internet Gateways (1) and Security Lists (5).
Data ingress is free, like all other cloud providers. Data egress is free for the first 10 TB each month. This is practically unlimited for the vast majority of users, equivalent to ~333 GB per day or over 800 hours of 4K video each month.
Unfortunately, there is only a single Availability Domain for most OCI regions. The entire region operates as a single large data centre, but with multiple Fault Domains.
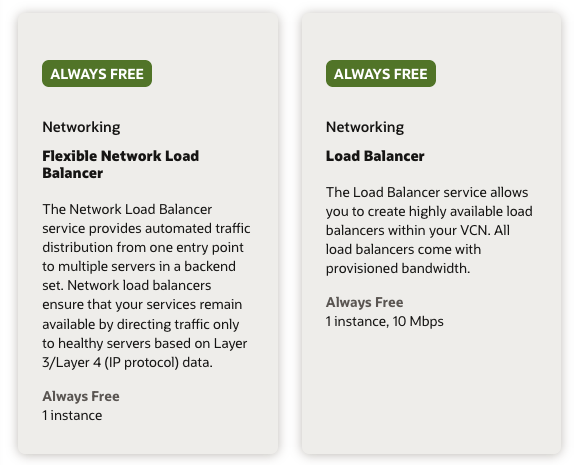
Load Balancer
One Flexible Network Load Balancer (L3/L4) and one regular Load Balancer (L4/L7) are provided in the Always Free tier.
Managed Kubernetes services often create a new load balancer for each ingress/gateway. Using a controller like ingress-nginx or Traefik (see below) routes everything through a Service with type LoadBalancer, which only requires a single resource.
Terraform/OpenTofu
The Terraform/OpenTofu code for the examples below can be found in my GitHub repo calvinbui/infra.
Budget Alerts
Launching the ARM instances with a free account is a hassle as the compute is in high demand, leading to an "Out of Host Capacity" error. I upgraded my account to Pay As You Go to get the instances to launch, but this meant I could be charged if resources went over the Always Free limits.
The code for this can be found in my GitHub repo calvinbui/infra.
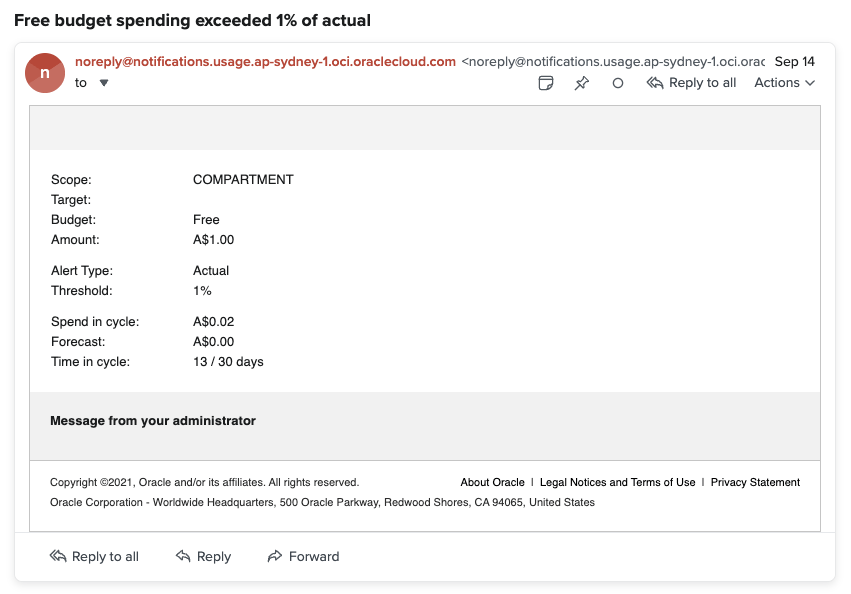
To be cautious, I created a $1 budget and two 1% alert rules to be notified whenever the account begins accruing costs.
- Budget: oci_budget_budget
- Budget Alert Rule: oci_budget_alert_rule
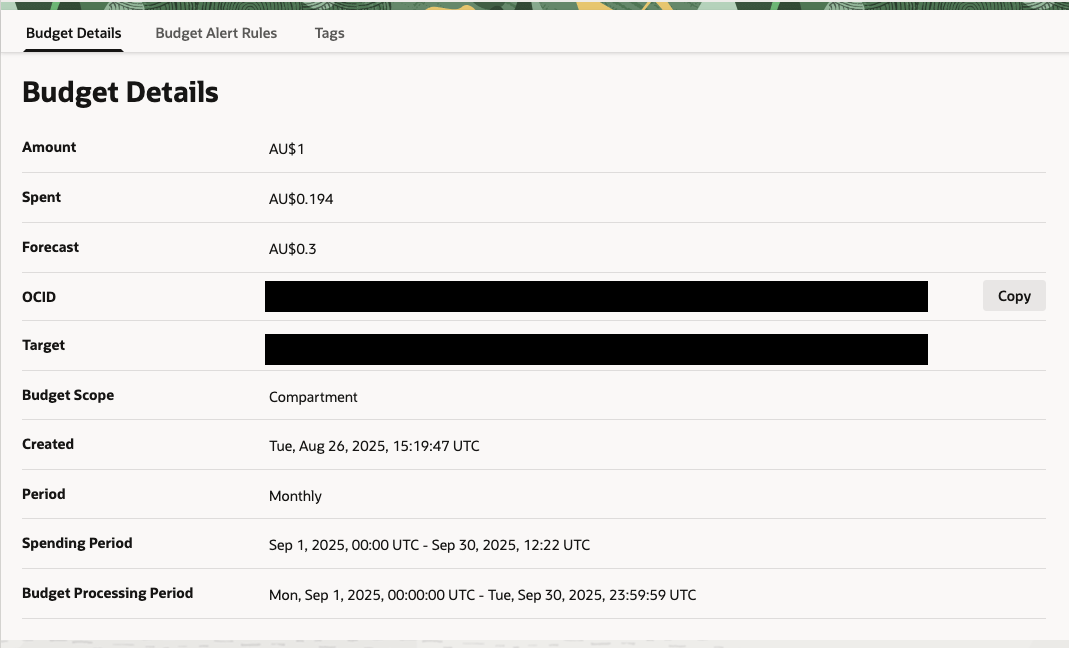
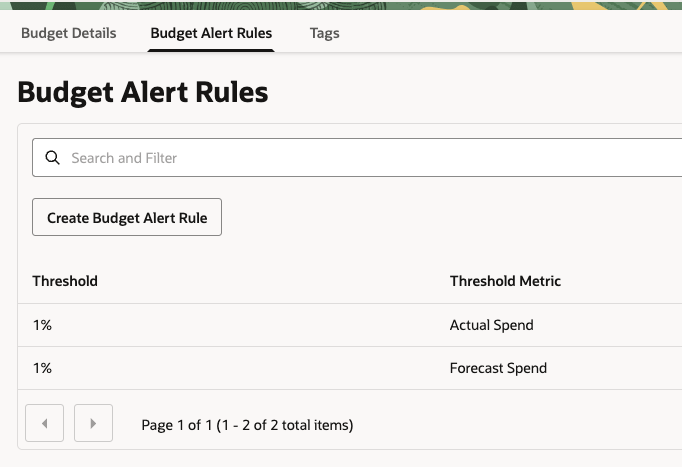
This has already saved me when I recreated my ingress-nginx controller, but for some reason, it didn't delete the orphaned Network Load Balancer.
OKE
Here's my attempt at a draw.io diagram to show all the free resources used to run a Kubernetes cluster in OCI:
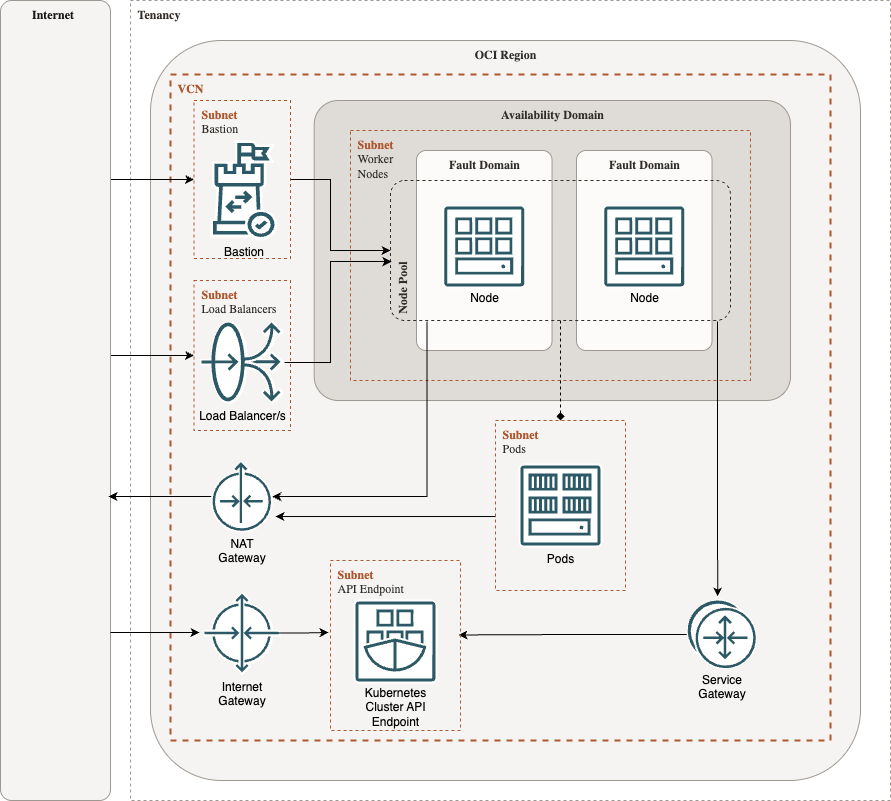
These are the resources required (in order):
- Virtual Cloud Network (VCN) (oci_core_vcn): software-defined network.
- Route Tables (oci_core_route_table): specify how traffic should be routed.
- Security Lists (oci_core_security_list): allow ingress/egress to and from the cluster and nodes.
- Subnets (oci_core_subnet): subdivisions of the VCN, ideally divided into public and private.
- NAT Gateway (oci_core_nat_gateway): internet access for resources in the private subnet (i.e. nodes)
- Service Gateway (oci_core_service_gateway): allows the nodes and control plane to interact privately.
- Internet Gateway (oci_core_internet_gateway): allows access from the internet to resources in the public subnet (i.e. control plane and load balancers).
- Cluster (oci_containerengine_cluster): OKE cluster.
- Node Pool (oci_containerengine_node_pool): OKE node pool.
- Bastion (oci_bastion_bastion): I've included a Bastion host for secure and public access to the node pools. It is also a free-tier resource.
The code for this can be found in my GitHub repo calvinbui/infra.
Applications
After setting up the free cluster, my priorities changed. I no longer needed it for Tailscale. Instead, I identified two new, better uses for it.
- Host a status page to keep users of my Plex, Immich and Bitwarden instances informed about uptime and maintenance.
- The clusters I use at work are stable and robust, but that also means they're less dynamic. This cluster is a place for experimentation and pushing beyond my daily work.
Beyond the usual deployments of external-dns, cert-manager, metrics-server and descheduler, these are the applications I've experimented with and will continue using.
The code for my Kubernetes deployments can be found in my GitHub repo calvinbui/k8s.
Flux, Kustomize & SOPS
I experimented with a couple of deployment methods tools (like Helmfile), and landed on a combination of Flux, Kustomize and SOPS.
- Flux is a continuous delivery tool to automate deployments. It's primarily a GitOps tool, but I'm using it in Gitless mode primarily for its Helm Controller.
- Kustomize is a Kubernetes native configuration management tool. It's made for layering environment-specific changes on top of a common set of base YAML files. I use it to group all my manifest files together in a deployment (i.e. namespace, helm release, CRDs, etc.)
- SOPS (Secrets OPerationS) is an editor that encrypts values directly in YAML files, so they can be safely stored in Git. Sensitive values are encrypted with age, a modern alternative to PGP/GPG. With SOPS, I encrypt secret tokens and domain names.
This combination creates a streamlined and secure deployment workflow with these benefits:
- Gitless and CLI-driven: No GitOps required. Everything is initiated from the command line, and the feedback loop is almost instant.
- One command (
kustomize build --enable-alpha-plugins --enable-exec . | kubectl apply -f -): Not the prettiest command, but it can be made into an alias. All applications are deployed in the same consistent way, instead of using different tools. I wanted to approach this like only having to useansible-playbookfor running Ansible Playbooks. - Deploy Helm Charts and regular manifests: Uses regular YAML files to deploy resources as well as Helm charts using the Flux
HelmReleaseCRD. All deployments are consistent and packaged using Kustomize. - Standard CLI tools (
kubectlandkustomize): Kubernetes native and cross-platform.kubectlis the universal language of Kubernetes, andkustomizeis now built intokubectlas well. This ensures long-term compatibility and avoids vendor-specific tools or complex plugins. - Code is public and open source: With SOPS handling the encryption, my code can be made public like all my other repos, such as this website, Ansible playbooks and Terraform/OpenTofu infrastructure.
To deploy a new application, these are the steps I perform, using cert-manager as an example. The example below can be found in my GitHub repo calvinbui/k8s.
Start by creating a new folder with the name of the application and a namespace file if required.
namespace.yaml
 ---

 apiVersion: v1
 kind: Namespace
 metadata:
   name: cert-manager
Create a Flux OCIRepository or HelmRepository resource depending on how the Helm chart is distributed. Flux's Source Controller will fetch the chart to be used for the Helm release.
oci-repository.yaml
 ---

 apiVersion: source.toolkit.fluxcd.io/v1
 kind: OCIRepository
 metadata:
   name: cert-manager
 spec:
   interval: 24h
   url: oci://quay.io/jetstack/charts/cert-manager
   ref:
     tag: v1.18.2
   layerSelector:
     mediaType: application/vnd.cncf.helm.chart.content.v1.tar+gzip
Create the HelmRelease to install the Helm chart. It references the previously created OCIRepository as its source. The chart version and values can also be provided.
helm-release.yaml
 ---

 apiVersion: helm.toolkit.fluxcd.io/v2
 kind: HelmRelease
 metadata:
   name: cert-manager
 spec:
   interval: 5s
   chartRef:
     kind: OCIRepository
     name: cert-manager
   values:
     crds:
       enabled: true

     prometheus:
       enabled: false

     config:
       enableGatewayAPI: true
To use cert-manager, a ClusterIssuer is required. It is a CRD resource that can be written in YAML and similarly deployed using this method.
clusterissuer.yaml
 ---

 apiVersion: cert-manager.io/v1
 kind: ClusterIssuer
 metadata:
   name: letsencrypt
 spec:
   acme:
     server: https://acme-v02.api.letsencrypt.org/directory
     privateKeySecretRef:
       name: cert-manager-letsencrypt
     solvers:
- dns01:
           cloudflare:
             apiTokenSecretRef:
               name: cert-manager-cloudflare-token
               key: apiToken
The ClusterIssuer references a Kubernetes secret. This is when SOPS comes in. At the top level of my repo, I have a .sops.yaml file which contains the public key and what keys to encrypt.
.sops.yaml
 ---

 creation_rules:
-
     path_regex: '.*\.ya?ml$'
     age: "age1abcdefghijklmnopqrstuvwxyz"
     encrypted_regex: "^(data)$"
Next, create the secret file. I like to suffix it with .sops.yaml to indicate that it's an encrypted file.
secret-cloudflare-token.sops.yaml
   ---

   apiVersion: v1
   kind: Secret
   metadata:
     name: cert-manager-cloudflare-token
   type: Opaque
   data:
     apiToken: c2VjcmV0Cg==
Afterwards, I encrypt the file by running sops -e -i secret-cloudflare-token.sops.yaml. Afterwards, if there are any changes I want to make to it, I use sops secret-cloudflare-token.sops.yaml to edit the file instead of decrypting first and encrypting it again afterwards.
encrypted secret-cloudflare-token.sops.yaml
   ---

   apiVersion: v1
   kind: Secret
   metadata:
     name: cert-manager-cloudflare-token
   type: Opaque
   data:
     apiToken: ENC[AES256_GCM,data:jbQMtl0H+55Tt12fFvYHvppn5I0QFyiSQqbmPDgWECwRoI8T8eNoqU9IxyuZ7EwB70/Rl48S2=,iv:FVdDMIpi4a+8I6IIgnwbkUHLYB+Gp+ZH70kwLu6MVcU=,tag:BWC12irGO3zuVfhKUeNHRw==,type:str]
   sops:
     age:
- recipient: age1abcdefghijklmnopqrstuvwxyz
         enc: |
-----BEGIN AGE ENCRYPTED FILE-----
321SlLWVuY3J5cHRpb24ub3JnL3YxCi0+IFgyNTUxOSB2M1BHc3dEaW1WQnR1dVQ5
TjVDV1Q4bGNWRm92b05oMUFGa0M3YsasSVCmxtV0asdtZnBIL2ljcGNMM3M2cC9Y
NjcyU3VtUmFGRnl1NWtvWkIwMmJpMWMKlqCm0GPTVeqnkZ28zmUzF58iEVMrWECw
UOI/t0NNpO9G9HwuXynt/b2fjmTeA/dTlyLEGZi7NEZ5jRbEYMyUsQ==
-----END AGE ENCRYPTED FILE-----
     lastmodified: "2025-10-09T12:26:30Z"
     mac: ENC[AES256_GCM,data:Q76lczr/T1jM137TRwvCqYUZwRG8dG7lhieCgoUO0ez3d4QTVEi2/Te52s1Q94e2/FG1MR8QL2/lcenpJ6+3YckXsnGpLDIbbiX58ZxyZjBHg6CQ7f/fm+cKEKAvv9cV1e0bQROC7PRBEvYDY/MK9MM+vEliFmAJ/pwbX4U3irE=,iv:hjSncvBg4BhAT5tBHByNW7rlAYYxQ1qsHjxNXl82rQc=,tag:P14057IZpECFojUteImfqA==,type:str]
     encrypted_regex: ^(data|hostname)$
     version: 3.10.2
Kubernetes cannot decode SOPS files and won't let you apply an encrypted file either. To decrypt files for deployment, I use KSOPS, a Kustomize plugin by Viaduct. It acts as a generator to decrypt SOPS-encrypted files when running kustomize build.
secret-generator.yaml
   ---

   apiVersion: viaduct.ai/v1
   kind: ksops
   metadata:
     name: secret-generator
     annotations:
       config.kubernetes.io/function: |
exec:
path: ksops
   files:
- cloudflare-token.sops.yaml
The final file is the kustomization file, which packages all our other files together.
kustomization.yaml
 ---

 apiVersion: kustomize.config.k8s.io/v1beta1
 kind: Kustomization
 namespace: cert-manager
 generators:
- secret-generator.yaml
 resources:
- namespace.yaml
- helm.yaml
- cluster-issuer.yaml
To test everything works, I run kustomize build --enable-alpha-plugins --enable-exec . and check its output. To apply my changes, I pipe it to kubectl, which looks like:
$ kustomize build --enable-alpha-plugins --enable-exec . | kubectl apply -f -

namespace/cert-manager configured
secret/cert-manager-cloudflare-token configured
clusterissuer.cert-manager.io/letsencrypt configured
helmrelease.helm.toolkit.fluxcd.io/cert-manager configured
ocirepository.source.toolkit.fluxcd.io/cert-manager configured
Sometimes, the command will fail as CRDs may not exist yet. Wait a little bit and run the command again.
Longhorn
Longhorn is a cloud native distributed block storage for Kubernetes. It takes the boot volume of each node into highly available persistent storage. Data is synchronously replicated between nodes automatically to ensure that if one node fails, data is still immediately available from replicas on other healthy nodes, with no data loss.
The total available space is around 60GB. As previously mentioned, the free tier is limited to 200GB. Disk space is also reserved for the operating system and container images automatically by Longhorn. As data is replicated, this cuts the total in half again.
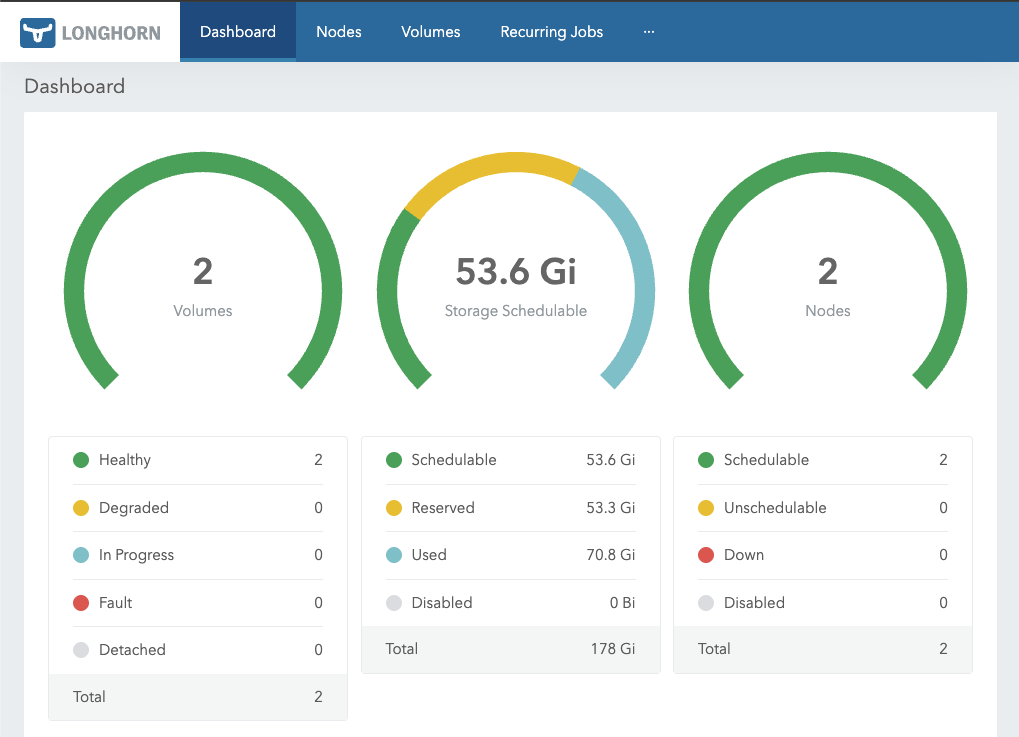
Total data loss is possible if both my nodes go down at the same time. The most critical rule is to never perform maintenance on multiple nodes simultaneously. Always upgrade nodes one by one, and before starting the next, wait for Longhorn to fully sync and rebuild the data replicas from other healthy nodes in the cluster.
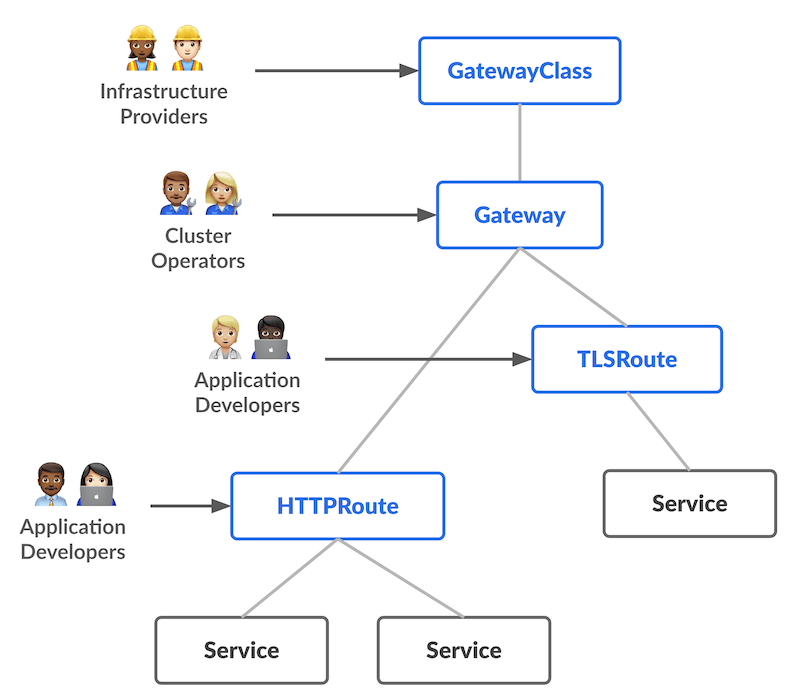
Gateway API
Gateway API is the upcoming replacement for Ingress. It's been generally available since October 2023, and there's a full list of controllers that support it.
I started using nginx-ingress, but it will soon be deprecated when InGate is available.
I chose to go with Traefik as my Gateway Controller, as I was familiar with it for my own home server. The only issue I haven't resolved is getting HTTP3 working, as it is not possible to listen on TCP and UDP on the same Kubernetes Service with type LoadBalancer.
OneUptime
Oneuptime is the status page application I currently run on the cluster.
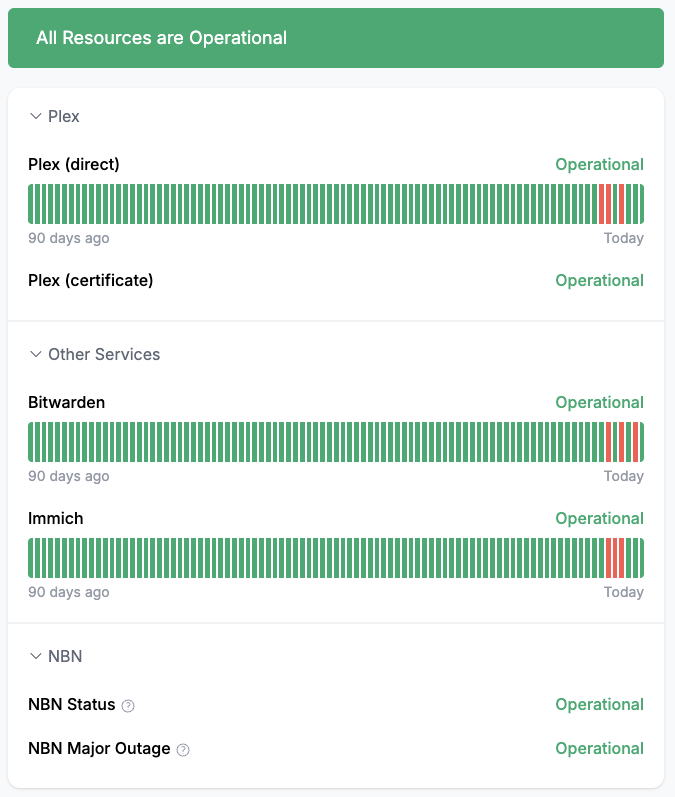
I wanted a service that could support a 'degraded' status, which only Oneuptime and Kener supported. Kener required writing JavaScript to evaluate API/website responses, while Oneuptime was a few clicks. Other tools I looked into include Uptime Kuma, gatus, Checkmate, Peekaping and CheckCle.
Oneuptime is a very resource-heavy application; its system requirements recommend a computer with 8 CPU cores, 16GB of RAM, and 400 GB of disk space. The first time I deployed it without knowing this, both nodes reached 100% memory usage. Obviously, this is beyond our limits, but I've made a few pull requests and changes that keep it much more usable:
-
Use the
Recreatestrategy (PR #2023), so a second full installation of Oneuptime doesn't kill the cluster. -
Disable the auto-generated date label (PR #2024), so that each deployment doesn't cause all its pods to restart too.
-
Don't enable every service. Even services that aren't used chew up a lot of resources. These are the services I have safely disabled:
- API Reference
- Docs
- Fluent Ingest
- Home (only Dashboard is needed when self-hosting)
- Incoming Request Ingest
- Isolated VM
- Open Telemetry Collector
- Open Telemetry Ingest
- Server Monitor Ingest
- Worker
- Workflow
-
Use CloudNativePG to run the PostgreSQL pod. The one provided with the chart is not as thorough and uses more resources.